Use Cascading Style Sheets to Specify Color
|
If you are working through this book chapter by chapter, you have undoubtedly noticed the emphasis on structure versus presentation in XHTML. Although it is possible to use HTML elements and attributes to specify colors for your page, you are much better off if you learn to use Cascading Style Sheets right from the beginning. By using CSS for style and HTML for structure, you will already be a long way down the path to writing “standards-compliant” XHTML. An added benefit is that, when it comes to applying color, CSS are much more versatile than HTML. After all, style are what CSS are all about.
| Tip | For an explanation of what “standards-compliant” XHTML means, check out Chapter 7. |
Set Page Colors with the Color Property
In straight HTML, your ability to set page colors is limited to the <font> and <basefont> elements and the text, color, and bgcolor attributes. CSS allow you to set page colors with a freedom you could only dream of before. You’ll learn in detail what you can do with CSS in Chapter 10, but the following are some samples.
Embed a Style Sheet with the <style> </style> Element
If you have been working the examples in this chapter, you have already been creating embedded style sheets, although you might not have realized it. You learned in the previous chapter how to do an inline style sheet by using the style attribute. However, if you’re going to do very much with CSS, you need to learn to use embedded style sheets. With inline styles, you must use the style attribute in every element you wish to modify. An embedded style sheet is contained between the <head> tags on your page, and its styles affect all the elements to which they are applied. For example, suppose you want all of your <h1> elements to be blue. If you are using inline styles, you must insert the style attribute every time an <h1> occurs on your page. With an embedded style sheet, you need to add the style rule only once, and it will be applied to every <h1> on your page.
To add an embedded style sheet to a page, open template.htm and save it as csscolor.htm. Then, in between the <head> </head> tags, insert the following lines:
<html> <head> <title>CSS Color Samples</title> <style type="text/css"> </style> </head> <body> </body> </html>
Set Background Colors with CSS
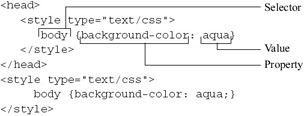
As you have seen in the preceding examples, setting background colors with CSS is a simple and straightforward process. You simply place a rule inside the <style> element. A rule is a CSS style instruction. It is made up of three parts: a selector, a property, and a value. Don’t let the terms confuse you, as they are very similar to what you have already learned with HTML: elements, attributes, and values. In CSS terminology, selector corresponds to element, property to attribute, and (of course) value to value. Still confused? Look at the next listing.
To use CSS to embed a style sheet on your page and set an aqua background for the page, insert the following line between the <style> tags:
Save the page and display it in your browser. The background will be aqua.
Recalling what you covered in the previous chapter, you used a property (background-color) and combined it with a value (aqua). But in this case, you’ve added another item: a selector (body). The selector is the HTML element you wish to be affected by your style rule. Because you want to set the background for the entire page, you chose body as your selector. You could just as easily have chosen another element—h1, for example—and specified a particular background color for that element. To see this work, try creating some level-one headings with their own background colors.
Create Style Classes
One of the most exciting things about embedded style sheets is that you can apply your styles to any element. You can even create different classes of styles. For example, say you want to define not one, but four different styles for <h1> elements, giving a different style and background color to each. With straight HTML or inline styles, you can do it using some of the techniques you learned in the last two chapters, but you would have to insert the control elements every single time you wanted to modify <h1>. With style sheets, you do it just one time, by creating classes.
To create a class, just add a period after the selector and follow it up with a class name. In the example that follows, we create a class for the <h1> element that is named “red.” There’s nothing special about the name. You could name it “Toledo” if you wanted to, but a descriptive name generally works better. To create a special “red” style class, you just modify the h1 selector to look like this: h1.red. To apply your class selector on a Web page you just add the class attribute, like this: <h1 >. Then the styles that you set for that particular class will be applied to that <h1> element.
To see how this works, try adding the following lines in between the <style> </style> tags on your page:
h1 {font-family: arial; color: blue;} h1.red {font-family: times-new-roman; color: red; background-color: white;} h1.white {font-family: times-new-roman; color: white; background-color: blue;} h1.bluered {font-family: arial; font-style: italic; color: blue; background-color: red;} After you’ve included the style lines, add the lines that follow in the <body> </body> portion of your page to see how they display. To apply the special style classes you created, remember to include the class attribute inside each opening <h1> element tag. The value should be set to the class name you assigned your style. That’s the portion of the selector that follows the period.
<h1>Blue text on white background</h1> <h1 >Red text on white background</h1> <h1 >White text on blue background</h1> <h1 >Blue text on red background</h1>
Save and display the page in your browser. Your results should resemble this:
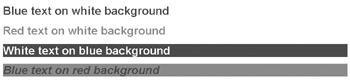
Anywhere you specify one of those four classes you created, the display takes on the characteristics of that class. You can see that using style sheets can save you a great deal of time, not to mention open up many creative options. Style sheets can also help you develop a consistent look for your Web site that spans all of your pages.
Remember, when using embedded style sheets, always enclose properties and values inside curly braces {}.
| Note | For inline style sheets, properties and values are enclosed in quotation marks (see Chapter 3). |
Properties should be separated from their values by a colon (:) and from other properties by a semicolon (;). Selectors (the elements you wish to set a style for) should be outside and to the left of the curly braces. Proper style sheet syntax is reflected in the following line:
selector {property: value; property: value; property: value;} It also can be written this way:
selector { property: value; property: value; property: value; }
Set Font Colors and Paragraph Styles with CSS
Suppose you want to include several different font colors on a page, each with a distinctive look and background. With CSS it’s a breeze. Just remember that the background-color property controls an element’s background, and the color property controls the foreground (in this case, the font). Thus, to set font colors for any element, you simply write your style rule like this: selector {color: value}. Try creating three paragraph styles for your csscolors.htm page, with different font and background colors. Insert the following lines of code between the <style> </style> tags:
p.blackback {font-family: arial; font-style: italic; font-weight: bold; color: aqua; background-color: rgb(0,0,0);} p.yellowbk {background-color: rgb(100%,100%,0%); font-size: 16pt} p.red {font-weight: light; color: #ff0000; text-align: center; font-size: 32pt;} | Note | To set the background color for an element, use the background-color property. To set font colors, use the color property. |
You have defined three paragraph classes:
-
Blackback An Arial italic font, displaying in aqua with a black background
-
Yellowbk A 16-point font with a yellow background
-
Red A light, 32-point font that will be centered and displayed in red
These are in addition to the undefined <p> element, which will display as it normally does. To see these new paragraph styles in action, insert the following lines of code into the <body> </body> portion of your page:
<p >This is a sample of the blackback style.</p> <p >Here is how yellowbk looks.</p> <p >I enjoy this red, centered font.</p> <p>An unmodified paragraph looks like this.</p>
When you have saved the page, display it in your browser. It should look something like the following illustration. Are you beginning to see the possibilities?

Set Link Colors
You can use CSS to set link colors, too, using what is called a pseudo-class. A pseudo-class is used to define a “class” that doesn’t actually exist in a page’s HTML code but exists because it fulfills certain conditions. For example, a visited link is defined by a pseudo-class because there is no specific HTML element for visited links. Instead, your visitor’s browser “remembers” whether a link has been visited. You need not worry too much about what that means right now, as it will be covered in Chapter 10. To use CSS to set link colors:
-
a:link {color: navy} Sets link colors to navy
-
a:visited {color: #0000ff} Sets visited link colors to blue
-
a:active {color: rgb(0, 255, 0)} Sets active link colors to bright green
-
a:hover {color: rgb(100%,0%,0%)} Turns a link red when a cursor moves over it
|
EAN: 2147483647
Pages: 126