Client-to-Client Hacking
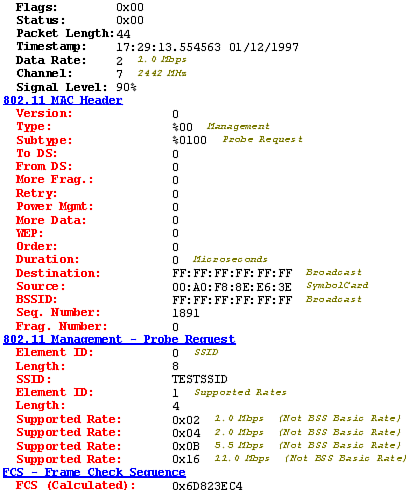
| Clients exist on both wireless and wired networks. A client can range from anything such as a Network Attached Storage (NAS) device, to a printer, or even a server. In a typical ad-hoc network, there are no servers or printers ”just other individuals' computers. Because the majority of consumer operating systems are Microsoft based, and since the majority of users do not know to how to secure their computers, there is plenty of room to play here. For example, an attacker can strike at a laptop that uses a wireless connection. Even though the office has not deployed a wireless connection, a laptop that is connected to the Ethernet could still have its Wireless Network Interface Card installed and configured in peer mode. Wireless Network Interface Cards running in peer mode also send out the probe request frames we discussed in the war driving section. These probe request frames are sent out at regular intervals in an attempt to connect with another device that has the same SSID. Thus, using a wireless sniffer or NetStumbler, we are able to find wireless devices configured in peer mode. Figure 7.19 shows a probe request frame that was captured with a wireless sniffer. Figure 7.19. Probe request frame captured with a wireless sniffer. This would allow an attacker to connect to the laptop, upon which he could exploit any number of operating system vulnerabilities, thus gaining root access to the laptop. Once an attacker has gained root access to a system, a well-placed Trojan horse or a key logger will allow him to further compromise your various network systems. This type of attack can even take place when the target user is traveling and using her laptop in a hotel lobby or airport, regardless of whether she is actively using her Wireless Network Interface Card. For a wireless client to send data on a network, the client must create a relationship called an association with an access point. During the association process, the client will go through three different states:
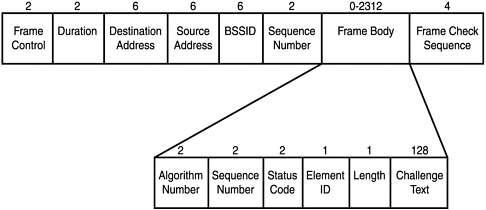
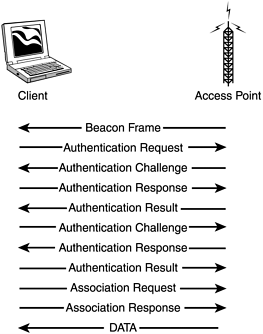
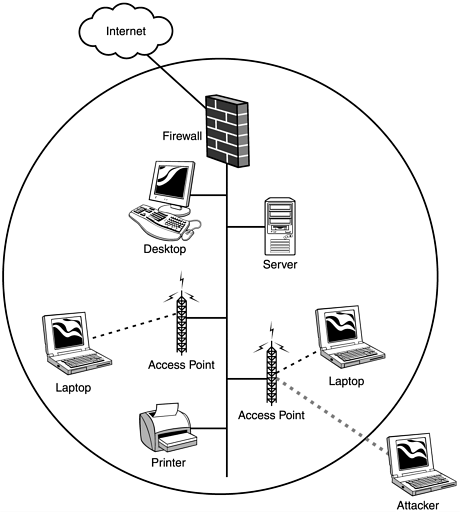
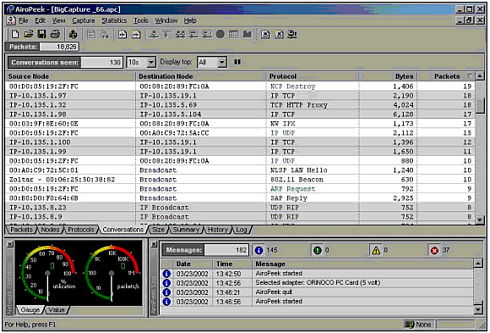
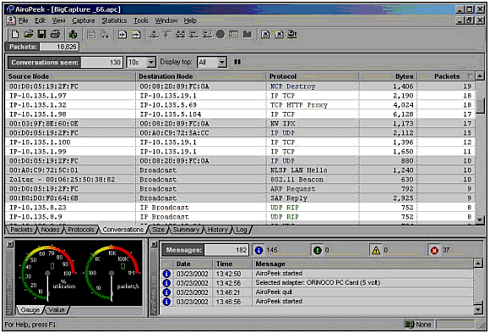
To begin, a client first has to receive the beacon management frame (packet) from an access point within range. If beacons from more than one access point are received, the client will pick which Basic Service Set to join. For example, the ORiNOCO Client Manager associates with the first BSS heard , but a list of available SSIDs and the capability to switch is available. Those who use Windows XP will be presented with a list of SSIDs, and will be asked to choose what network to join. In addition, the client can broadcast a probe request management frame to any access point. After an access point has been located, several management frames are exchanged as part of the mutual authentication. There are two standard methods to perform this mutual authentication. The first method is known as open system authentication. The majority of access points, especially if left with their default settings, use this method. As the name implies, this is an open system, and all authentication requests are serviced. Management frames sent during this process are sent unencrypted, even when WEP is enabled. The second method is called shared key authentication, and it uses a shared secret along with a standard challenge and response. For this to work, the client sends an authentication request management frame stating that it wants to use shared key authentication. When an access point receives the request, it responds to the client by sending an authentication management frame, which contains 128 octets of challenge text. The WEP pseudo-random number generator (PRNG) is used to generate the challenge text with the shared secret and a random initialization vector (IV). The client then receives the authentication management frame and copies the challenge text into a new frame. A new IV is selected by the client and then included in the frame with the copied challenge text. The entire frame is then WEP-encrypted (using the shared secret) and transmitted to the access point. When the frame is received, the access point decrypts it and looks at the 32-bit CRC integrity check value (ICV) to verify that it is valid. This is done by comparing the challenge text to that of the first message that was sent. If the text matches, then the authentication is considered successful, but it is only halfway done. At this point, the client and the access point swap roles, and the entire process is repeated. This is done to guarantee mutual authentication. Once completed, the client is considered to be in the second state ”unassociated and authenticated. Once in this state, a client will send an association request frame to the access point. The access point will respond with an association response frame and send it to the client. When received, the client is then considered to be in the third state, associated and authenticated. At this point, the client becomes a peer and is able to transmit and receive data frames on the network. Figure 7.20 shows the format of an authentication management frame, and Figure 7.21 shows a breakdown of the authentication and association process. We generally don't recommend shared key authentication, because it creates additional IVs on the network before any data has even been sent. This has the propensity to "break" the WEP key even with fewer than 1,000,000 to 5,000,000 packets. Figure 7.20. Authentication management frame. Figure 7.21. Authentication and association process. After your client has been associated and authenticated, you are on the network. However, in most cases, an IP address is required to actually communicate with other clients or servers on the network. Many access points are configured by default to act as a DHCP server. If this is the case, you will be given a valid IP address for that network. If DHCP is not enabled, you will have to assign one to yourself. Figure 7.22 shows how a typical corporate network might be set up. The firewall offers protection to the internal users and servers, and all wireless devices are inside the firewall. All inbound and outbound Internet traffic is filtered through the firewall. Unfortunately, an attacker that has been associated and authenticated by an access point can suddenly gain access to all internal servers and computers. In addition, the Internet connection can now be exploited to launch an attack on someone else's network. Figure 7.22. Typical network setup using standard Ethernet and 802.11b devices. More advanced access points have a feature called Access Control Lists (ACLs). This allows an administrator to predefine the Ethernet MAC addresses of each client allowed to associate and authenticate. When a client attempts to authenticate, if its MAC address is not contained within the ACL, the client is denied access to the network. As you saw in the war driving section of this chapter, Figure 7.15 showed how it is possible to change the MAC address of our wireless network interface cards. With this functionality, and with a wireless sniffer such as AiroPeek (http://www. wildpackets.com), you can capture a list of MAC addresses that are in use on the network (Figure 7.23). Having gathered this information, you can then spoof the Ethernet MAC address of a client that's listed in the ACL, thus allowing you to associate and authenticate. Figure 7.23. MAC addresses captured using AiroPeek. After an attacker has been associated and authenticated, his abilities are only limited by your internal network security. For example, suppose you have a network configuration similar to the one in Figure 7.22. This could be your personal home network, or a corporate network with or without all of the components shown. After the attacker has been associated, his next step will be to gain a valid IP address on the network. Using AiroPeek to sniff wireless frames, the attacker can see a listing of IP addresses currently communicating on the network, and he can get a good idea of how the network IP addressing is configured (Figure 7.24). Figure 7.24. IP addresses captured using AiroPeek. Now that the attacker has a valid IP address on your network, it is time for him to find his target and get more information about your setup. The various methods of doing this are no different than those an attacker uses on a standard Ethernet network. Recall when a WNIC associates with an access point, it is as if it is plugging directly into your Ethernet LAN. Hence, general types of information gathering techniques such as port scans and ping sweeps all apply. These various methods will supply the attacker with a list of available resources on your network, such as your printer. In this example, let's assume the printer has its own built-in TCP spooler and is configurable via a Web interface (a common setup for today's enterprise printers). The attacker finds the printer, and while checking out the Web interface, he spots the capability to put the printer into a test page loop, causing it to print test page after test page. Meanwhile, you are unable to print because the queue is full of these test pages, and your printer is running out of toner quite fast. This is just one example of a fairly harmless yet highly annoying type of attack. Printer attacks are fairly benign . However, consider how vulnerable this makes your critical data stored on the computers and servers in your network. Consider this paradox: Many companies do not feel it is necessary to protect their internal networks from attacks generated on the inside. Why, then, do they lock their building doors at night, yet not supply every employee with a key? |
EAN: 2147483647
Pages: 171