Investigation and Discovery
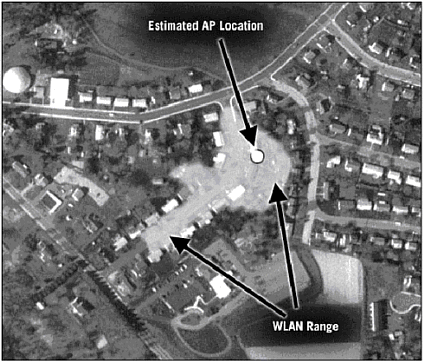
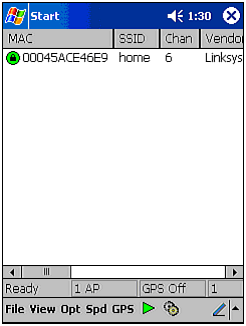
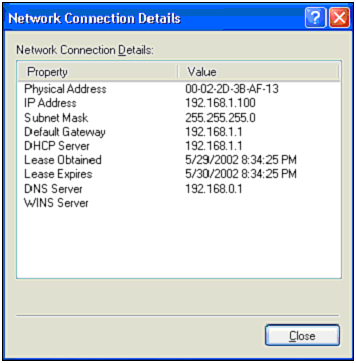
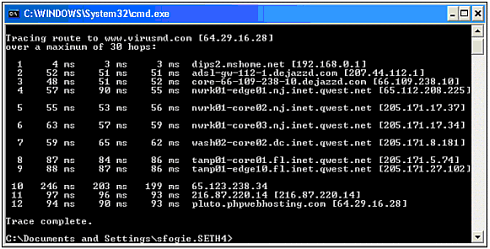
| Because we have a defined target in mind, we can immediately start the audit. In this stage of the hack attempt, we will be investigating and probing our wireless network to see what information can be gleaned that can help us punch through to the wired network beyond. This is an important part of any hacking process, and can take several days ”or even weeks, if probing all aspects of a network. In fact, many hacking attempts never truly leave this stage of attack because they demand a constant state of discovery and research. Only when the attack is successful can a hacker honestly say he is done probing and investigating his target. As previously mentioned, the juxtaposition of wired and wireless networks will often demand two stages of hacking. In our case, the scanning of the wireless network was accomplished using an iPAQ with an expansion sleeve and an ORiNOCO wireless network card. As you learned in Chapter 1, "Wireless Hardware," and Chapter 10, "Pocket PC Hacking," the iPAQ is an extremely versatile, mobile computer with a lot of potential for wireless auditing. Using programs built for the Pocket PC and the Embedded Linux operating system, a hacker or auditor can systemically detect, probe, and infiltrate a network from a car or even the sidewalk without drawing attention to himself. For this walkthrough, we will be running a program called MiniStumbler, which was discussed in Chapter 10. Using our iPAQ, we will audit our wireless network to see what information is available and how far the 802.11b signal extends. In addition to the standard wireless antenna built into the network card, we will also be using a Yagi directional antenna (reviewed in Chapter 1) to provide a realistic test as to how far out the wireless network can be detected (Figure 11.2). It is important to do this because most war drivers will be using some form of an external antenna. Figure 11.2. Yagi antenna. Figure 11.3 shows the range of detection for the WLAN, with the strongest signal represented by the white circle. By estimating the area of strongest signal location, you can make a very good guess as to where the access point is located. Figure 11.3. Overhead view of WLAN radiation zone. As the overhead satellite image in Figure 11.3 illustrates, our access point's radiation zone extends several hundred feet up the street. In other words, a hacker could be sitting up the street or in a neighbor's house with complete access to the WLAN's signal. In addition to the security, this information is also important to know in case our WLAN's connectivity starts to degrade. Because the reason for this is typically interference with other wireless devices, one of the first troubleshooting steps to consider is to see whether the neighbors are using a WLAN of their own or have installed a wireless phone. While determining the WLAN's range, MiniStumbler provided us with several other important pieces of information. From Figure 11.4 you can quickly see that this network is WEP-protected, has a BSSID of home , and is a Linksys. This tells us several things that will be important to know as we attempt to penetrate the network. One, we will need to employ a cracking tool to get through the protection. Two, the network is broadcasting its BSSID. Three, the access point maker is Linksys, which will come in handy later when we attempt to access the configuration settings of the access point. For example, by knowing that this is a Linksys AP, the hacker could go to the Linksys Web site and download the user manual to find all the default settings for the AP. Because many APs are left at the default settings, successful entry into the WLAN would then enable control over the AP as well. Figure 11.4. MiniStumbler in action. This illustration is just one of many possible scenarios. For example, if we were scanning for wireless networks as part of a security audit, we might also want to employ a wireless sniffer to search the airwaves for closed system WLANs. By using another sniffer in addition to MiniStumbler, we could detect the actual packet traffic instead of relying on an access point's broadcasts. We might also want to use AiroPeek to see how many wireless users are on the WLAN in case we need a valid MAC address to bypass MAC filtering, or if we want to perform some ARP poisoning . Only dedicated hackers or hired auditors will perform these extra steps. A script kiddie would most likely not even notice a closed WLAN, or spend the time attempting to find ways into a secure WLAN. At this point, information gathering enters a new stage. Although it can be debated that attacking WEP is more than a simple matter of investigation, in reality it is not an active attack against the WLAN. The process of cracking WEP is passive and cannot be detected because the sniffer does not send data back to the network. To crack WEP, we will be using a basic laptop running Linux with AirSnort installed. This program, as you learned in the tools chapter, is a leader in WEP sniffing/cracking programs. Although there are other good programs, such as the original WEPCrack, we use AirSnort here because it provides you with a friendly interface and built-in sniffer. In addition, it also supports both Prism II- and Hermes-based chipsets. Because of these factors, it has become a standard for WEP cracking. We have installed the PCMCIA 3.33 drivers and the appropriate patch from the AirSnort site, and we have everything working properly. Because we are performing this from a security audit perspective, all these steps were configured prior to the job and were tested against other live scenarios. If you are an auditor, we highly recommended that you have a multi-boot OS with various operating systems preconfigured for different scenarios. This reduces the downtime and makes auditing more productive. To collect the data, we placed our collection site up the street using our Yagi antenna, which is pointed at the access point. Once the equipment is set up, we start AirSnort and wait as a few packets are collected. Based on the rate of capture, we know it will take a few days to gather enough data to crack the password. After several days of collecting, AirSnort cracks the password (which ends up being games as expected.) At this point, we need to start our investigation process again. Because we know the WEP password, we can use this to collect and decipher the encrypted data. Again we will need to use our Linux system loaded with Ethereal to listen in on the network activity and determine for what reason the target is using the WLAN. This will provide us with MAC addresses, IP address schemes, and if someone checks their email or opens an FTP session, we can gather this information, as well. Using Ethereal, we again set up our collection point and set up the Yagi antenna to sniff the packets sent out by the access point. As expected, it is not long before our sniffer picks up an email session, which includes the username bob@online.com with a password of bob1 . In addition to this information, we discover that the WLAN supports two computers, and we collect their IP information as well as the IP address of the access point. As expected, the IP address of the Linksys AP is still at its default of 192.168.1.1. In addition to capturing data, a sniffer can also give us a list of the allowed MAC addresses, if MAC filtering is in place. To test the existence of MAC filtering, we only need to attempt to connect to the WLAN using one of our own computers with a spoofed MAC address. CAUTION If you attempt to connect to a WLAN without spoofing your MAC address, you increase the chance of being traced. Because the original MAC address belongs to only one NIC, it could in theory be traced to you by tracing the WNIC from the vendor to your purchase. In addition to sniffing, we also start to probe the WLAN's data flow. This is accomplished using programs like Tracert and ping. In addition, we allow our Windows XP laptop to make a quick connection to the WLAN and obtain an IP address and the routing information. This will give us a quick look inside the wired network to see what type of connection the network has to the Internet. Figure 11.5 illustrates the results of this probe. Figure 11.5. Windows XP network details. From this screenshot you can see that our computer was given an IP of 192.168.1.100, and the access point has an IP of 192.168.1.1. This information confirms the information gathered by Ethereal and gives us one more clue. Note that the DNS server is listed as 192.168.0.1. This is a different IP scheme, which intimates that there is an internal network to which the WLAN is an extension. It also indicates that there is another device inside the network that is handing out IP addresses. While connected to the WLAN, we can confirm the existence of another routing device by performing a Tracert to http://www.virusmd.com. This will result in the following string (see Figure 11.6), which shows us the path the packet took as it travels to the server at VirusMD.com. Figure 11.6. Using Tracert to track packets. At this point, the wireless network is essentially owned. Further investigation using ping sweep tools will reveal our internal network and the IP addresses of each computer. This can be accomplished using Nmap or another program. Once the locations of the equipment are located, ping scans can be performed on each machine. This will provide us with a list of all the services and open ports running on each machine. We can use this to determine whether there are either shares or applications that can be exploited to gain control over a machine. In our scans we discovered several computers connected to the network, two with shares, one of which had an FTP server running. Thanks to our sniffer, which provided us with the username and password of the mail account, we can make at least one educated guess as to an account on the FTP server ”if not the login and password of the FTP server itself. Note that this part of the process will be revisited time and again during a hack. It is rare that a hacker successfully finds a hole on the first run that will give him complete access. Usually it takes several attacks to find the one way into a system. Because of this, hackers often set up their own test networks with the information they discover to create a system on which they can safely test theories and attacks. |

EAN: 2147483647
Pages: 171