Introducing Crystal Reports 10
Introducing Crystal Reports 10
Crystal Reports remains the market leader and de facto standard for business and corporate report writing. In 1984, a Canadian shipping company wanted to produce custom reports from its accounting system. When the vendor said We can t help you, the company created Quick Reports, the precursor to Crystal Reports. Crystal Reports first bundle was with that vendor s next version of its accounting software. The acquisition of the Crystal series of tools by former competitor Business Objects is a testament to the ubiquity of this long- popular tool.
Crystal Reports is now bundled with close to 200 leading software packages, including many of the aforementioned ERP and accounting packages from vendors such as ACCPAC International and PeopleSoft. Versions of Crystal Reports are also included with various Microsoft packages, including their latest development environment, Visual Studio .NET.
Crystal Reports is aimed at three general types of users:
-
Casual business users, such as data analysts, executive assistants, and marketing directors, who will design reports around their corporate data to make intelligent business decisions.
-
Information technology professionals, who will use Crystal Reports to integrate sophisticated reporting right inside their own Microsoft Windows programs.
-
Webmasters, who will use Crystal Reports to provide print-quality reports and graphics over their intranets or the Internet.
Figure 1-1 shows the Crystal Reports 10 screen when the program is first started. Note the standard Windows user interface, including different toolbars , pull-down menus , and the Welcome dialog box.
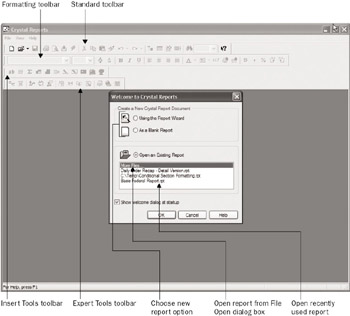
Figure 1-1: Crystal Reports opening screen
When you first start the program, the only two main functions that you ll usually want to perform are creating a new report and opening an existing report. Like most functions in Crystal Reports, these functions can be accomplished in several ways. If the Welcome dialog box appears, you can choose either function from it by using its various radio buttons. If you ve closed the Welcome dialog box, you may redisplay it from the Help menu and choose options from there. You may also open an existing report or create a new report with pull- down menu options, keyboard shortcuts, or toolbar buttons , as described later in the chapter.
Crystal Reports Screen Elements
The general look, feel, and layout of Crystal Reports 10 is identical to the previous version. The Crystal Reports screen consists of four main parts you ll want to familiarize yourself with: the pull-down menus, the toolbars, the report design/preview area, and the status bar.
Pull-Down Menus
The pull-down menus are standard Windows-type menus that you can pull down with your mouse. In some cases, you can also use shortcut key combinations (such as CTRL-N to start a new report) to choose pull-down menu options. You ll notice these shortcut key combinations next to their menu options when you pull down the menus. You can also use the standard Windows convention of holding down the ALT key and typing the underlined letter in the menu, and then choosing a menu option by typing another underlined letter from within the menu. For example, you can create a new report (File menu, New option) by typing ALT-F-N .
Toolbars
When you first start Crystal Reports, all four available toolbars are displayed across the top of the screen by default. To selectively turn on or off individual toolbars, choose View Toolbars from the pull-down menus. The toolbars contain buttons for almost all of Crystal Reports available functions (some options still require the use of pull-down menu options, but not many). Many of the icons on the toolbars are self-explanatory. In addition, tool tips are available for each toolbar button ”just point to a toolbar button with your mouse and wait a few seconds. A small yellow box containing a short description of the toolbar button s function will appear.
| Tip | You may undock the toolbars from their default positions and place them anywhere you want. Just click the gray line at the left of the toolbar and drag it to the desired location. If you move it left or right within its current location, it will simply move to a different position. If you move it away from the top of the screen, it will become its own window. If you place it near the edge of the Crystal Reports screen (or back near its original position), it will snap into place along the edge of the screen. |
The Standard Toolbar
This toolbar is the first toolbar just below the pull-down menus. It contains the most- often-used Crystal Reports functions, such as opening and saving report files, printing and exporting the report, undoing and redoing actions, and so on.
The Formatting Toolbar
This toolbar is the toolbar just below the Standard toolbar. You should be familiar with this toolbar if you ve used most any office suite type of tool, such as word processors or spreadsheets. This toolbar enables you to change the format ( color , font, size , alignment, and so forth) of one or more objects that you have selected on your report.
The Insert Tools Toolbar
The third toolbar contains options to insert new objects onto your reports, such as text objects, charts , maps, and cross-tab objects.
The Expert Tools Toolbar
The fourth toolbar s buttons will display various Crystal Reports experts that guide you through different report functions usually presented with a tabbed dialog box. Such experts include the Database Expert, Group Expert, and Select Expert.
Report Design/Preview Area
The large gray area in the middle of the Crystal Reports screen is the report design/preview area. Here, you actually manipulate fields and objects that make up your report. When you want to have a look at the way the report will eventually appear when printed on paper or displayed on a web page, you can preview the actual report in this area, as well.
You ll soon see that you can choose different views of a report by clicking a number of tabs that will appear at the top of the report design/preview area. When you initially create a report, you see a Design tab, which shows a design view, or layout, of your report, simply indicating the location of objects in different report sections. When you preview the report, a Preview tab appears that shows actual data from the database as it will appear in the final report. In addition, as you progress with your report work, you ll see additional tabs for subreports and drill-down views. Simply click the tab you wish to see.
Status Bar
The status bar appears at the very bottom of the Crystal Reports screen. Although you can hide the status bar by unchecking the Status Bar option on the View menu, you ll probably want to leave it displayed, because it contains very helpful information for you as you design and preview reports. In particular, the status bar will show more detailed descriptions of menu options and toolbar buttons. While the short tool tip that appears when you point to a button is handy, it may not offer a good enough description of what the toolbar button does. Just look in the status bar for more information.
Also, the status bar contains more helpful information on its right side, such as how many database records are being used in your report, what percentage of the report processing is finished, and at what location (X-Y coordinates) on the report page a currently selected object is located.
Starting Out: Opening or Creating a Report
To open an existing report, you may use either one of the options from the Welcome dialog box, choosing a recently used report from the list, or choosing the More Files option. If you ve closed the Welcome dialog box, select File Open, use the shortcut key combination CTRL-O , or click the Open button in the Standard toolbar. A standard file-open dialog box will appear, showing any files with an .RPT extension in the drive and folder. Navigate to any alternate drives or folders to find the existing Crystal Report .RPT file that you wish to open.
To create a new report, choose either the Using the Report Wizard or the As a Blank Report radio button on the Welcome dialog box. Or, if you ve closed it, start a new report by choosing File New, pressing the keyboard shortcut CTRL-N , or clicking the New button in the Standard toolbar.
If you use the As a Blank Report option from the Welcome dialog box, you skip the report wizard and proceed directly to custom report design (see Using the Blank Report Option later in the chapter). Any other new report step (the Using the Report Wizard radio button on the Welcome dialog box, or any of the new report options available after closing the Welcome dialog box) will display the Crystal Reports Gallery.
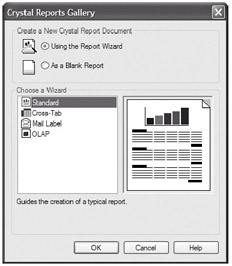
There are two general options you can choose from the Reports Gallery:
-
Create a report using one of the report wizards
-
Use the As a Blank Report option for precise control when designing a new report
EAN: N/A
Pages: 223