Managing Servers
Part of your administrative duties will include managing the various server components that make up your CE system (look earlier in the chapter, under Crystal Enterprise Architecture for a complete overview of all CE server components ). Management tasks may merely mean making sure all servers are running after you reboot the CE computer. Or, you may need to migrate the CMS database to a different database server. As your needs grow, you may decide to scale CE to multiple computers or cluster CMS computers. These all fall under the realm of server management.
While a small amount of attention has been paid to other management tools so far, the majority of CE administration has been undertaken with the Crystal Management Console, or CMC. However, another management tool (discussed just briefly so far) is the Crystal Configuration Manager, or CCM (and, yes, the two acronyms are often confused ). Some operations may be performed with either tool, while others require one or the other. In general, the CCM is required to perform configuration that requires the CE system to be offline, or stopped , while the CMC can be used while the system is up and running. For example, configuring the CMS datasource must be done in the CCM with the system offline, while setting the Page Server processing parameters can be done in the CMC with the system running.
Every server in the CE system displays management screens in both tools. So, you ll probably find yourself alternatively working with the CMC in some cases, and the CCM in others. Also, while various servers will require various levels of attention as you administer your Crystal Enterprise system, you ll probably find yourself spending more time with the CMS than other servers.
| Note | The rest of this section discusses managing servers in a Windows environment. A Unix equivalent of the CCM exists to manage Unix servers. Instructions for performing these steps can be found in the online Administrator s Guide. |
Managing the CMS
The Crystal Management Server (CMS) is the heart of the Crystal Enterprise System. The CMS authenticates users upon logon, controls security, manages all user requests , handles scheduling, and coordinates the viewing of reports . To do all this, the CMS becomes the center of all communications between the various servers in the CE system. Each server must register with the CMS so that they can talk to perform all of their necessary functions.
To handle all of these tasks, the CMS must keep track of a variety of data, and does so via a proprietary internal database. The database is stored in Microsoft Data Engine (MSDE) format by default, but it may be stored in SQL Server, Oracle, Sybase, or DB2/UDB. The type of database to use may be chosen at installation, or the database may be migrated to a different platform at a later time (discussed later in this section).
Obviously, the configuration of the CMS is of the utmost importance. That configuration is handled by the Crystal Configuration Manager (CCM) and not the Crystal Management Console. While other servers may be configured using the CMC from within CE, the CMS cannot ”stopping the CMS to change configuration parameters would stop the CE system entirely, including the CMC.
CCM Settings for the CMS
The Crystal Configuration Manager (CCM) is a stand-alone Windows application installed on the physical CMS computer. Most of the CMS configuration is done with this program outside of the CE environment, since the CMS itself is required to run that environment. The CCM may be used to migrate the CMS database to a new database format, add additional CMS servers to a CMS cluster, or configure Web Connectors. It can also be used to alter several technical configuration parameters such as the port number, SOCKS firewall settings, and account logon information.
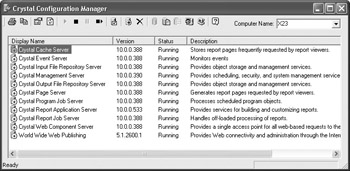
The CCM is available from the Crystal Enterprise 10 program group on the physical CMS computer. When you initially start it, it shows all CE services (as well as the World Wide Web Publishing Service), their status, version, and description.
While you may view all CMS settings from the CCM while the CMS is running, you must stop it before changing any settings. Before you do this, ensure that all CE users are aware that the system will be brought down ”you may wish to view CMS properties from the CMC to see which users are still logged on to the CMS. Once you are sure that you may safely stop the CMS, select the Crystal Management Server in the CCM and click the Stop button in the toolbar.
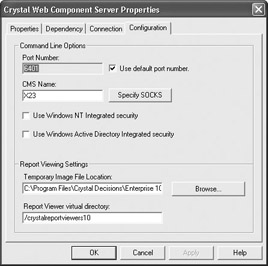
With the CMS still selected, click the Properties button in the toolbar, or right-click the CMS and select Properties from the context menu. The resulting dialog box exposes four tabs: Properties, Dependency, Connection, and Configuration.
The Properties tab contains general information about the CMS, including the server type, display name, server name , command, and startup type. One possibility is to alter command- line parameters at the end of the CMS startup command (details on available command-line parameters are provided in the online Administrator s Guide). By default, the CMS is assigned the NT System account and is set to automatically start when the CMS computer boots.
The Dependency tab contains a list of the services that the CMS is dependent upon. The dependency relationship indicates that the services listed here must be running in order for the CMS to run. These services will vary depending on the type of database system that is used for the CMS database. You may add and/or remove services from the dependency list, but it is highly unlikely that you will ever need to do so.
The Connection tab allows configuration of SOCKS servers. A SOCKS server may be used to allow communication between the Web Component Server and the CMS in architectures that involve a firewall. For more information on configuring SOCKS servers, see the Administrator s Guide.
The Configuration tab contains some very important parameters. First, the Port Number may be changed, if necessary, to work with firewalls between the CMS and other CE servers. Be sure to work closely with the network administrator if you change this number. Second, the CMS Datasource may be changed should you desire to migrate the CMS database to another server, or cluster this CMS with other CMSs (database migration and CMS clustering are discussed later in this chapter).
Migrating the System Database to a New Server
When you initially install the CE CMS, the Microsoft Data Engine (MSDE) is installed to host the CMS database (the exception to this rule is if Microsoft SQL Server is detected in the CMS computer ”in that case, SQL Server is used and MSDE is not installed). While MSDE (a lite version of SQL Server) is often perfectly acceptable for stand-alone, simple CE installations, many system architects make the decision to migrate the database to another database system for improved performance, ease of maintenance, backup simplicity, staff knowledge, or other reasons. Also, if you plan to cluster multiple CMS machines to provide load balancing or fault tolerance, you must migrate the CMS database to another sharable SQL database.
| Note | The following procedure assumes that you are copying an existing CE version 10 CMS database to a new, fresh database in another database system. Upgrading from a previous version of CE involves a different process that is detailed later in this chapter. |
As with most operations of this magnitude, the initial step in the process is to back up the current environment. First, back up the current CMS database just in case you need to restore it later. By default, MSDE installs the CMS database in .MDF and .LDF files in \Program Files\ Crystal Decisions\Enterprise 10\ODBCSupt. Then, back up the entire Input and Output File Repository Server directory structures. By default, these are located in \Program Files\Crystal Decisions\Enterprise 10\FileStore.
The next step is to prepare the new destination database. First, define a new database in the destination database system. Do not create any new tables, as this will be done automatically by CE when the CMS database is migrated. Ensure a database user ID and password combination exists that allows Create, Update, and Delete privileges. Then, create an ODBC datasource for the new database on the CMS machine (note that certain databases, such as Oracle and DB/2, can be accessed via native drivers and don t require an ODBC connection). Finally, be sure that you can connect using the appropriate account and datasource from the CMS machine.
Then, open the CCM and follow these steps:
-
Select the CMS and stop the CMS server.
-
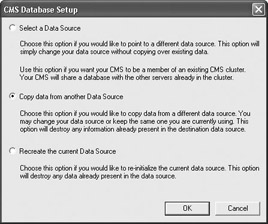
With the CMS still selected, click the Specify CMS Datasource button in the toolbar. You can also select the Configuration tab in the Crystal Management Server Properties dialog box and click the Specify button in the CMS Datasource category. The CMS Database Setup dialog box will appear.

-
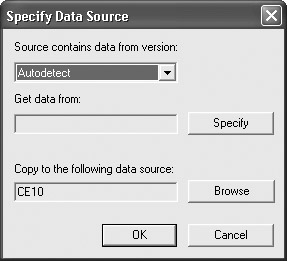
Select Copy Data from Another Data Source and click OK. The Specify Data Source dialog box will appear.
-
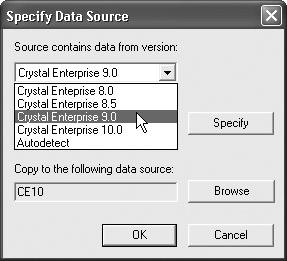
Select either Autodetect or Crystal Enterprise 10.0 from the Source Contains Data from Version drop-down list.
-
Click the Specify button next to the Get Data From text box and specify your current datasource (you may need to choose the database your current CMS datasource uses before you pick the actual datasource). You may need to enter logon information to complete this step.
-
Click the Browse button next to Copy to the Following Data Source: to specify your new destination datasource. You will be given a choice of database connection methods , and then given the choice of a new datasource name. Again, you may need to enter logon information to complete this step.
-
Click OK, and then click Yes for the confirmation.
-
When the migration is complete, click OK.
After migration, it is best to check for a migration log file to see if any errors or other messages were written. If you installed CE to the default directories, you will find the log file in \Program Files\Crystal Decisions\Enterprise 10\Logging.
Next, use the CCM to start and enable the CMS and Web Component servers. Log on to the CE system via the CMC. In the License Keys section, check to make sure all of the CE license keys were transferred properly. Then, if necessary, return to the CCM to start and enable all of the other CE servers. Because the CE file system has not changed locations, all server configurations should remain as they were before migration.
At this point, the CE system should be fully migrated to the new database system. Test the system in a variety of ways to be sure that everything is functioning properly. For example, view a report, view an instance of a different report, and schedule yet another report to be run in the near future.
Clustering Multiple CMS Machines
Part of the benefit of the multiserver, multitier architecture of CE is its scalability. It can grow as your needs grow. Another benefit is that the processing load can be spread among multiple servers as needed. Despite this flexibility and scalability, there is one vulnerable portion of CE that must always be in operation if the system is to be available. That piece, as you might imagine, is the CMS. Because all other servers communicate with the CMS and because users must route all their report requests through the CMS, it becomes the most critical portion of the CE architecture.
Because of this, larger CE implementations may benefit from CMS fault tolerance and load balancing. This is accomplished by clustering two or more physical CMS computers to appear as a single logical CMS in a single CE system. If one CMS fails, the other CMSs continue to work, providing a failover system that keeps the CE system up and running as if nothing happened . And, when all CMSs are operating normally, they automatically balance their processing load, handing logon requests, schedules, and other functions to the least busy CMS.
One major requirement for a CMS cluster is that all of the machines must be configured the same way. All machines must have the same operating system, the same CE release and patches, the same database connection and account, and the same date and time. The machines also have to be on the same subnet and must communicate on a single IP address.
There are two common procedures for creating an CMS cluster: adding a brand-new CMS machine to a cluster, and adding an existing CMS to a cluster.
Adding a New CMS to a Cluster
The easiest way to add a brand-new CMS to a cluster is to start with a fresh computer and perform a Crystal Enterprise installation using the Expand option. This choice allows you to pick and choose which CE components you want to install on the machine.
You should ensure that the correct database connection to an existing CMS database is set up on the computer. During the CE Expand installation, choose this datasource and provide the information necessary to connect. If you wish to install any additional CE servers in addition to the APS, select them as well. Depending on your system architecture, you may install just the CMS or you may install a nearly complete set of CE servers. The Expand installation then installs all of the requested components and adds the new CMS to the existing cluster.
Adding an Existing CMS to a Cluster
In this case, you begin with two separate stand-alone CMS computers. The goal is to disconnect the first CMS (the original CMS) from its own database and point it to a shared database maintained by the second CMS (the target CMS). The target CMS must be using a shared database rather than a stand-alone MSDE database.
The original CMS s database should be backed up for safety. Also, as when migrating a CMS database to a new server, make sure that you have a proper database connection to the new shared database, including a database account with Create, Update, and Delete privileges.
To add an existing CMS to a cluster:
-
Start the CCM.
-
Select the CMS and stop the CMS server.
-
With the CMS still selected, click the Specify CMS Datasource button in the toolbar.
-
Click Select a Data Source and click OK.
-
Choose the connection to the target datasource. You may need to enter logon information to complete this step.
-
Click OK to complete the process.
-
Select the CMS and start the CMS server.
The original machine should now be clustered with the target machine, and the cluster should be sharing the data from the target database.
Upgrading from an Older CE System
Often a new CE installation will be an update to an older version, and therefore the original data needs to be copied to the new database. This process is similar to migrating the database to a new database server, but in this case the desired data is being copied out of an original database and into the current database.
As always, the initial step in the process is to back up the database, which in this case is the original database. Then, back up the entire directory structures, starting with the root directories of the Input and Output File Repositories.
Once you ve properly backed up your existing database, perform the following steps to migrate to a newer CE database structure:
-
Select the CMS and stop the CMS server.
-
With the CMS still selected, click the Specify CMS Datasource button in the toolbar. You can also select the Configuration tab in the Crystal Management Server Properties dialog box and click the Specify button in the CMS Datasource category. The CMS Database Setup dialog box will appear.
-
Select Copy Data from Another Data Source and click OK. The Specify Data Source dialog box will appear.
-
Select the appropriate version of CE from the Source Contains Data from Version drop-down list.
-
Click the Specify button next to Get Data From and specify the original datasource (you may need to choose the database your current CMS datasource uses before you pick the actual datasource). You may need to enter logon information to complete this step.
-
Click the Browse button next to Copy to the Following Data Source to specify the new destination datasource. You will be given a choice of database connection methods, and then given the choice of a new dataset name. Again, you may need to enter logon information to complete this step.
-
Click OK, and then click Yes for the confirmation.
-
When the migration is complete, click OK.
After migration, it is best to check for a migration log file to see if any errors or other messages were written. If you installed CE to the default directories, you will find the log file in C:\Program Files\Crystal Decisions\Enterprise 10\Logging.
At this point, there is a new wrinkle: you must make sure the Input and Output File Repository Servers recognize the original file structures. There are two options to accomplish this:
-
Copy the complete directory structures from the original file repository locations to the current destination file repository locations.
-
Configure the current Input and Output File Repositories so that their root directory locations point to the original root directories. You may do this by making choices in the Crystal Management Console Servers area for the Input and Output File Repository Servers.
Then, as before, use the CCM to start and enable the CMS and Web Component servers. Log on to the CE system and open up the CMC. In the License Keys section, check to make sure all of the CE license keys were transferred properly. If necessary, use the CCM to start and enable the File Repository Servers.
Because the data being imported is from an earlier version of CE, the CE objects themselves must be updated to conform to the current CE 10 object specifications. Return to the CCM and ensure that the CMS has been restarted. Click the Update Objects button in the toolbar. You will need to log on to the CMS. The CMS will search its database for any objects that require updating. If it finds them, an Update button will be presented to start the process of updating any necessary reports and instances to the CE 10 format. Click the button to perform the update.
If necessary, start any additional services that may not be running. At this point, the original CE data should be fully migrated to the current database system. Test the system in a variety of ways to be sure that everything is functioning properly. For example, view a report, view an instance of a different report, and schedule yet another report to be run in the near future.
| Tip | The Crystal Import Wizard (discussed in the following section) can also be used to migrate an older CE database and file structure to a new CE system. |
Upgrading from Crystal/Seagate Info
Crystal/Seagate Info version 7.5 is the precursor to Crystal Enterprise. While Info had many similar features and functions, the CE architecture has changed significantly since its Info-based beginnings. Because of this fact, existing Info databases cannot simply be migrated to the CE environment as discussed previously. Instead, CE provides a stand-alone Windows application called the Crystal Import Wizard to handle the task.
Also, the Crystal Import Wizard may be used to import one CE environment into another CE environment, thereby combining the databases instead of overwriting one with the other. For more information on this procedure, see the Administrator s Guide.
Because of the fundamental differences between Info and Enterprise architecture, there are several considerations to keep in mind when running the Import Wizard. For example, while users and groups will typically be imported from Info to CE, some reports (those based on Info Views, for example) will be handled specially. And, while some instances that are scheduled in Info will be imported into Enterprise, others based on scheduling concepts not supported by Enterprise (such as Business Calendars) won t be imported. When the Import Wizard encounters duplicate users, groups, folders, and reports, various things may happen (typically they re imported with a sequential number added to them).
| Note | Specific details on how various Info objects are imported with the Import Wizard can be found in the online Administrator s Guide. Look in the index for Importing From Info. |
The wizard consists of two main processes: specifying the source and target environments, and specifying the objects to be imported. First, make sure you have administrator privileges for both the source and destination environments. Then, as with most wizards, simply proceed through the series of dialogs.
-
Start the Crystal Import Wizard from the Crystal Enterprise 10 Program Group. Click Next to get through the intro screen.
-
Specify the source environment, including the version, the Info APS name, and the logon credentials.
-
Specify the destination environment, including the CMS name and the logon credentials.
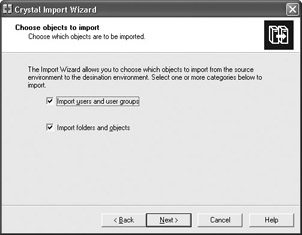
-
Using the check boxes, choose the objects to import. For Info, you ll be given the choices Import Users and Groups and Import Folders and Objects.
-
You may be given a warning that importing objects with rights requires that users/groups associated with those also be imported. Click Next.
-
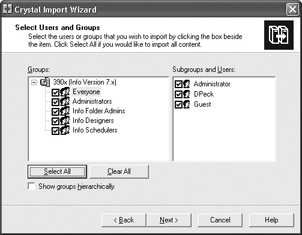
If you chose to import users and groups, choose which users and groups to import with the appropriate check boxes. You may use the Select All and Clear All buttons to select groups and users en masse.
-
If you chose to import folders and objects, choose which folders and objects to import with the appropriate check boxes. You may expand and contract folders with the plus/minus signs. You may also use the Select All and Clear All buttons to select reports and folders en masse. To import existing instances (both complete and recurring), check the Import All Instances check box.

-
When the Information Collection Complete dialog box appears, click Finish to begin the import.
When the import is complete, an Import Summary dialog will appear. Simply click Done to complete the process. If errors were noted, click View Detail Log to see the log file. The log file is also written to the hard drive in ImportWiz.log in the folder used to run the import wizard (by default, \Program Files\Crystal Decisions\Enterprise 10\win32_x86).
Check the integrity of your CE system, comparing it to your Crystal/Seagate Info system.
| Note | If you use the Import Wizard to import into CE 10 something other than an existing Seagate Info system (perhaps you are importing a CE 9 system or another test CE 10 system), you may see additional prompts and slightly different behavior than the previous example. |
Managing Other Servers
Besides the maintenance and configuration tasks for the CMS that were covered in the preceding section of this chapter, you ll probably find a need at one time or another to perform maintenance or adjustments to other CE servers as well. As with the CMS, all other CE servers can be found in the Windows-based Crystal Configuration Manager. As with the CMS, you can view various configuration options for the servers while they are running. However, to change server configuration, you must stop the server in the CCM and then change its properties. While many of the CMS properties are set in the CCM, most other servers have minimal settings that can be changed in the CCM (the command-line switches used when starting the server being a notable exception).
In the CCM, each server s Properties dialog is very similar. For each server you can set the server name, startup command, and startup type. You can change the NT account that the service uses when the computer boots. You can set dependencies with other NT services, as well as configuring SOCKS server information when dealing with firewalls. And, you can specify which CMS the server communicates with. In a few cases, there are additional options relevant to the particular server. In most cases, you will not need to adjust any of these parameters in the CCM.
Another major use of the CCM is adding and deleting additional servers or additional server instances. As a CE system grows to accommodate more users, more report processing, more viewing, and so forth, the system needs to scale to adequately handle the load. For example, if there is an increasing need to provide more on-demand viewing, the system may need more Page Servers to perform the report processing. These new Page Servers may be added using the CCM, either as additional Page Server instances on the same machine or Page Server services being added on additional machines.
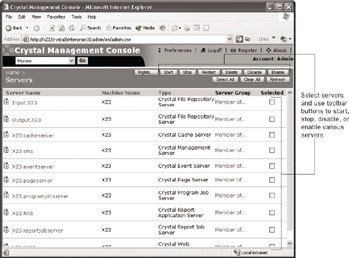
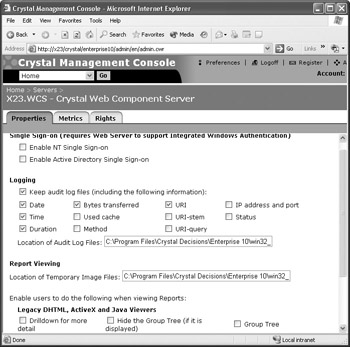
Unlike the CMS, the other CE servers also have various properties that appear in the web-based Crystal Management Console. Begin to work with servers by clicking Servers in the Organize area of the main CMC screen. You may enable or disable one or more servers in the CMC (perhaps you have multiple servers of each type and you wish to limit processing to just one of them for a particular reason). You may also select individual servers and view and change various configuration options on the Properties tab.
| Note | Specific details of both CCM and CMC server properties can be found in the online Administrator s Guide. Consult this guide for specific information on the various options available. As the default settings for many of these properties are often adequate, make note of the previous setting before making a significant change. Should your change reduce performance or cause a server to fail, you ll be able to restore the previous setting. |
EAN: N/A
Pages: 223