Other General Administrative Tasks
Other General Administrative Tasks
In addition to steps discussed previously in this chapter, other administrative tasks of a general nature will probably be required. For example, you may need to add additional license keys to the CMS to allow additional users or features to be enabled. You may choose to view metrics indicating how many users are currently logged on to the CMS. You may need to set limits on the number of report or program object instances that are retained by the CMS. Or, you may desire to change some default behavior of the Crystal Enterprise Web Desktop, which is the primary user interface for non-administrative users who view and schedule reports (the Web Desktop is covered in detail in Chapter 25).
| Note | As a Crystal Enterprise 10 Administrator, you may also be responsible for maintaining the Crystal Repository or Crystal Business Views. While both of these features are also maintained in the CE 10 Crystal Management Server database, they are not administered with the Crystal Management Console. Instead, you must use the Business View Manager Windows application. Using the Business View Manager to work with the repository is discussed in detail in Chapter 7. Business Views are discussed in detail in Chapter 17. |
Adding Additional Licenses
A great deal of Crystal Enterprise functionality and capability is determined by the license key or keys you are provided when you acquire the tool. For example, when you purchase Crystal Reports 10 Professional Edition, you receive a copy of Crystal Enterprise Express Edition. However, when you purchase Crystal Enterprise Developer or Advanced Developer Edition, you receive a copy of Crystal Enterprise Professional Edition. However, if you compare the CDs in each of these bundles, you ll find that they are exactly the same ”only the license keys are different. Furthermore, you may purchase various licensing quantities and types, as well as add-on features such as web-based reports design. In each of these cases, all that is provided you is a certain set of license keycodes that enable or disable certain features or Crystal Enterprise editions.
When you first install Crystal Enterprise, you are prompted to supply a single keycode by CE Setup. That keycode will provide the initial set of licensing options available to you. However, should you ever buy additional licenses or features, or desire to upgrade from CE Express to Professional or Premium Edition, you will merely need to supply replacement or additional keycodes ”no re-installation will be required.
You specify additional keycodes in the Crystal Management Console. Click License Keys from the Manage area of the main CMC screen. The License Keys screen will appear.
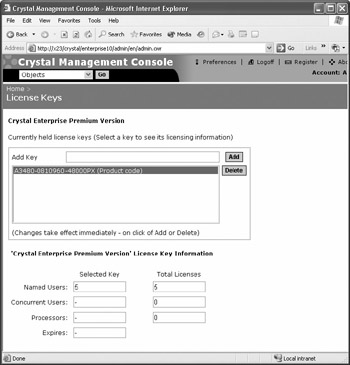
The initial keycode you used when you installed Crystal Enterprise will appear here. You may click the existing keycode in the list to display the type of keycode and number of licenses it provides in the Selected Key column below. To delete a keycode (if, for example, you are upgrading from CE Express to CE Professional), select the existing keycode and click Delete. To add a replacement or additional keycode, type it in the Add Key box (include the dashes) and click Add.
| Caution | In some instances, you may need to replace an initially specified keycode with another keycode (when upgrading from a trial to fully functional version, for example). In this situation, you will need to remove the first keycode before adding the replacement keycode. Otherwise, you may receive an error that you are attempting to add a conflicting keycode. |
Viewing Server Metrics
Various server metrics and settings are available from various screens in the Crystal Management Console. You may, for example, determine the version of Crystal Enterprise installed on each server, as well as see indications of service packs of version dates. You may also see how many users are currently logged into the system, what license complements are currently being used, and so forth.
The first set of metrics you may want to view are current license usage and processing job status (successful instance count, failed instance count, and so forth). Click Settings from the Manage area of the main CMC page. The Properties tab will appear, showing version information for the current CMS you are logged on to. Click the Metrics tab to see license usage and processing job information.
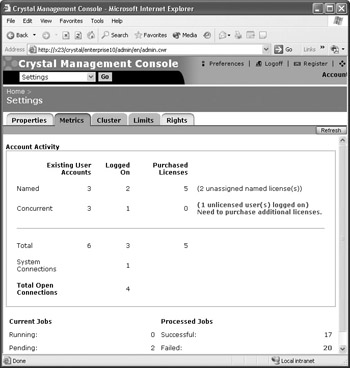
While this screen indicates the number of licenses in use, it doesn t indicate which accounts are using them. This information might be helpful, for example, if you need to track down who is using excessive licenses or you need to request users to log off so that you can perform some system maintenance. Individual user information is available from another screen specific to the CMS.
To see this metric, and similar metrics for other servers, click Servers from the Organize area of the main CMC screen. A list of all configured servers will appear. Click on the desired server to further examine details (for example, click the CMS to see current users). The Properties screen for the particular server you chose will appear. Information on the Properties screen will vary with the server you chose (for example, the CMS Properties screen will show currently logged-on users).
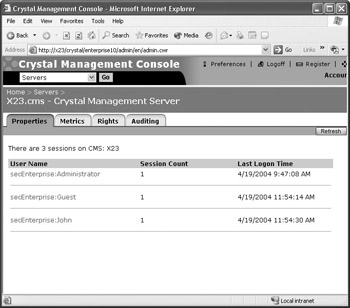
Each server screen also has a Metrics tab. Click it to see various metrics, such as server software version, number of open files, and so forth, particular to that server.
| Note | Specific information on various options exposed by server Properties tabs can be found in the online Administrator s Guide. |
Setting Instance Limits
As you might imagine, even a moderately busy Crystal Enterprise system can use up disk resources rapidly if many reports and program objects are being scheduled on a frequent basis. If you recall architecture discussions earlier in the chapter, you remember that the Output File Repository Server is charged with keeping all report instances that have been scheduled, as well as the text output from all scheduled program object instances. If reports and program objects are scheduled on a frequent basis, the number of instance files can grow rapidly , as can usage of Output FRS disk space. Furthermore, a report object may not be particularly useful if hundreds of saved instances appear in the History list when a user views it.
The CMS includes the capability to automatically purge report and program object instances when they either exceed a certain age or quantity. Once these settings are made, the CMS will automatically purge instances from the Output FRS and its own database once instances exceed the defined age or quantity. These instance limits can be set globally at the CMS level, as well as at both the folder and object levels. For example, you may choose to set a folder limit of 25 retained instances, but allow a certain report that runs every hour to retain 50 instances. Furthermore, these settings can be specified for individual users and user groups.
To set global CMS settings, click Settings from the Manage area of the main CMC screen. Then, click the Limits tab. If you want to set limits at the folder or object level, click Objects or Folders from the Organize area of the main CMC screen (depending on whether you want to set folder or object instance limits). Once you ve chosen the folder or object, you ll see the Properties tab for the object or folder (or the Subfolders tab for a folder that contains subfolders ). In either case, click the Limits tab to set instance limits for the folder or object.

The overall number of instances retained for a folder or object can be set by checking the Delete Excess Instances check box and typing in the number of instances to retain in the text box that follows . If you do nothing else, this will set an instance limit for all objects in the folder. You may either leave this unchecked and specify individual quantity and age limits by user or group , or set a global instance limit and specify more restrictive limits by user and group.
To specify either a quantity or age limit by user or group, click the Add/Remove button next to the Delete Excess Instances section (to limit by quantity) or the Delete Instances after N Days section (to limit by age). A list of groups will appear. Choose one or more groups that you want to set limits for and click the right-arrow button to add the groups to the chosen list. If you want to set limits for individual users, choose Add Users from the top drop-down list. You can then either pick one or more users directly, or use the Find feature to locate a specific user.
Once you ve finished choosing users and/or groups, click OK. The Limits tab will reappear with the groups and users you chose now appearing. Set the instance quantity or time limits by typing numbers in the appropriate Instance Limit or Maximum Days text boxes. When finished, click Update in the upper right-hand corner to save your settings.
| Note | An instance will be deleted if it meets any one of the criteria. So, for example, if you set an overall instance limit of 50, an instance limit for the Administrators group of 25, and a ten-day limit for the Everyone group, any instance over ten days will be deleted, regardless of who owns it and how many instances there are overall. Administrator-owned instances will be deleted if they exceed a total of 25, and all other users will see their instances deleted if they exceed 50. Also, if you set instance limits at the object level, they will take precedence. |
Specifying Default Web Desktop (ePortfolio) Settings
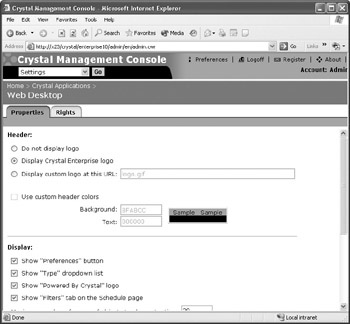
The out-of-the-box user interface for Crystal Enterprise, the Web Desktop (also known as ePortfolio), contains a default look and feel when initially installed (the Web Desktop is covered in Chapter 25). While each user can customize their Web Desktop appearance, you may want to control some more specific Web Desktop items, such as whether or not to show the Crystal logo, what custom colors to use for Web Desktop headers, and so forth.
To customize the Web Desktop, click Crystal Applications from the Manage area of the main CMC page. Web Desktop and Crystal Management Console entries will appear. Click the Web Desktop item to customize various options. Choose from the available choices for appearance and behavior. When finished, click Update to save the changes.
EAN: N/A
Pages: 223