Navigating and Viewing Report Parts
Navigating and Viewing Report Parts
Crystal Reports includes features that enhance web-based reporting, particularly when using various Crystal Enterprise editions. Crystal Reports on-line web viewers used with the RDC, Java Reporting Component, and Crystal Enterprise support standard Crystal Reports drill-down capabilities (discussed in detail in Chapters 3 and 10). As well, they support hyperlinks to standard web items, such as web pages and e-mail addresses. However, these standard drill-down capabilities are limited to drilling down within groups in the same report or using other non “Crystal Report web resources as hyperlink targets. However, there are two additional features that provide more flexibility for drill down and navigation.
The first feature is known as Guided Navigation (or just Navigation for short). Navigation allows you to designate certain objects on your report, such as charts , summary fields, and so forth, to act as hyperlinks to other objects on a report ”either the same report where the original object resides, or an entirely separate report. The second feature is Report Parts, the ability to display just certain portions of a report in a web page, rather than the entire page of a report. Navigation gives you much more flexibility to navigate through reports ”you are no longer limited to hyperlinking to web pages or e-mail addresses. And, by using report parts, you can develop web applications that show just specific parts of a report that you may be interested in, such as a single chart or a single grand total in a portal application (report parts can often make web-based Crystal Reports more useful on handheld devices with small screens).
Using Navigation
The first requirement for using Navigation is that your reports must be used in some version of Crystal Enterprise ”either Embedded Edition with non-managed reports, or another edition for reports managed by the Crystal Enterprise Crystal Management Server. Navigation can be used in several ways in the DHTML-based report viewers available with these systems (you cannot use the feature in older viewers, such as the ActiveX viewer). By using navigation, you can set up two types of hyperlinks:
-
Report Part Drilldown A hyperlink to another part of the same report. Only the object or objects that you choose as the destination of your hyperlink will appear when you drill down ”not the entire report. This option is only available when using the Report Part viewer, and is discussed later in the chapter in the Displaying Report Parts section.
-
Another Report Object A hyperlink to another report object, either in the same report as the calling object, or in a completely separate report. If you use this option with the Report Part viewer, only the object or objects you choose as the destination of your hyperlink will appear when you click. If you use one of the page-oriented DHTML viewers, the entire report will appear when you click, but the object you choose as the destination will be navigated to and highlighted.
Tip Crystal Enterprise 10 Express, Professional, and Premium include a report navigation package in a sample folder when the product is first installed. You may view the package to see how navigation works, as well as opening the two reports that make up the package in the Crystal Reports designer to see how the navigation has been set up.
First, if you will be hyperlinking from one report to another, it s helpful to begin the process by opening both reports in the Crystal Reports designer. This comes in handy when you need to reference the destination object in the Format Editor Hyperlink tab of the source object. If you are only hyperlinking within the same report, you need only have one report open .
-
Select the object that you wish to be the destination of the hyperlink. For example, if you wish to click on a group name field in one report to display related detail data from another report, select the object in the detail report that you wish to navigate to.
-
Right-click the destination object and choose Copy from the pop-up menu. While you will actually be able to paste a copy of the object onto the Design tab if you choose, if you paste the object into the Hyperlink tab of the Format Editor, a reference to the object will be pasted.
-
If you are working with multiple reports, use the Window menu to choose the report that will contain the original hyperlink. If you are hyperlinking from the same report, you can obviously skip this step.
-
Select the object that you wish to act as the hyperlink. Click the Insert Hyperlink toolbar button in the Expert Tools toolbar, or choose Format Hyperlink from the pull-down menus .
-
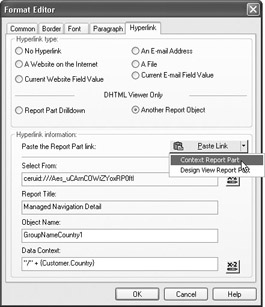
The Format Editor Hyperlink tab will appear. Click the Another Report Object radio button in the DHTML Viewer Only section.
-
Click the Paste Link button. You may also click the down-arrow next to the Paste Link button to choose from available contexts (options in this drop-down list will vary, depending on what type of object you copied in step 2).
Several (if not all) of the text boxes will be populated based on the object you originally copied.
-
Select From will show the name of the report that the copied object resided in. If you opened the source report from within Crystal Enterprise, an Enterprise identifier will appear in this box. While you cannot type over what is placed in this box, you can click the conditional formula button to the right of the box to create a string formula that sets this value.
-
Report Title will display the value placed in the Report Title field of the Summary Info dialog box (displayed with File Summary Info) when the source report was created. If this field was not filled, the filename of the report will appear here. You cannot type over what is placed in this box.
-
Object Name will contain the name of the object that will appear and be highlighted when you click the hyperlink. This object name can be set in the source report by typing a name into the Object Name text box on the Format Editor common tab. You may wish to give relevant objects more logical names (TopProductsChart instead of Chart1) when preparing them to act as hyperlink targets. You may also find it helpful to use the Report Explorer (discussed in Chapter 1) to determine object names. If you want to navigate to and highlight additional objects beyond what you had originally copied in the source report, type a semicolon after the existing object name and type in additional object names. You will also want to specify multiple object names here if you are only displaying report parts via the Report Part viewer (discussed later in the chapter).
-
Data Context indicates the location in the destination report that will initially be displayed. For example, if you preview a report and, in the preview tab, click on a group name field displaying 1/2001, you ll notice a data context string similar to /Order Date[1/2001] when you paste the object reference into the Hyperlink tab. Data Context strings require some getting used to. The best approach is to experiment with various permutations of copy and paste operations to see the resulting Data Context strings. These context strings will vary (or may not even appear), based on whether you copied the source object when displaying the Design tab or Preview tab, and what choice you make from the Paste Link button drop-down list. You may either type over what has already been placed in this box or click the conditional formula button to the right of the box to create a string formula that sets the context.
Displaying Report Parts
By default, reports are always displayed a full page at a time when viewed in the various Crystal native web viewers. While the page on demand architecture that s familiar to most Crystal Reports users is very effective at displaying only the currently required page of the report, an entire page is always displayed. However, there is an additional choice available to those who use any of the Crystal Enterprise editions as their web reporting method. The Report Part Viewer allows individual objects on a particular report page (such as charts, summary fields, cross-tabs, text objects, and so forth) to be specifically chosen as report part targets. When you use the Report Part Viewer, only those objects specifically chosen as Report Part hyperlink targets will be shown in the viewer.
For example, a report shown using the regular DHTML Viewer in Crystal Enterprise will appear similar to Figure 21-5.
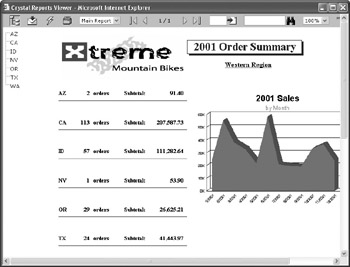
Figure 21-5: Complete report shown in Crystal Enterprise DHTML Viewer
And, by choosing the Mobile Desktop option from the Crystal Enterprise 10 User Launchpad, the Report Part Viewer is used and the same report will appear similar to the one shown in Figure 21-6.
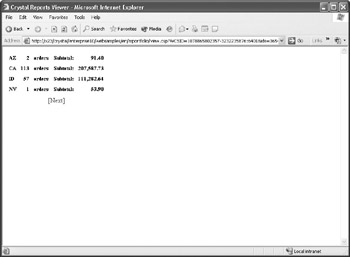
Figure 21-6: Partial report shown in Report Part Viewer
The difference is that the group summaries shown in the latter example were specifically chosen as the initial report part objects for the demonstrated report. Had no initial report part object been selected, the web page would have been blank when using the Report Part Viewer to view the report.
The general idea in using report parts is to show only limited sets of report objects in a web browser (perhaps inside a larger web application, such as a portal or on a mobile device) and allow those limited sets of objects to act as hyperlinks to other limited sets of objects. The stark difference between the Report Part Viewer and the other DHTML viewers is that the other viewers all maintain the whole report page at a time approach, whereas the Report Part Viewer can now display just individual objects on a report.
Initial Report Part Setting
The first step in setting up a report to use the Report Part viewer is selecting initial report part settings. These indicate what specific object or objects will initially appear when you view a report in the Report Part viewer. If you don t specify these, the report will appear as an empty web page when you attempt to view it. Initial report part settings are chosen in the Report Options dialog box. Choose File Report Options from the pull-down menus to display this dialog box.
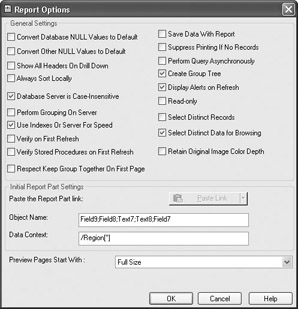
Complete the Object Name and Data Context fields with appropriate report object names and data context strings (discussed earlier in the chapter). You ll probably want to use the same copy and paste approach to place an object reference in these fields. If you wish to initially display more than one object in the Report Part Viewer (perhaps a chart along with a text object describing the chart or multiple summaries and text objects), either CTRL-click the objects before copying or type in each separate object name in the Object Name field, separating them with semicolons. As discussed previously, you may find it helpful to give report objects more meaningful names in the Format Editor before using them, as well as using the Report Explorer to locate specific objects.
| Note | It s important to remember that you can only display objects in the same report section when working with the Report Part Viewer. For example, if you want to display a chart and text object side by side in the Report Part Viewer, they must be in the same section of the originating report ”the chart can t, for example, be in the report header if the text object is in a group header. This limitation also pertains to Report Part Drilldown, discussed in the following section. |
Report Part Drilldown
While showing an initial limited set of objects in the Report Part Viewer may be sufficient for simple applications, the drill-down capabilities of the Report Part Viewer give you tremendous flexibility in controlling how end users navigate through your report. While the page-oriented viewers use the grouping hierarchy of your report to determine drill-down logic, you can more closely control individual objects that appear when you drill down with the Report Part viewer.
This is accomplished by setting up a specific drill-down path in your report. For example, you may choose to have a group chart contained in the report header be the initial report part object that appears when you first view the report. If a viewer then clicks on a particular pie wedge or bar in that chart, your drill-down path will take them to a lower-level summary field or advanced chart that appears in a lower group level. In this situation, you are mimicking the regular drill-down capabilities of the page viewer, but you are completely controlling the specific objects that appear when the user drills down. You can go a step further and combine report parts and Navigation (discussed earlier in the chapter) to drill down to a pre-determined set of objects in another report.
Once you ve defined your initial report part object or objects, you may then further define your path by creating a Report Part Drilldown hyperlink for these objects. For example, if you may want to select a group name field as your initial report part object and then click the Hyperlink toolbar button to set up the report part drill down. Click the Report Part Drilldown radio button in the DHTML Viewer Only section. The Format Editor will expand, showing available report sections, and fields within it, that can be drilled down on (only sections and objects in a logical report section just below your selected object will appear).
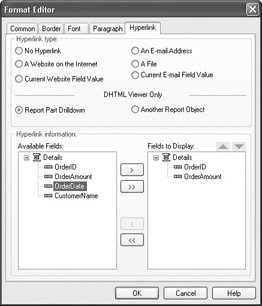
| Note | Report Part Drilldown is only available if you ve chosen a group chart or map or a summary field in a group header or footer. Other objects will not allow a Report Part Drilldown to be chosen. |
Choose the field or fields you d like to appear when the report viewer drills down. You may click on one field, or CTRL-click to choose multiple fields, clicking the right arrow to add them to the Fields to Display list. Or, click the double-arrow to add all fields. The order the fields are displayed in the Fields to Display list is the order the fields will appear when a viewer drills down. If you need to change the order of the fields, select a desired field and click the up or down arrows above the Fields to Display list to change the order.
Once you ve made these choices, save the report and view the report using the Report Part Viewer (perhaps add the report to a Crystal Enterprise Embedded Edition directory and use the Report Part Viewer to view it). Notice that the initial report view shows only the object or objects that you chose in the initial report part settings. If you then click the initial object ( assuming you ve defined a Report Part Drilldown for the object), only the resulting objects for that Report Part Drilldown will appear in the browser.
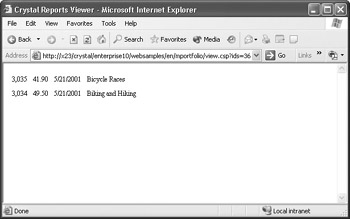
For example, if you set a Report Part Drilldown hyperlink for a group summary shown in Figure 21-6 to navigate to a lower-level detail fields, the following might appear in the Report Part Viewer when you click the AZ group name field in the original report (considering that there are two orders for Arizona). Notice that no other objects, other than those chosen for the Report Part Drill Down, will appear.
| Tip | Report parts can be viewed with the Report Part Viewer in the out-of-the-box Crystal Enterprise Embedded Edition and the Mobile Desktop option available from the Crystal Enterprise Professional or Premium User Launchpad. However, you may find that you ll ultimately derive the most benefit by custom-coding your web application to make full use of this viewer. |
EAN: N/A
Pages: 223
- Chapter VI Web Site Quality and Usability in E-Commerce
- Chapter VIII Personalization Systems and Their Deployment as Web Site Interface Design Decisions
- Chapter XI User Satisfaction with Web Portals: An Empirical Study
- Chapter XIV Product Catalog and Shopping Cart Effective Design
- Chapter XVIII Web Systems Design, Litigation, and Online Consumer Behavior