| This section isn't going to cover all of the objects available to ASP.NET that would take an encyclopedia! Instead, it covers a few of the most common ones that you'll be using often in your ASP.NET pages. You should already be somewhat familiar with the first one the Response object. Note None of these objects are "built-in" to ASP.NET. That is, all of the following objects are part of the .NET Framework (not ASP.NET) and can be used by any application under that framework.
The Response Object The Response object allows the server to communicate with the client. For example, you can use the Write method of the Response object to send HTTP output to the browser. You've already seen an example of this method: Response.Write("Hello world!") But what happens, exactly, when you use this object? When a user requests a page, ASP.NET creates an instance of the HttpResponse object, which contains information (properties and methods) needed to communicate with the client. This instance's name is Response, so you can use this name to access properties and methods of the HttpResponse object. As you may have guessed, one of these methods is Write, which writes a string out to the browser. So, one way to think about it would be that once an ASP.NET application starts, ASP.NET automatically executes the following code: dim Response as new HttpResponse The variable Response can then be used throughout your pages. The Write Method Let's create an ASP.NET page that more closely examines the Write method. See Listing 4.2. Listing 4.2 Using Response.Write 1: <%@ Page Language="VB" %> 2: 3: <script runat="server"> 4: sub Page_Load(obj as object, e as eventargs) 5: dim i as integer 6: 7: Response.Write("This is an example") 8: Response.Write("<HR width=100%\>") 9: 10: for i = 1 to 5 11: Response.Write("<font size=" & i & ">Hi!<br></font>") 12: next 13: end sub 14: </script> 15: 16: <html><body> 17: 18: </body></hhtml>  | The Write method expects a string for its parameter, so you enclose the input in quotes. See the caution later today for more detail. Let's examine line 8 more closely: |
Response.Write("<HR width=100%\>")  | Specifically, notice the seemingly out-of-place backslash character at the end of the line. Without this character, this line would contain the string %>, which tells ASP.NET that it has come to the end of the script block. It would stop execution in the middle of the string, which causes an error. This is a special character sequence that you have to set apart somehow so ASP.NET doesn't get confused. Therefore, you introduce the escape character (\). |
The backslash isn't shown in the HTML output. If you wanted to output double quotes, you'd have to escape them with another set of quotes: Response.Write("<HR width=""100%"">") This listing should produce what's shown in Figure 4.2. Figure 4.2. Writing output to the browser using Response.Write.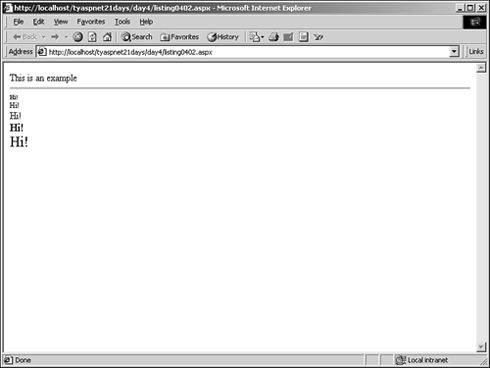
Caution VB.NET performs some casting of data types automatically, if possible. Casting from an integer to a string would be one example. This is why you can use Response.Write(6) in a VB.NET ASP.NET page. However, C# doesn't perform the same casting automatically. Therefore, using Response.Write(6) will produce an error in a C# ASP.NET page. Instead, use the following: Response.Write(6.ToString()); Always remember to cast your variables appropriately!
Buffering Pages Buffering allows you to control when output is sent to the browser. You've probably experienced this when browsing Web pages but weren't aware of it. When the output is buffered, nothing is sent to the browser until all code has been executed. This is the default method for ASP.NET. Unbuffered output, on the other hand, goes to the browser immediately. For example, suppose you had two Response.Write methods in your page. With buffered output, the output of both methods would be stored in memory and sent to the browser all at once when all ASP.NET code had stopped executing. With unbuffered output, the output of each method is sent to the browser immediately. Figure 4.3 illustrates this concept. Figure 4.3. The difference between buffered and unbuffered output.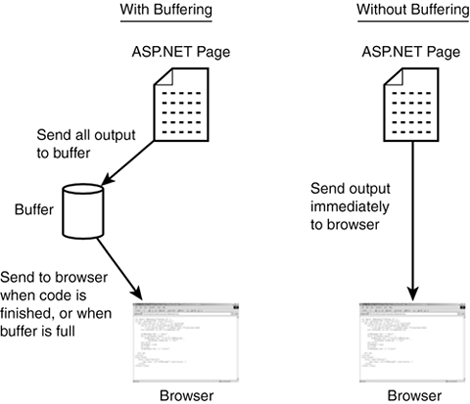
Buffering provides a nice performance boost, so generally you should leave it on. However, to turn buffering off, simply specify BufferOutput = false before you send any output to the browser. The following will cause an error because you've already sent output to the browser: <html><body> <% Response.Buffer = False %> </body></html> Instead, use the following: <% Response.Buffer = False %> <html><body> blah blah </body></html> You manipulate the buffer by using the Clear, Flush, and End methods. Clear empties the buffer, effectively losing anything you've stored, while Flush sends whatever is in the buffer to the browser immediately. The End method stops the Response object from sending any new output to the browser any output that's currently in the buffer is sent. Listing 4.3 shows an example. Listing 4.3 Testing Output Buffering 1: <%@ Page Language="VB" %> 2: 3: <script runat="server"> 4: sub Page_Load(obj as object, e as eventargs) 5: dim i as integer 6: 7: Response.Write("Before flush<br>") 8: Response.Flush() 9: for i = 0 to 5000 10: 'just wasting time 11: next 12: 13: Response.Write("After flush, before clear<br>") 14: Response.Clear() 15: for i = 0 to 5000 16: 'just wasting time 17: next 18: 19: Response.Write("After clear, before end<br>") 20: Response.End() 21: for i = 0 to 5000 22: 'just wasting time 23: next 24: 25: Response.Write("After end<br>") 26: end sub 27: </script> 28: 29: <html><body> 30: 31: </body></html> | Buffering is on by default, so you don't have to specify it explicitly. On line 7, you store "Before flush" in the buffer, and on line 8 you send it to the browser immediately. You use a for loop simply to waste time (that is, insert a pause) so you can better see the effects of buffering. On line 13, you store another string in the buffer but clear it immediately after. On line 19, you store yet another string, and you call End on line 20. The result is that the buffer is sent to the browser, and all further output is not. Therefore, you should see only "After clear, before end." |
This code produces what's shown in Figure 4.4. Figure 4.4. Manipulating the Response buffer.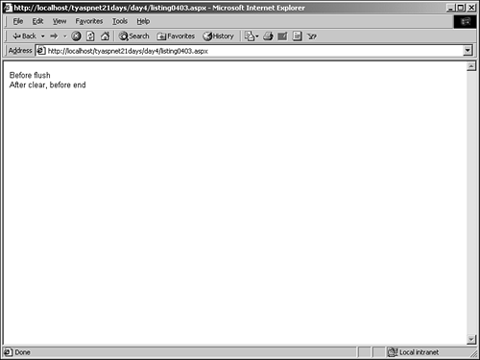
Redirecting Users The Response object also allows you to send users to other pages without their knowledge, using the Redirect method. For example: <%@ Page Language="VB" %> <script runat="server"> sub Page_Load(obj as Object, e as EventArgs) Response.Redirect("http://www.microsoft.com") end sub </script> <html><body> Hello! </body></html> When a user requests this page, he'll be sent to www.microsoft.com immediately and will never see your Hello message. This is a useful method if you want to send a user someplace depending on the username and password he enters in your form, for example. The Request Object In contrast to the Response object, the Request object allows browser-to-server communication. The browser sends a lot of information to the server when requesting a page. Whenever this happens, an HttpRequest object is created to deal with all that information. This object variable is called Request. Thus, the Request object represents the client requesting a Web page, and the Web server sends it back as a response using the Request and Response objects. This object's functionality isn't necessary for typical ASP.NET development because ASP.NET handles most of it for you. However, there are a few things you should know about. Discovering Client Information | One of the main uses of this object is to gather custom information from the browser, such as user input into forms or querystring values. The querystring is any information tacked onto the end of the request URL. For instance: |
http://www.Microsoft.com?id=Chris&sex=male The querystring, ?id=Chris&sex=male, presents data in key/value pairs. id is the first key and Chris is the first value, sex is the second key and male is the second value, and so on. The first key/value is always preceded by a question mark, and subsequent pairs are separated by ampersands, as shown. The querystring is useful for passing information between pages. For example: Response.Redirect("mypage.aspx?ID=Chris") myPage.aspx could now use this querystring information as needed. Caution Be careful not to store too much information in the querystring. Older browsers had a limitation of only 255 characters in this string, and you never know when one of your visitors will use an old browser. Also, placing large amounts of text here can open up some bugs on older versions of IIS.
ASP.NET provides a layer of abstraction so that you don't need to use the Request object to gather form information (as you'll see on Day 5, "Beginning Web Forms"), but the object is still there for your use. Using the previous URL, you could type the following C# code to retrieve querystring values: Request.Querystring; //returns "id=Chris&sex=male" Request.Querystring("id"); //returns "Chris" If the user had submitted a form, you could use this: Request.Form; //returns all form values Request.Form(name); //returns a single value specified by name Both the Querystring and Form properties represent collections of information. This information is typically supplied by user input and retrieved by ASP.NET using the Request object. You won't use this object much in this book because the Web forms framework handles many of the requests for you. Two other common collections used with Request are ServerVariables and Cookies. The former returns miscellaneous information about the server, such as the IP address or HTTP protocol. The latter returns information about cookies, which are small files on the client's computer (see "The HttpCookie Object" later today). Table 4.3 shows some of the common environment variables in the ServerVariables collection. Table 4.3. Commonly Used Environment Variables | Variable | Description | | URL | The URL of the ASP.NET page, starting after the server and domain name (that is, after http://www.server.com/) | | PATH_INFO | The same as URL | | PATH_TRANSLATED | The full physical path of the ASP.NET on the server | | SERVER_NAME | The Web server's name | | SERVER_SOFTWARE | The name of the Web server software, such as Microsoft-IIS/5.0 | The HttpCookie Object | A cookie is a small file on the user's computer that contains information specific to one Web site. This file can contain things such as usernames and passwords that will be used to customize a user's visit to the site. Cookies can contain any simple data type, such as strings, integers, floats, booleans, and so on. For example, many sites that display news headlines will allow users to select which types of news they want to see. This information can be stored in cookies so that the next time the user visits, the site can read those values and customize accordingly. |
Tip One common mistake beginners make with cookies is that they assume that the server sends cookies to the client. In other words, that a Web site writes information to your hard drive, and that somehow Web sites can read your hard drive. This is untrue. What actually happens is that the Web server, through HTTP, sends an instruction to the browser on your machine. The browser on your computer, then, is the one that writes cookies to your machine, not the Web server. When you disable cookies, you are instructing your browser to ignore the create cookie command from the server. In this way, cookies are actually safer than some people think.
The HttpCookie object provides methods for accessing and creating these cookies. You can use this object to examine the properties of a cookie. However, the most common way to manipulate cookies is through the Request and Response objects, which both have a Cookies property that returns a reference to an HttpCookie object. Creating Cookies The Response object allows you to create cookies easily. There are two ways to create cookies: You can create multiple cookies, each with a single value, or you can create a single cookie with multiple key/value pairs. The following code snippet demonstrates both methods: 'set up some cookie variables Response.Cookies("MyCookie").Value = "Single Cookie" Response.Cookies("21DaysCookie")("Username") = "Chris" Response.Cookies("21DaysCookie")("Preference") = "800x640" | The second line creates a cookie on the client's computer named "MyCookie" with the value "Single Cookie". You can create as many cookies and key/value pairs as you like using this method but it can add up to a lot of cookies! The second set of code creates a single cookie named "21DaysCookie" that has two key/value pairs. To specify key names, you simply add another name in parentheses (or brackets in C#), as in the following: |
Response.Cookies[CookieName][KeyName]; On the second line, notice that you must use the Value property to assign a string to the cookie. Simply using Response.Cookies("MyCookie") returns an HttpCookie, and you can't write to that object. The Value property returns a string object that you can modify. In the second group of code, however, you don't need to specify Value because ASP.NET knows you need a string if you specify a key name. Caution If you create a cookie with a value and then add keys to it, the initial value will be erased. You cannot create a cookie with both values and keys.
Suppose a visitor comes to your Web site and you create a cookie for her. If she never comes back to your site, there's no reason for her to keep the cookie. She can delete the cookie manually, of course, but there's an easier way. You can use the Expires property to render the cookie invalid at any time you choose. For example: Response.Cookies("21DaysCookie").Expires = _ DateTime.Parse("1/1/2002") Or: Response.Cookies("21DaysCookie").Expires = _ DateTime.Now.AddMonths(1) The first example tells the cookie to expire on January 1st, 2002. The second one tells the cookie to expire one month from the time the code executes. The default Expires value renders the information invalid after 1,000 minutes. This is great if you simply want to maintain information for the current session (see "The Session Object" later today). However, cookies are usually used to store information for much longer periods weeks, months, or even years. To delete a cookie from the client, you must set the cookie's Expires value to some time in the past, or to 0. The cookie will then be deleted as soon as the user closes her browser. There are four other properties of the HttpCookie object that you should be aware of. Domain restricts the use of the cookie to whatever domain you specify, such as www.myserver.com. This provides greater access control for the cookie, but typically you can just leave it as the default value. Path is similar to Domain, but it restricts the ASP.NET pages that can access the cookie to a certain path on your server. HasKeys tells you if this cookie has keys or is simply a single-value cookie. Finally, Secure tells ASP.NET whether or not it should transmit the cookie securely that is, only over the HTTPS protocol instead of HTTP. The default value is false. Accessing Cookies The browser sends all cookie information to the server when it makes a request. Therefore, you can use the Request object to gather that information. Accessing a cookie follows the exact same syntax as creating a cookie. In the following listing, you'll use Response.Write to write the cookie values to the browser: 'set up some cookie variables Response.Write( _ Request.Cookies("MyCookie").Value) Response.Write( _ Request.Cookies("21DaysCookie")("Username")) Response.Write( _ Request.Cookies("21DaysCookie")("Preference")); Again, notice the difference between accessing a value and key/value pairs specifically, the use of the Value property. Since key/value pairs are simply collections of data, you can iterate through them easily, as shown in Listing 4.4. Listing 4.4 Looping Through Cookie Keys 1: <%@ Page Language="VB" %> 2: 3: <script runat="server"> 4: sub Page_Load(Sender as Object, e as EventArgs) 5: dim strVariable as string 6: 7: 'set up some cookie variables 8: Response.Cookies("temp").Value = "HI" 9: Response.Cookies("21DaysCookie")("Username") = "Chris" 10: Response.Cookies("21DaysCookie")("Preference") = _ 11: "800x640" 12: Response.Cookies("21DaysCookie")("Password") = _ 13: "CookiesRock" 14: Response.Cookies("21DaysCookie")("LastVisit") = _ 15: DateTime.Now.ToString 16: Response.Cookies("21DaysCookie")("UserAgent") = _ 17: Request.ServerVariables("HTTP_USER_AGENT") 18: 19: for each strVariable in Response.Cookies _ 20: ("21DaysCookie").Values 21: Label1.Text += "<b>" & strVariable & "</b>: " & _ 22: Request.Cookies("21DaysCookie")(strVariable) & "<br>" 23: next 24: end sub 25: </script> 26: 27: <html><body> 28: <form runat="server"> 29: <asp:Label runat="server"/> 30: </form> 31: </body></html> | On line 29, you've created an ASP.NET Label server control, which will be discussed on Day 5. For now, just know that it displays HTML text in a <span> element. |
Note that most of this code is in the Page_Load event handler, which is discussed in the next section. On lines 8 17, you create your cookie and set up some keys and values. On line 17, you even use the Request.ServerVariables collection to return the HTTP_USER_AGENT setting. Line 19 returns a collection of the cookie's keys. Using a for...each loop, you print the key names and values to the label. Recall that the for...each loop assigns the value returned from the collection, in this case the key name, to the counter strVariable. You access the key's value with this: Request.Cookies("21DaysCookie")(strVariable) You should see something similar to Figure 4.5. Figure 4.5. Iterating through a cookie collection.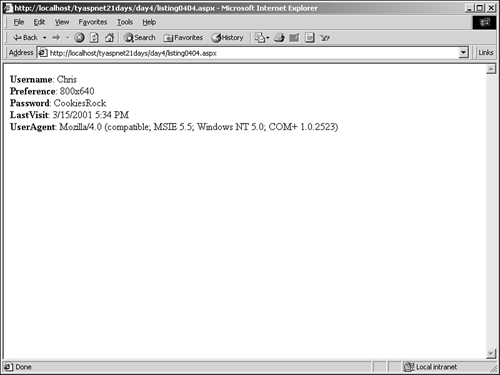
Cookies are a great tool for maintaining information about a user. Their only drawback is that they aren't supported on all browsers. You'll learn another method for maintaining information later today in "The Session Object." The Page Object The Page object contains all the properties and methods for every ASP.NET page that you build. When you execute an ASP.NET page, it inherits from the Page class in the .NET Framework. Recall the discussion about inheritance yesterday. A class defines some parameters and methods for objects based on that class. When you create another class that inherits from that parent class, you also inherit its members. However, you can also create your own members for the child class. ASP.NET pages are the child objects for the Page object, which is where the pages inherit the members from. Any methods or properties you define in the ASP.NET page become members of the object based on your page. This means that if you create another page, it can access the methods and properties of the first page! This is object-oriented programming at work. This object only has a few useful built-in members. IsPostBack tells you if a form on this page posted to this same page. (For a discussion of postback forms, see Day 2, "Building ASP.NET Pages.") You'll be using this property quite often after you learn about Web forms on Days 5 and 6, "Learning More About Web Forms." Databind binds all data expressions to the controls on the page we're getting way ahead of ourselves, though. This is discussed on Day 9, "Using Databases with ASP.NET." Finally, this object has an event that you're very interested in Load. This event fires whenever the page starts loading into the browser a very useful time for ASP.NET developers. Listing 4.5 shows an example. Listing 4.5 Using the Page_Load Event 1: <%@ Page Language="VB" %> 2: 3: <script runat="server"> 4: sub Page_Load(Sender as Object, e as EventArgs) 5: tbMyText.Value = "This is the page load event!" 6: end sub 7: </script> 8: <html><body> 9: <form runat="server"> 10: <input type="text" size="25" 11: runat="server" /> 12: </form> 13: </body></html> | On line 10, you create a simple HTML form text input box named tbMyText and specify that it runs at the server. On line 4, you define the event handler for the Load event, Page_Load (note the standard event handler parameter list). When this event fires that is, when the page loads into the browser you set the Value property of tbMyText to "This is the page load event!" Figure 4.6 shows the output of this code. |
Figure 4.6. The Page_Load event at work.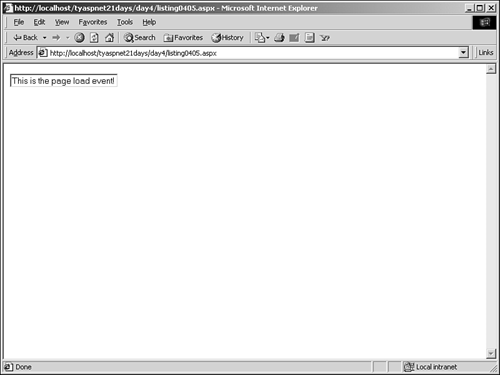
In effect, you fill out the form field before the user even sees it. Note Note the format of the event handler's name. ASP.NET requires event handlers to follow the naming convention of object_event. In this case, it's Page_Load. This is a necessary convention. Otherwise, how would ASP.NET know which event handler to use for its built-in events? You don't have to follow this naming convention for event handlers that you define. It only applies to the events that you don't have programmatic access to.
The Load event is very important for ASP.NET developers. You can do a lot of things with this event, including verifying user identities, loading data from a database, and redirecting the user. In fact, nearly all of the ASP.NET pages that you'll see from now on will have a handler for this event. Let's look at another example. Suppose you want to show the user different messages depending on what time he visits the page. You could implement this as shown in Listing 4.6. Listing 4.6 Displaying Different Messages with the Load Event 1: <%@Page Language="C#" %> 2: 3: <script runat="server"> 4: void Page_Load(Object Sender, EventArgs e) { 5: DateTime Now = DateTime.Now; 6: int intHour = Now.Hour; 7: 8: Label1.Text = "The time is now " + Now.ToString("T") + "<p>"; 9: 10: if (intHour < 12) { 11: Label1.Text +="Good morning!"; 12: } else if (intHour > 12 & intHour < 18) { 13: Label1.Text +="Good afternoon!"; 14: } else { 15: Label1.Text +="Good evening!"; 16: } 17: } 18: </script> 19: 20: <html><body> 21: <form runat="server"> 22: <asp:Label runat="server"/> 23: </form> 24: </body></html> | On line 22, you create another Label control. In your Load event, you set the Now variable to the current time and use the Hour property of the DateTime object to return the hour. |
Line 8 displays the current time in the Label control. The ToString method returns a string with the formatted date and takes one argument, a string that tells the object how to format the date. Table 4.4 lists the valid formatting strings. Table 4.4. Valid DateTime Format Strings | String | Example | | "d" | 2/01/2001 | | "D" | Thursday, February 01, 2001 | | "f" | Thursday, February 01, 2001 4:32 PM | | "F" | Thursday, February 01, 2001 4:32:30 PM | | "g" | 2/01/2001 4:32 PM | | "G" | 2/01/2001 4:32:30 PM | | "m" | February 01 | | "r" | Thu, 01 February 2001 16:32:30 GMT | | "s" | 2001-01-01T16:32:30 | | "t" | 4:32 PM | | "T" | 4:32:30 PM | | "u" | 2001-01-01 16:32:30Z | | "U" | Thursday, February 01, 2001 16:32:30 | | "y" | February, 2001 | | "dddd, MMMM dd yyyy" | Thursday, February 01 2001 | | "ddd, MMM d "'"yy | Thu, Feb 1 '01 | | "dddd, MMMM dd" | Thursday, February 01 | | "M/yy" | 2/01 | | "dd-MM-yy" | 01-02-01 | Starting on line 11, you use a series of if statements to determine the proper message to display in the label. Figure 4.7 shows the output of this page at the time of this writing. Figure 4.7. Displaying customized messages in the Load event.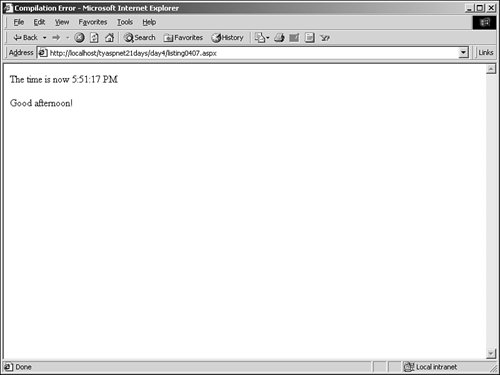
You'll be using the Load event for more interesting things after you learn about Web forms in a few days. The Session Object The Session object presents a very interesting concept. Because the Web is a stateless medium (see Day 2), information about a particular user is hard to keep track of. There's no way to use HTTP to find out if a series of requests comes from one user or a bunch of different users. This makes it hard to tailor a Web site for one user. The Session object combats this limitation. It allows you to store items (such as variables, objects, strings, or whatever) that are pertinent to a specific user in a single location on the server. Essentially, it acts as that user's personal storage locker of information. Imagine lockers in a school you put your belongings in your locker to store while you're in class. When you leave for the day, the locker is emptied. | The Session object works by the same mechanism. When a user visits your site, he's allocated a "locker" into which the developer can put whatever information she likes. The user's time at the site is called a session. Once the user leaves the site, the locker is abandoned, the information is lost, and the session ends. |
Imagine that a user comes to your site and enters his name in a form, which you would like to remember. You can put the name into the Session object and then recall it from anywhere you want, assuming the session hasn't ended. The syntax is as follows: Session.Add(variablename, value) Or: Session(variablename) = value; You can store as many variables in session for each user as your computer's memory will hold. Listing 4.7 is a page that implements the preceding example. Listing 4.7 Storing Variables in Session 1: <%@ Page Language="VB" %> 2: 3: <script runat="server"> 4: sub Submit_Click(Sender as Object, e as EventArgs) 5: if tbName.Value <> "" 6: Session("Name") = tbName.Value 7: Response.Write("Hi " & Session("Name") & "!") 8: else 9: Response.Write("You forgot to enter a name.") 10: end if 11: end sub 12: </script> 13: 14: <html><body> 15: <form runat="server"> 16: Please enter your name: 17: <input type="text" 18: runat="server"/> 19: 20: <p> 21: <asp:Button 22: text="Submit" 23: runat="server" 24: OnClick="Submit_Click" /> 25: </form> 26: </body></html> | Let's examine the function in the code declaration block. First, on line 5 you check if the user did indeed enter a value in the text box. If she didn't, you use Response.Write to print an error message on line 9. If she did, however, you create a new Session variable called "Name" and assign it the value in the text box on line 6. Finally, on line 7, you write a Welcome message to the user using the variable you just put into the Session object. Figure 4.8 displays the output. |
Figure 4.8. Storing and retrieving Session variables.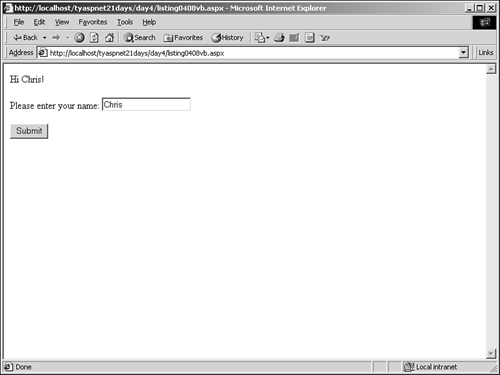
Note how the text you entered stays in the text box, even after you click the Submit button. This is the automatic viewstate management at work! Using the Session object is very easy and very helpful. Let's create another page that uses the Session variable you just created. See Listing 4.8. Listing 4.8 Retrieving Variables in Session 1: <%@ Page Language="VB" %> 2: 3: <script runat="server"> 4: sub Page_Load(Sender as Object, e as EventArgs) 5: Label1.Text = "Welcome back " & Session("Name") & "!" 6: end sub 7: </script> 8: 9: <html><body> 10: <form runat="server"> 11: <asp:Label runat="server"/> 12: </form> 13: </body></html> Assuming you haven't closed the browser or let it sit there for an extended length of time, you should now see a Welcome message using the name you stored in Listing 4.7. You can even store objects and data stores in Session, just as with any other variable. How does ASP.NET keep track of sessions? Normally, when a user visits the site and a session is started, the computer generates a unique ID for that user, which is then stored on the client computer as a cookie. As the user moves from page to page, ASP.NET reads this cookie value to determine which session this user belongs to. You can easily read this value with the following: Response.Write(Session.SessionID) The Session ID is a 120-bit string that is guaranteed to be unique for each user. Once the session expires, the cookie is deleted. (You can change this behavior, though, as you'll see on Day 18, "Configuring and Deploying ASP.NET Applications.") Controlling Session There are various ways to control how the Session object behaves in your ASP.NET applications. The first is the Timeout value, which sets how long a session can be idle before ASP.NET abandons it. In other words, if a user visits your site but doesn't click on anything, or leaves the site for an amount of time equal to this timeout value, the session and all its information will be lost. This value is 20 minutes by default in IIS 5.0, but you can easily change it as follows: Session.Timeout = x 'x is the number of minutes There are a number of reasons you may want to change this value. Let's examine a typical Web site: Each user that comes to the site gets a unique Session object, which means each user gets his own piece of the server's memory. Even if he leaves the site after only 30 seconds, his session is still alive for another 19 minutes and 30 seconds. After a while, this can add up to a lot of memory. Table 4.5 shows the growth of sessions with the default timeout value, assuming 100 visitors come to your site every half hour and a timeout value of 120 minutes. Table 4.5. The Growth of Sessions | Time | Users | Sessions | Description | | 0:00 | 100 | 100 | 100 sessions are created for the first 100 site visitors. | | 0:30 | 100 | 200 | The first 100 sessions are still active whether or not the visitors are still on the site. 100 new visitors means 100 new sessions. | | 1:00 | 100 | 300 | Another 100 visitors adds 100 new sessions, while the first two groups' sessions still haven't expired. | | 1:30 | 100 | 400 | 100 new visitors = 100 new sessions. | | 2:00 | 100 | 500 | … | | 2:30 | 100 | 500 | 100 new visitors create 100 new sessions, but the first group's sessions finally expire after two hours. | | 3:00 | 100 | 500 | It just keeps going and going… | You're obviously wasting a lot of memory 500 sessions for only 100 concurrent visitors not always an efficient way to work. Setting the Timeout too low could also result in some problems, however. Imagine an e-commerce site where users can add items to a shopping cart. The Session object can easily hold such items, but if you set the Timeout too low, a user may lose all the items in the cart before she even gets a chance to check out! Twenty minutes is ideal for many situations, but you may need to tweak this setting depending on your circumstances. A secure banking Web site may want a smaller value, while an online e-mail site may want a bigger one. You can also cause a session to expire immediately by using the Abandon method. Imagine a Web site where users can check their e-mail. After a user is done, he wants to log out so that other people can't use his e-mail account when he's away from his computer. Abandoning the session is one way to accomplish this. Simply call the following: Session.Abandon The temporary cookie is deleted, as well as any session information. Working with Session The Session object can be manipulated just like an array. You can loop through all the variables and manipulate them as needed. Listing 4.9 uses the for...each statement in VB.NET to loop through and display the contents of the session. Listing 4.9 Iterating Through Session Variables 1: <%@ Page Language="VB" %> 2: 3: <script runat="server"> 4: sub Page_Load(obj as object, e as eventArgs) 5: dim strVariable as string 6: 7: 'set up some session variables 8: Session("Name") = "Chris" 9: Session("FavoriteColor") = "Blue" 10: Session("EyeColor") = "Brown" 11: Session("AMessage") = "Welcome to my world" 12: Session("ASPNET") = "rocks!" 13: 14: for each strVariable in Session.Contents 15: Label1.Text += "<b>" & strVariable & "</b>: " & _ 16: Session(strVariable) & "<br>" 17: next 18: end sub 19: </script> 20: <html><body> 21: <form runat="server"> 22: <asp:Label runat="server"/> 23: </form> 24: </body></html> | On lines 8 12, you set up some useless Session variables. On line 14, you set up your for...each loop. This iterates through all the items in a collection; in this case, it's all the Strings in your Session Contents collection. Each item in this collection represents a key value a Session variable name such as "Name", "FavoriteColor", and so on. You retrieve the actual value of the key by using Session(strVariable). Then you simply display the key/value pairs in the Label control, as shown in Figure 4.9. |
Figure 4.9. Using loops to display Session keys and values.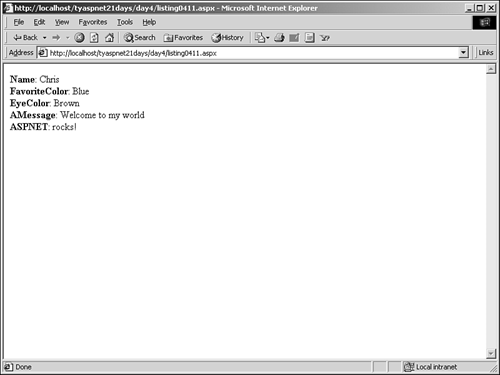
Sessions Without Cookies By default, ASP.NET uses cookies to store Session IDs and keep track of users. What happens, however, if the user's browser doesn't support cookies or the user just isn't accepting any? Luckily, ASP.NET has another way to keep track of sessions. | Cookie munging is the process that ASP.NET uses to keep track of sessions without cookies. Before a page is sent to the browser, ASP.NET scans the HTML code for any hyperlinks. At the end of each link, ASP.NET tacks on an encoded version of the Session ID. When the user clicks a link, ASP.NET grabs that string, decodes it, and passes it to the page the user is requesting. This page can now use that ID to set or retrieve any Session variables. ASP.NET also places the encoded Session ID in each link on this page as well. This all happens automatically if ASP.NET detects that the visitor doesn't support cookies. Figure 4.10 illustrates this concept. |
Figure 4.10. Cookie munging involves adding encoded Session IDs to hrefs in the form of querystrings.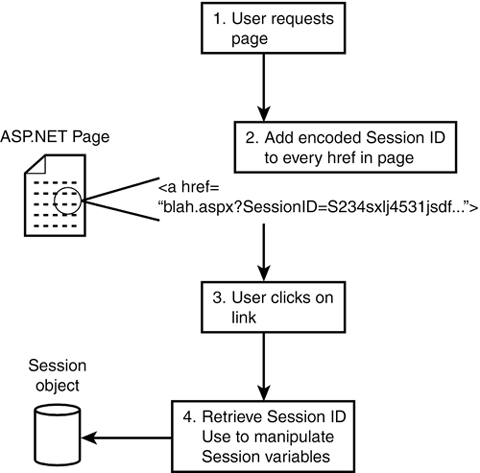
You'll learn some more advanced ways to configure session on Day 18. Session Recommendations There once was a time where it was recommended to put as little information into session variables as possible. Limited memory resources, older versions of Web servers, and the situation outlined by Table 4.5 made storing loads of data in session detrimental to the performance of your Web site. Things, however, have changed. Nowadays, servers are often equipped with 512 megabytes of memory and more. If your Web site architecture is set up properly, most of this memory is not doing anything; it's just sitting there going to waste. Why shouldn't we use it instead? Let's imagine that you store user infomration in a database. To retrieve this information, you need to work with ADO.NET and communicate back and forth to a database, not to mention the fact that the database has to search the hard drive for the requested information. When you store this data in memory via session instead, you don't have to perform all of those steps. Accessing from memory can be as much as 100 times faster than retrieving from the database. You may be scared that you have too much data to store in memory, but you'll often find that your entire store of data doesn't add up to more than a few megabytes, and relative to the amount of memory on your server the performance benefits greatly outweigh the drawbacks if you can call using your system resources as they were designed to be used a drawback. You'll learn more about using your system memory to its full potential in Day 14, "Using ASP.NET's Improved Caching Capabilities." | Do | Don't | | Do use Session variables to store as much user-specific information as you can. The performance of your site will be greatly enhanced. | Don't use Session variables when you have a limited amount of memory to spare, or you need to use your Web server for things other than serving a Web site (for instance, if your Web server is your home PC). | |
The HttpApplication Object The HttpApplication object represents an ASP.NET application. (ASP.NET defines an application as all the files in a single virtual directory and below.) This object will be examined in much more detail on Day 18, but this section will cover some introductory topics. | Like the Response object, ASP.NET creates an HttpApplication object named Application whenever your application starts that is, as soon as someone requests any page from your site for the first time. Only one Application object is created for your entire application, unlike the Session object, where a new one was created for each new user. Like the Session object, however, the Application object can be used to store variables and objects in memory. These application variables are available across your entire application and don't apply to any specific user. |
For example, suppose you have a footer or disclaimer that you need to place on every single page. You can store this in an application variable with the following: Application("Disclaimer") = "Copyright 2001" And then you simply call it from every page: Response.Write(Application("Disclaimer")) Imagine if you stored this string in a Session object. Each new user that visited your site would receive this string in his session. If you had 100 users, you'd have stored this string 100 different times. This is a waste of memory when storing it in Application will suffice. Like the Session object, it's a good idea to store information in Application variables because you can access it faster than you could from other sources. | Do | Don't | | Do use application variables when a variable isn't specific to any user. | Don't use application variables to store personalized content, such as usernames, passwords, and so on. | | Do use Session variables when storing personalized information. | Don't store large amounts of HTML in the Application object when you can simply write it in an HTML page. | |
There are a few events that you can handle from the Application object, but let's leave those for Day 18. The HttpServerUtility Object The last object today is the HttpServerUtility object, which provides several helper methods that are used in processing requests. You can use the name Server to access this object's members. Redirecting Users You've examined one way to redirect users with the Response object, but there are two other ways. The Response.Redirect method sends HTTP information to the browser, instructing it to go to another page. This requires a round trip that may not be necessary. Therefore, ASP.NET can also use the Execute and Transfer methods of the HttpServerUtility object to send users off to different pages. Server.Transfer simply transfers execution to another page. This doesn't require any information to be sent to the browser it all occurs on the server without the user's knowledge. For instance, this code snippet examines a user's password (assuming he entered one in a form): if (strPassword == "blahblah") _ Server.Transfer("success.aspx") If the password matches the string on line 1, you transfer him to another page. This is a valuable method for easily redirecting users. Server.Execute transfers ASP.NET execution to another page, but it returns to the original page when it's done. This is useful if you need to execute some code on another page (such as data processing, for instance) but continue on the same page. It works much like the branching logic we described yesterday, and follows the same format as Server.Transfer. Formatting Strings Typically, when you send output to the browser, it's interpreted as HTML. For example, the following prints a line break in the browser: Response.Write("<br>") However, there are times when you want the actual word to be printed. Instead of a line break, you want <br> to actually appear on the visitor's screen. To do this, you can use the HtmlEncode method of the HttpServerUtility object. The following would output <br> and the user would see <br> in the browser: Response.Write(Server.HTMLEncode("<br>")) < is the HTML-encoded equivalent to <, while > translates to >. HtmlEncode makes these two substitutions to your text. UrlEncode does something similar, but it formats a specified string using the rules for a URL. For example, the ampersand and question mark have special meanings in a URL, so Server.UrlEncode changes these characters to their URL-encoded versions. This is helpful if you ever need to place a string into the querystring. Server.HtmlDecode and Server.UrlDecode perform these operations in reverse, translating encoded character sequences to the characters they represent (from < to <, for example). The MapPath method doesn't exactly format a string, but it helps to determine the proper string you need. This method translates a virtual path to a physical path on the server. For example, the following: Server.MapPath("/TYASPNET21Days/day4") would translate to this: c:\inetpub\wwwroot\TYASPNET21Days\day4 This is very helpful when you need to know a physical path, such as when you're writing files to the server (as you'll learn on Day 13, "Reading and Writing Files on the Web Server"). Controlling Scripts The HttpServerUtility object provides one property to control the execution of ASP.NET scripts: ScriptTimeout. This value tells the server how long to wait before terminating a script or page. For example, the following tells ASP.NET that any code that has been executing for 90 seconds should be terminated: Server.ScriptTimeout = 90 Occasionally, code you write may have a bug, such as an infinite loop, and may go on executing forever or until your server crashes. Using this property prevents that from happening. ASP.NET thinks any code that executes for longer than the ScriptTimeout period isn't working correctly and terminates it. On the other hand, occasionally some code really does take that long to execute (if it's very complex, for instance) and the ScriptTimeout property may be too short. Thus, you can easily extend the time. Creating Objects Finally, the CreateObject method instantiates a COM object identified by progid. We'll skip this topic for now and return to it in more detail in Week 3. | 