| Looking back at Figure 19.1, you can see the benefits of separating code from content. What if you could move the top ASP.NET code portion of the page out of the .aspx file altogether? This would represent a true separation of code from content. ASP.NET allows you to do just that with code-behind forms. Code-behind forms serve as a method to separate any and all ASP.NET code from the user interface. Now, instead of one file as shown in Figure 19.1, you have two, as shown in Figure 19.2. Figure 19.2. ASP.NET allows you to completely separate the UI from the logic with code-behind forms.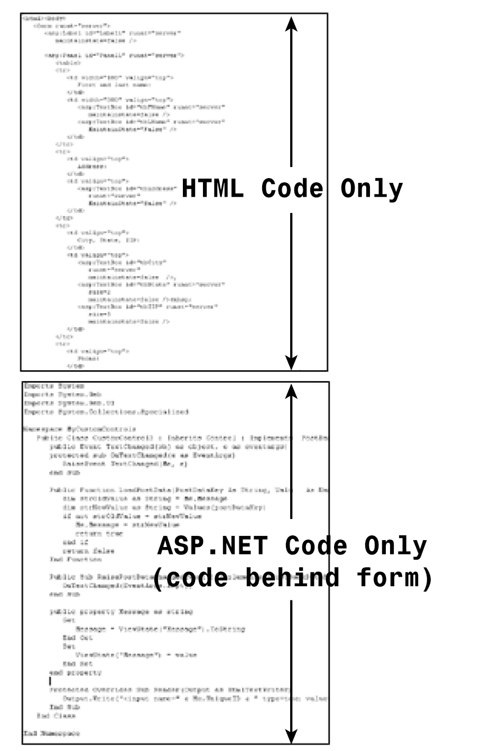
Let's take a look at the way ASP.NET works one more time so that we can better understand the code-behind model. When a client requests an ASP.NET page (an .aspx file) for the first time, ASP.NET parses the page and examines all components on it, for instance, server controls. ASP.NET then creates a new class dynamically based on your .aspx file. It is this class that is compiled and executed to return HTML to the client. This class must derive from the System.Web.UI.Page class, which provides the definition for all ASP.NET pages. This all happens invisibly once a page is requested. However, an .aspx file does not have to derive from the Page class directly; as long as it derives somehow from that class, everything will be fine. Thus, you can create an intermediary class that derives from the Page class, and make the .aspx file derive from it instead. This new class can contain any functionality that you want, and it will be available to the .aspx file. Figure 19.3 illustrates the relationships among all these classes. Figure 19.3. An ASP.NET page must derive directly or indirectly from the System.Web.UI.Page class.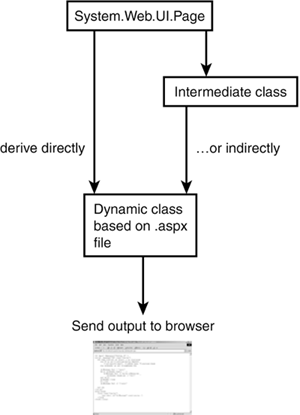
This new intermediary class is your code-behind form. It defines functionality that your ASP.NET page can use. With so many classes floating around, it might quickly become confusing. Essentially, it all boils down to the fact that an ASP.NET page must derive from the Page class, and it's up to you to determine how. Adding the code-behind class doesn't provide any obvious benefits. The code-behind page doesn't contain any inherent functionality, so your ASP.NET page isn't gaining anything new. It doesn't aid the execution of the ASP.NET page either. However, using a code-behind page does allow you to move your code into an intermediary class, leaving only UI-rendering HTML in a much-simplified ASP.NET page. As you move into advanced levels of ASP.NET development, you'll use code-behind forms more and more. They are an advanced tool, but one that every ASP.NET developer should learn. Using Code-Behind in ASP.NET Pages Creating a code-behind form is very simple; it is similar to creating a business object, except that compiling isn't necessary. You must take some extra precautions, however, to ensure that it all works correctly. Listing 19.1 shows a typical ASP.NET page that displays information from a database. You'll use this listing to generate your code-behind form in a moment. Listing 19.1 A Typical ASP.NET Page Contains Code and HTML 1: <%@ Page Language="VB" %> 2: <%@ Import Namespace="System.Data" %> 3: <%@ Import Namespace="System.Data.OleDb" %> 4: 5: <script runat="server"> 6: 'declare connection 7: dim strConnString as string = "Provider=" & _ 8: "Microsoft.Jet.OLEDB.4.0;" & _ 9: "Data Source=c:\ASPNET\data\banking.mdb" 10: dim objConn as new OleDbConnection(strConnString) 11: 12: sub Page_Load(Sender as Object, e as EventArgs) 13: FillDataGrid() 14: end sub 15: 16: sub FillDataGrid 17: 'open connection 18: dim objCmd as OleDbCommand = new OleDbCommand _ 19: ("select * from tblUsers", objConn) 20: dim objReader as OleDbDataReader 21: 22: try 23: objCmd.Connection.Open() 24: objReader = objCmd.ExecuteReader 25: catch ex as OleDbException 26: lblMessage.Text = "Error retrieving from the " & _ 27: "database." 28: end try 29: 30: DataGrid1.DataSource = objReader 31: DataGrid1.DataBind() 32: 33: objReader.Close 34: objCmd.Connection.Close() 35: end sub 36: </script> 37: 38: <html><body> 39: <form runat="server"> 40: <asp:Label runat="server" /> 41: 42: <asp:DataGrid runat="server" 43: BorderColor="black" GridLines="Vertical" 44: cellpadding="4" cellspacing="0" 45: width="100%" Font-Name="Arial" 46: Font-Size="8pt" 47: HeaderStyle-BackColor="#cccc99" 48: ItemStyle-BackColor="#ffffff" 49: AlternatingItemStyle-Backcolor="#cccccc" /> 50: </asp:DataGrid><p> 51: </form> 52: </body></html>  | This listing connects to the user database we created on Day 8, "Beginning to Build Databases" (and modified in Week 2 in Review, "Bonus Project 2"). On lines 7 and 10, you create your connection string and OleDbConnection object. In the Page_Load event, you call the FillDataGrid method, which pulls information from the database and binds it to the DataGrid on lines 42 50. This listing produces the output shown in Figure 19.4 when viewed from the browser. |
Figure 19.4. A simple data-driven ASP.NET page.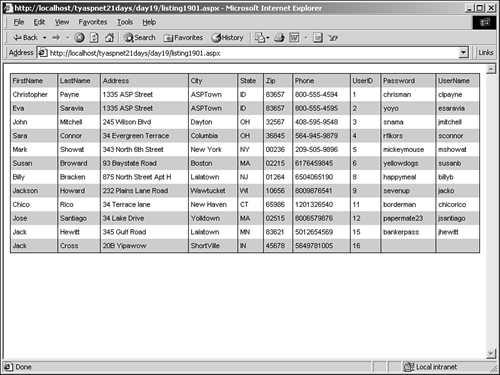
Now let's build your code-behind form using Listing 19.1 as a starting point. First, you need to create a VB.NET (or C#) class that derives from the System.Web.UI.Page class, as shown in the following code snippet: Imports System Imports System.Web Imports System.Web.UI Imports System.Web.UI.WebControls Imports System.Data Imports System.Data.OleDb Public Class CodeBehind1 : Inherits Page 'insert code here End Class This will be the basis for moving the code within the script block out of Listing 19.1. Recall that in VB.NET and C# classes, you have to manually import all the namespaces that were automatically imported by ASP.NET. You also have to import the System.Data and System.Data.OleDb namespaces because your ASP.NET page uses them to display data. The next step is to create all the public variables you need. Because of the nature of code-behind forms, this process is a bit different than what you're used to. Let's examine it further. The code-behind class will be used to control the UI (that is, the Web form); it contains the logic that handles UI events. However, the code-behind class doesn't contain any UI elements itself the UI is contained in the .aspx file. This leaves you with a problem. The code-behind form must control a UI that is located in a separate file. How can you accomplish this? Now you see the reason that the ASP.NET file derives from the code-behind class: If you declare all the appropriate UI elements in the code-behind, the .aspx file can inherit them. In essence, the code-behind creates and provides logic for all the UI elements, but it doesn't display them. The ASP.NET file is responsible for that part. Figure 19.5 illustrates this concept. Figure 19.5. The code-behind declares UI elements and their logic, whereas the ASP.NET page simply displays them.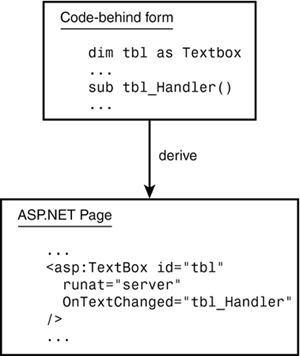
Let's move the code from Listing 19.1 into a code-behind form, as shown in Listings 19.2 and 19.3. Listing 19.2 The Code-Behind Containing All UI Functionality 1: Imports System 2: Imports System.Web 3: Imports System.Web.UI 4: Imports System.Web.UI.WebControls 5: Imports System.Data 6: Imports System.Data.OleDb 7: 8: Public Class Listing1903 : Inherits Page 9: 'declare public variables for .aspx file to inherit 10: public lblMessage as Label 11: public DataGrid1 as DataGrid 12: 13: 'declare connection 14: private strConnString as string = "Provider=" & _ 15: "Microsoft.Jet.OLEDB.4.0;" & _ 16: "Data Source=c:\ASPNET\data\banking.mdb" 17: private objConn as new OleDbConnection(strConnString) 18: 19: sub Page_Load(Sender as Object, e as EventArgs) 20: if Not Page.IsPostBack then 21: FillDataGrid() 22: end if 23: end sub 24: 25: private sub FillDataGrid 26: 'open connection 27: dim objCmd as OleDbCommand = new OleDbCommand _ 28: ("select * from tblUsers", objConn) 29: dim objReader as OleDbDataReader 30: 31: try 32: objCmd.Connection.Open() 33: objReader = objCmd.ExecuteReader 34: catch ex as OleDbException 35: lblMessage.Text = "Error retrieving from the " & _ 36: "database." 37: end try 38: 39: DataGrid1.DataSource = objReader 40: DataGrid1.DataBind() 41: 42: objReader.Close 43: objCmd.Connection.Close() 44: end sub 45: 46: End Class Listing 19.2.Cs The Code-Behind Containing All UI Functionality in C# 1: using System; 2: using System.Web; 3: using System.Web.UI; 4: using System.Web.UI.WebControls; 5: using System.Data; 6: using System.Data.OleDb; 7: 8: public class Listing1903 : Page { 9: //declare public variables for .aspx file to inherit 10: public Label lblMessage; 11: public DataGrid DataGrid1; 12: 13: //declare connection 14: private OleDbConnection objConn = new OleDbConnection ("Provider=Microsoft.Jet.  OLEDB.4.0;Data Source= C:\\ASPNET\\data\\banking.mdb"); 15: 16: void Page_Load(Object Sender, EventArgs e) { 17: if (!Page.IsPostBack) { 18: FillDataGrid(); 19: } 20: } 21: 22: private void FillDataGrid() { 23: FillDataGrid(-1); 24: } 25: 26: private void FillDataGrid(int EditIndex) { 27: //open connection 28: OleDbCommand objCmd = new OleDbCommand ("select * from tblUsers", objConn); 29: OleDbDataReader objReader; 30: 31: try { 32: objCmd.Connection.Open(); 33: objReader = objCmd.ExecuteReader(); 34: 35: DataGrid1.DataSource = objReader; 36: DataGrid1.DataBind(); 37: 38: objReader.Close(); 39: } catch (OleDbException ex) { 40: lblMessage.Text = "Error retrieving from the database."; 41: } 42: 43: objCmd.Connection.Close(); 44: } 45: 46: }s OLEDB.4.0;Data Source= C:\\ASPNET\\data\\banking.mdb"); 15: 16: void Page_Load(Object Sender, EventArgs e) { 17: if (!Page.IsPostBack) { 18: FillDataGrid(); 19: } 20: } 21: 22: private void FillDataGrid() { 23: FillDataGrid(-1); 24: } 25: 26: private void FillDataGrid(int EditIndex) { 27: //open connection 28: OleDbCommand objCmd = new OleDbCommand ("select * from tblUsers", objConn); 29: OleDbDataReader objReader; 30: 31: try { 32: objCmd.Connection.Open(); 33: objReader = objCmd.ExecuteReader(); 34: 35: DataGrid1.DataSource = objReader; 36: DataGrid1.DataBind(); 37: 38: objReader.Close(); 39: } catch (OleDbException ex) { 40: lblMessage.Text = "Error retrieving from the database."; 41: } 42: 43: objCmd.Connection.Close(); 44: } 45: 46: }s  | Save this file as listing1903.vb or listing1903.cs. On lines 1 6, you import the necessary namespaces, and on line 8 you declare your code-behind class. Note that its name is Listing1903 and that it derives (that is, inherits) from the Page class. We use this name because this code-behind will be inherited by listing1903.aspx in a moment. Naming your code-behind the same name (minus, of course, the extension) as the ASP.NET page that inherits from it is a good coding convention that will help you keep things straight. |
Remember from Listing 19.1 that you used two server controls: a label named lblMessage and a DataGrid named DataGrid1. These controls are declared as variables on lines 10 and 11 here. Now your ASP.NET page can inherit these controls, as well as any functionality that goes along with them. The rest of the file is the same as Listing 19.1, except that there is no HTML here. Let's look at the .aspx file that will inherit from this code-behind, shown in Listing 19.3. Listing 19.3 Inheriting from the Code-Behind Class 1: <%@ Page Inherits="Listing1903" src="/books/4/226/1/html/2/Listing1903.vb" %> 2: 3: <html><body> 4: <form runat="server"> 5: <asp:Label runat="server" /> 6: 7: <asp:DataGrid runat="server" 8: BorderColor="black" GridLines="Vertical" 9: cellpadding="4" cellspacing="0" 10: width="100%" Font-Name="Arial" 11: Font-Size="8pt" 12: HeaderStyle-BackColor="#cccc99" 13: ItemStyle-BackColor="#ffffff" 14: AlternatingItemStyle-Backcolor="#cccccc" 15: AutoGenerateColumns="True" /> 16: </asp:DataGrid><p> 17: </form> 18: </body></html> Save this listing as listing1903.aspx in the same directory as your code-behind file.  | With the exception of line 1, this listing is the same as the HTML portion of Listing 19.1. Line 1 has something new: The @ Page directive now has the attributes Inherits and src. Inherits specifies the class from which this page derives. In this case, you want to derive from the code-behind class you just created, Listing1903. The src attribute specifies the path of the file containing the code-behind class (which means that you aren't required to place the code-behind and the .aspx file in the same directory). That's all there is to it! Request this listing from the browser, and you should see the same output shown in Figure 19.4. Note that you can replace the src attribute on line 1 with Listing1903.cs and the page will work exactly the same way, without needing to convert your code to C#. |
The DataGrid and Label server controls in Listing 19.3 are instances of the Listing1903 class variables declared in Listing 19.2. Thus, although it's not shown here, any code in the code-behind that refers to these variables will have full access to the properties of the control instances on the Web form, such as the text contained in the label. Let's look at an example that handles form events. This time, you'll create both files from scratch. Listing 19.4 shows the ASP.NET page that holds the UI. Note You can still create UI elements and logic within your ASP.NET page; there's no requirement that all the code must be in a code-behind form, and code-behind doesn't disallow inclusion of UI elements. You can also add code in an .aspx file to control a UI element declared in your code-behind. However, why add code to your ASP.NET page if you already have a code-behind?
Listing 19.4 An .aspx File Without Any ASP.NET Code 1: <%@ Page Inherits="Listing1904" src="/books/4/226/1/html/2/Listing1904.vb" %> 2: 3: <html><body> 4: <form runat="server"> 5: <asp:Calendar runat="server" 6: OnSelectionChanged="DateChanged" 7: Cellpadding="5" Cellspacing="5" 8: DayHeaderStyle-Font-Bold="True" 9: DayNameFormat="Short" 10: Font-Name="Arial" Font-Size="12px" 11: height="250px" 12: NextPrevFormat="ShortMonth" 13: NextPrevStyle-ForeColor="white" 14: SelectedDayStyle-BackColor="#ffcc66" 15: SelectedDayStyle-Font-Bold="True" 16: SelectionMode="DayWeekMonth" 17: SelectorStyle-BackColor="#99ccff" 18: SelectorStyle-ForeColor="navy" 19: SelectorStyle-Font-Size="9px" 20: ShowTitle="true" 21: TitleStyle-BackColor="#ddaa66" 22: TitleStyle-ForeColor="white" 23: TitleStyle-Font-Bold="True" 24: TodayDayStyle-Font-Bold="True" /> 25: </form> 26: You selected: 27: <asp:Label runat="server"/> 28: </body></html> This listing contains a calendar server control and a label. Although you haven't created the code-behind file yet, line 1 already specifies a class and filename, so you'll know ahead of time what to create. On line 6, you provide a handler for the SelectionChanged event of the calendar. Also note the names of the two controls: Calendar1 and lblMessage. If you try to request this page by itself, it will result in an error for two reasons. The first is that ASP.NET will look for the code-behind specified in the Inherits attribute of the @ Page directive, but won't find it. The second reason is that the SelectionChanged event handler is specified as DateChanged, but there isn't a DateChanged method in this file. Let's create the code-behind to remedy these problems, as shown in Listings 19.5 and Listing 19.5.cs. Listing 19.5 Controlling the Calendar's Events 1: Imports System 2: Imports System.Web 3: Imports System.Web.UI 4: Imports System.Web.UI.WebControls 5: 6: Public Class Listing1904 : Inherits Page 7: public lblMessage as Label 8: public Calendar1 as Calendar 9: 10: Public sub Page_Load(Sender as Object, e as EventArgs) 11: if not Page.IsPostBack then 12: Calendar1.SelectedDate = DateTime.Now 13: lblMessage.Text = Calendar1.SelectedDate. _ 14: ToString("dddd, MMMM dd yyyy") 15: end if 16: End Sub 17: 18: Public sub DateChanged(Sender as Object, e as EventArgs) 19: if Calendar1.SelectedDates.Count > 1 then 20: lblMessage.Text = Calendar1.SelectedDates(0). _ 21: ToString("dddd, MMMM dd yyyy") & " through " & _ 22: Calendar1.SelectedDates(Calendar1. _ 23: SelectedDates.Count - 1). _ 24: ToString("dddd, MMMM dd yyyy") 25: else 26: lblMessage.Text = Calendar1.SelectedDate. _ 27: ToString("dddd, MMMM dd yyyy") 28: end if 29: End Sub 30: End Class Listing 19.5.cs Controlling the Calendar's Events in C# 1: using System; 2: using System.Web; 3: using System.Web.UI; 4: using System.Web.UI.WebControls; 5: 6: public class Listing1904 : Page { 7: public Label lblMessage; 8: public Calendar Calendar1; 9: 10: public void Page_Load(Object Sender, EventArgs e) { 11: if (!Page.IsPostBack) { 12: Calendar1.SelectedDate = DateTime.Now; 13: lblMessage.Text = Calendar1.SelectedDate. ToString("dddd, MMMM dd yyyy"); 14: } 15: } 16: 17: public void DateChanged(Object Sender, EventArgs e) { 18: if (Calendar1.SelectedDates.Count > 1) { 19: lblMessage.Text = Calendar1.SelectedDates[0]. ToString("dddd, MMMM dd  yyyy") + " through " + Calendar1.SelectedDates[Calendar1.SelectedDates.Count - 1]. yyyy") + " through " + Calendar1.SelectedDates[Calendar1.SelectedDates.Count - 1].  ToString("dddd, MMMM dd yyyy"); 20: } else { 21: lblMessage.Text = Calendar1.SelectedDate. ToString("dddd, MMMM dd yyyy"); 22: } 23: } 24: }s ToString("dddd, MMMM dd yyyy"); 20: } else { 21: lblMessage.Text = Calendar1.SelectedDate. ToString("dddd, MMMM dd yyyy"); 22: } 23: } 24: }s  | Save this file as Listing1904.vb and Listing1904.cs. On line 6, you declare this code-behind class as Listing1904, which was specified earlier by the ASP.NET page. On lines 7 and 8, you create two public variables, lblMessage and Calendar1. Recall that these are the same names used for the controls in the .aspx file. On lines 10 16, the Page_Load event sets the calendar's selected date to today, and displays a message to the user in the label. Finally, the DateChanged method on line 18 is the event handler for the calendar's SelectionChanged event, as specified on line 6 of Listing 19.4. This method displays the date in long format to the user. If more than one day is selected (as specified by the SelectedDates.Count property), you want to alert the user that he's selected a range of dates (lines 19 24). Otherwise, you simply display the selected date (line 26). Viewing Listing 19.4 now produces the output shown in Figure 19.6. |
Figure 19.6. The code-behind form handles the events of the ASP.NET page.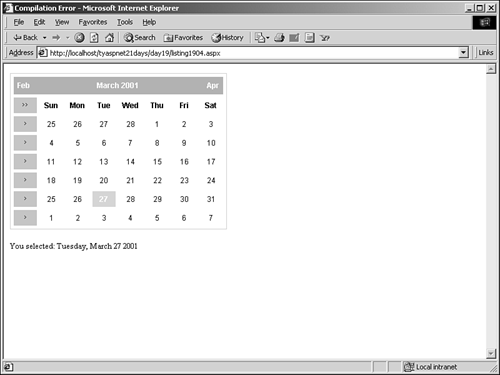
Now you can completely separate your Web form's code from its presentation layer! Using Code-Behind in User Controls Using code-behind forms with user controls differs from using them with ASP.NET pages. Specifically, you must derive from the System.Web.UI.UserControl class instead of the Page class (see Day 6, "Learning More About Web Forms," for more information on user controls). Listings 19.6 through 19.8 show a modification of the calculator you developed in Day 2 as a user control with a code-behind form. Listing 19.6 The User Control 1: <%@ Control Inherits="CalculatorControl" src="/books/4/226/1/html/2/Calculator.vb" %> 2: 3: Number 1: <asp:textbox runat="server"/><br> 4: Number 2: <asp:textbox runat="server"/><p> 5: <asp:button runat="server" Text="+" 6: OnClick="btOperator_Click" /> 7: <asp:button runat="server" Text="-" 8: OnClick="btOperator_Click"/> 9: <asp:button runat="server" Text="*" 10: OnClick="btOperator_Click"/> 11: <asp:button runat="server" Text="/" 12: OnClick="btOperator_Click"/><p> 13: The answer is: 14: <asp:label runat="server"/>  | Save this listing as Calculator.ascx. This is a straightforward user control. It simply provides the HTML to display a couple text boxes for users to enter values, four buttons to perform arithmetic operations, and a label to display the answer. You use the @ Control directive on line 1 instead of the @ Page directive you used with ASP.NET pages, but the syntax is still the same: You use the Inherits and src attributes to specify your code-behind file. Take note of the names of each control because you'll have to use them in your code-behind form. Listing 19.7 shows the code-behind file for this user control. |
Listing 19.7 The Code-Behind Class 1: Imports System 2: Imports System.Web 3: Imports System.Web.UI 4: Imports System.Web.UI.WebControls 5: 6: Public Class CalculatorControl : Inherits UserControl 7: public lblMessage as Label 8: public btAdd as Button 9: public btSubtract as Button 10: public btMultiply as Button 11: public btDivide as Button 12: public tbNumber1 as TextBox 13: public tbNumber2 as TextBox 14: 15: Sub btOperator_Click(Sender as Object, e as EventArgs) 16: lblMessage.Text = Operate(CType(Sender, Button).Text, _ 17: tbNumber1.Text, tbNumber2.Text).ToString 18: End Sub 19: 20: private function Operate(operator as string, number1 as string, optional  number2 as string = "1") as double 21: select case operator 22: case "+" 23: Operate = CDbl(number1) + CDbl(number2) 24: case "-" 25: Operate = CDbl(number1) - CDbl(number2) 26: case "*" 27: Operate = CDbl(number1) * CDbl(number2) 28: case "/" 29: Operate = CDbl(number1) / CDbl(number2) 30: end select 31: end function 32: End Class number2 as string = "1") as double 21: select case operator 22: case "+" 23: Operate = CDbl(number1) + CDbl(number2) 24: case "-" 25: Operate = CDbl(number1) - CDbl(number2) 26: case "*" 27: Operate = CDbl(number1) * CDbl(number2) 28: case "/" 29: Operate = CDbl(number1) / CDbl(number2) 30: end select 31: end function 32: End Class  | Save this listing as Calculator.vb. The functionality here is a bit more complex than in Listing 19.5, but the format is the same. You import the necessary namespaces on lines 1 4. On line 6, you declare your class, CalculatorControl, which inherits from the UserControl class (not the Page class). Then on lines 7 13, you declare public variables that correspond to the server controls in your user control. |
When a user clicks one of the buttons in the user control, the btOperator_Click event handler is executed. It calls the Operate method, which takes three parameters: the operation to perform, and the two numbers to perform the operation on. The button that caused the event will be represented by the obj variable in line 15 when the page is requested. Take a look at the first parameter of the Operate method, shown on line 16: CType(Sender, Button).Text This parameter retrieves the Text property from the button that fired the event (for example, if the user clicked the Add button, this value would be +). If this were in an ASP.NET page, you could simply use Sender.Text to retrieve this value. However, VB.NET and C# classes act a bit differently than ASP.NET pages. Specifically, they don't allow late binding.  | Late binding means that variables that are of type Object (as Sender is) are not processed until runtime. Until then, you can use them to represent any type of object you want, which is why you can use Sender.Text even though the Object data type doesn't have a Text property. ASP.NET won't balk at this because it knows that when the page is requested, the Sender variable might become a Button (if it doesn't, you might have problems). |
Without late binding, the Object data type is processed immediately, and the compiler will throw an error when it realizes that you've tried to access a property that isn't there (Object does not have a Text property). Therefore, you have to make VB.NET or C# believe that Sender is indeed a button, even before the page is requested, so that you can access the Text property with your code. The CType method casts one data type into another, and on line 16, you cast a variable of type Object into one of type Button. This seems like a rather convoluted solution, but after you develop more examples and learn about late binding, it'll all become clearer. The Operate method, on lines 20 31, analyzes the operator passed to it by the btOperator_Click method with a select case statement. Depending on the operator, a different operation is performed on the two numbers. The value is then returned to btOperator_Click and displayed to the user. Finally, let's take a look at the short ASP.NET page that implements this user control, shown in Listing 19.8. Listing 19.8 The ASP.NET Page That Implements the User Control and Code-Behind Form 1: <%@ Register TagPrefix="TYASPNET" TagName="Calculator" src="/books/4/226/1/html/2/Calculator.ascx" %> 2: 3: <html><body> 4: <form runat="server"> 5: <TYASPNET:Calculator runat="server"/> 6: </form> 7: </body></html>  | This page is straightforward. Recall from Day 6 that you must use the @ Register directive to register a user control on your pages. Then you may use the control just as any other server control, as is done on line 5. View this page from the browser, and try entering some values and performing some operations. You should see something similar to Figure 19.7. |
Figure 19.7. The code-behind form handles the events of the user control on the ASP.NET page.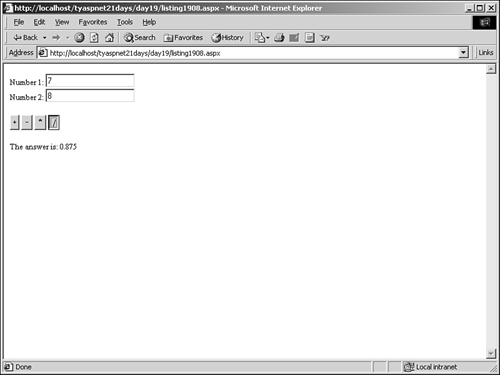
Code-Behind Recommendations Once you understand the process model behind code-behind forms, they become easy to use. They just require a bit more planning up front to build your pages which can be a good thing. In general, if your pages are at all complex, you'll want to move into code-behind forms. This by no means is required, but it will help you down the road by keeping complex code separate from HTML content; the final choice on whether or not to use code-behind is a personal choice. Code-behind forms become more important as you have more and more people working on a single site especially those who have different areas of expertise. You can let your HTML people build the UI for your pages, while you build the actual functionality. Even better, if the layout of the page needs to change, but the functionality stays the same, no one else has to look at your ASP.NET code. We've avoided code-behind forms throughout this book because it's easier to present code that resides in a single file. In real life, however, code-behind forms are your friend.s |