Flylib.com

Books Software


Recipe 14.28. Adding Pop-up Help to Controls


Recipe 14.28. Adding Pop-up Help to Controls

Problem

Dialog boxes in Windows applications support pop-up help on controls. On such forms, clicking the question-mark button in the upper-right corner of the form and then clicking on a form control displays a tooltip-like message describing the use of the control. (See Figure 14-27 for an example.) You want to add a similar feature to controls on your form.

Figure 14-27. Pop-up help for a control
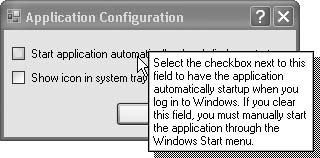
Solution

Sample code folder: Chapter 14\PopupHelp

Include a HelpProvider control on your form, and use it to enable the pop-up help.

Discussion

Create a new Windows Forms application, and add a Button control to the form. We'll add pop-up help to this button. Next, add a HelpProvider control to the form, which you'll find in the Components part of the Windows Forms Toolbox. This control (HelpProvider1) appears in the off-form area of the designer.

Change the form's HelpButton property to TRue . The button won't appear yet because it only appears when the Minimize and Maximize buttons are hidden. Set both the MinimizeButton and MaximizeButton properties to False to make the help button appear. You'll see the standard Windows question-mark button.

To set the help message for the Button control, select it on the form. One of the control's properties is HelpString on HelpProvider1 , which appears indirectly through the HelpProvider1 control. Add some text to this property.

To view the pop-up help, run the program, click on the question-mark button, and then click on the Button control. The pop-up help will appear until you click some-where else.

The HelpProvider control also supports more standard online help methods . It can display help through a web page that appears when the user presses the F1 key from anywhere on the form. It can also display online help through a compiled HTML Help 1.x ( .chm ) file.

To enable web-page-based help, add a HelpProvider control to your form, and change its HelpNamespace property to any valid web page.

To display help through HTML Help files, set the HelpProvider control's HelpNamespace property to the help-file path . Change the form's HelpKeyword on HelpProvider1 property (the name may vary based on the name you gave to the help provider control) to the name of the page within the compiled file as defined by your HTML Help editing tool. An example may be html/EditorPage.htm . Also change the form's HelpNavigator on HelpProvider1 property to Topic .

The HelpNavigator on HelpProvider1 property includes other methods with which you can access compiled help pages. For instance, the TableOfContents and Index values, when used, bring up the Table of Contents page and the Index page for the online help, respectively.


Recipe 14.29. Maintaining User -Specific Settings Between Uses of an Application

Problem

The user of your application is allowed to configure certain aspects of the application to suit her preferences. You would like to save these per-user settings so that the application uses them the next time it is run.

Solution

Sample code folder: Chapter 14\UserSettings

Use the My.Settings feature of Visual Basic to enable user-and application-specific settings.

Discussion

This recipe's sample code remembers the position of the form on the screen from one use to the next, and it also displays the name of the last user, which it retains in local settings.

Create a new Windows Forms application. Add a Button control named ActPrefs , and set its Text property to Preferences … Then add a Label control named UserName , and set its Text property to Your name is not set . and its UseMnemonic property to False . Adjust the form to look like Figure 14-28.

Figure 14-28. Controls on the user preferences sample

Open the Project Properties window, and select the Settings tab. This panel presents a grid of user-specific and application-specific settings. By filling in the grid, you automatically add settings that you can use in your application to retain user-preferred changes. Add two settings rows to this grid:

  • Add a setting named PrefsUserName , and leave its Type as String .

  • Add a setting named MainFormLocation , and select System.Drawing.Point for its Type.

Leave the Scope for both settings as User , and don't provide any Value column data. Close the Project Properties window and return to the form.

Add the following source code to the form's code template:

Private Sub ActPrefs_Click(ByVal sender As System.Object, _
	      ByVal e As System.EventArgs) Handles ActPrefs.Click
	   ' ----- Prompt the user to change his/her preferred name.
	   Dim newName As String

	   newName = InputBox("Enter your name.")
	   If (newName.Trim( ) <> "") Then
	      ' ----- Save the user's preferences.
	      My.Settings.PrefsUserName = newName.Trim
	      UserName.Text = "Your name is " & newName.Trim & "."
	   End If
	End Sub

	Private Sub Form1_Load(ByVal sender As System.Object, _
	      ByVal e As System.EventArgs) Handles MyBase.Load
	   ' ----- Display the user-defined name, if available.
	   If (My.Settings.PrefsUserName <> "") Then
	      UserName.Text = "Your name is " & _
	         My.Settings.PrefsUserName & "."
	   End If
	End Sub

Return to the Form Designer, and select the form. Expand the form's (ApplicationSettings) property, and change the Location subproperty to MainFormLocation .

If Location does not appear as a subproperty, select the (PropertyBinding) subproperty and click its "…" button. On the Application Settings form that appears, locate Location in the list, and set its second column to MainFormLocation . Finally, click OK.


Run the program to test it. Each time you exit and restart the program, it remembers where you moved the form on the display. If you click the Preferences button and enter your name when prompted, it also remembers this setting the next time the program runs.

The My.Settings object is new in Visual Basic 2005. It provides a standard way to manage user-and application-specific settings. Each time the program exits, it saves any settings changes to an XML file, and it reads in that same file the next time the program runs. The exact location of this file varies, but its default location in Windows XP is:

C:\Documents and Setting\<username>\Local Settings\
	   Application Data\<projectname>\<specialhash>\
	   <version>\user.config

Application-specific settings, although not used in this sample program, are stored in an app.config file in the folder that contains your application assembly. Application-specific settings cannot be modified through the running application; you can only change them by changing the app.config file.