Recipe 9.24. Creating Odd-Shaped Forms and Controls
ProblemYou're tired of the plain rectangular forms and controls. You want to use irregular shapes for your form and the controls included on it. SolutionSample code folder: Chapter 09\IrregularShapes Use a GraphicsPath object to define the new drawing and clipping region for the form and controls. This recipe's code uses an ellipse to define the boundaries of a form and a control. DiscussionCreate a new Windows Forms application, and add a Button control named ActClose. Set its Text property to Close, and put the button somewhere in the middle of the form. Then add the following source code to the form's class template: Private Sub ActClose_Click(ByVal sender As System.Object, _ ByVal e As System.EventArgs) Handles ActClose.Click ' ----- Close the form. Me.Close() End Sub Private Sub Form1_Load(ByVal sender As System.Object, _ ByVal e As System.EventArgs) Handles MyBase.Load ' ----- Change the shape of the form and button. Dim finalShape As Region Dim shapePath As Drawing2D.GraphicsPath ' ----- Reshape the form. shapePath = New Drawing2D.GraphicsPath() shapePath.AddEllipse(0, 0, Me.Width, Me.Height) finalShape = New Region(shapePath) Me.Region = finalShape shapePath.Dispose() ' ----- Reshape the button. shapePath = New Drawing2D.GraphicsPath() shapePath.AddEllipse(0, 0, ActClose.Width, ActClose.Height) finalShape = New Region(shapePath) ActClose.Region = finalShape shapePath.Dispose() End Sub When you run the program, both the form and the button appear with elliptical shapes. Figure 9-34 shows the form in use. We left the Visual Studio view of the source code in the background so that you can see the nonrectangular shape of the form. Figure 9-34. An irregularly shaped form and button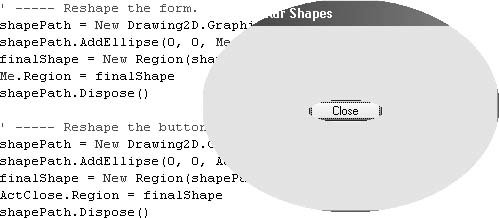 So what shapes can you use? If you can build it into a GraphicsPath object, you can use it to define the boundaries of your form or control. Replacing the form or control's Region property results in a new clipping region for the form (the clipping region is the area outside which the form is not drawn; it's not just hidden, it actually doesn't exist). Since the new region indicates only which portions of the form are drawn or not, you'll find that any normal form or control components that reside only partially within the clipping region will appear cut off. Unfortunately, the result can be some-what ugly. For example, the elliptical button created by this recipe's sample code doesn't look very good because portions of the original rectangular border still appear. You can also still see small portions of the form border. In addition to providing a custom region, you may want to provide custom drawing code for the control or form in its Paint event handler. For forms, setting the FormBorderStyle to None lets you supply your own form border. Another way to change the shape of a form is by making a portion of the form invisible. This is done by setting a specific form color to the invisible color using the form's transparencyKey property. See AlsoRecipe 9.10 shows how to use transparency to make a portion of a form invisible. |
EAN: 2147483647
Pages: 400