| System administrators need to check the Windows Update Web site frequently to obtain the latest security patches and operating system stability fixes. Microsoft's Windows Update Web site automates the process by scanning your hard drive for previous installed patches before displaying a list of the latest recommended patches. Administrators, however, must still download and test the latest patches before manually distributing and applying them to client computers.  | Traditional enterprise software tools, such as Microsoft's Systems Management Server (SMS), are also used to update clients ' computers. If you're using electronic software distribution solutions for complete software management, Microsoft recommends that you continue to do so. SUS is not a replacement for SMS or Microsoft Group Policybased software. |
Many companies implement policies to prevent users from browsing the Internet for software updates. The Software Update Service (SUS) provides a solution to the problem of managing and deploying Windows patches by dynamic notification of critical updates, at scheduled times, to Windows client computers. Updates can be tested by the administrator and then scheduled to automatically update selected client computers. Large companies can use a centralized distribution point SUS server to deploy updates to other servers. Updates include security fixes, critical updates, and critical driver updates. SUS is installed on a Windows 2000 (SP2 or later) or Windows Server 2003 inside the company's firewall. After it's installed, the SUS server downloads all critical updates and security roll-ups when they're posted to the Windows Update Web site. After the download completes, a blue globe icon appears in the taskbar tray with a message informing you that the updates are ready to be installed. The administrator also has the option of receiving email notification when new updates are posted. SUS contains the following features: -
Software Update Services server The SUS server on your internal intranet synchronizes with the Windows Update Web site whenever new critical updates for Windows 2000, Windows 2003, or Windows XP computers are available. Administrators can perform the synchronization manually or automatically. After all updates are downloaded to your SUS server, you can test and decide which updates you want to publish to the client computers. SUS server is supported for Windows 2000 Server (SP2 or later) and the Windows Server 2003 family. -
Automatic Updates client This client component is usually configured to connect to your SUS server for updates. Administrators can control which clients connect and can also schedule when to deploy the critical updates, either manually or by using Active Directory Service Group Policy. The Automatic Updates client software is automatically installed when you install Windows Server 2003, Windows 2000 Server (SP3 or later), Windows 2000 Professional (SP3 or later), or Windows XP Professional and Home Editions (SP1 or later). | | The Automatic Updates client software is supported and available for the following: -
Windows 2000 Professional with Service Pack 2 -
Windows 2000 Server with Service Pack 2 -
Windows 2000 Advanced Server with Service Pack 2 -
Windows XP Professional Clients can obtain the Automatic Updates client at http://www.microsoft.com/windows2000/downloads/recommended/susclient/default.asp |
Installing and Configuring SUS on a Server The minimum configuration requirements are as follows : -
Pentium III 700MHz or higher processor -
512MB of RAM -
6GB of free hard disk space -
Internet Explorer (IE), version 5.5 or higher -
Internet Information Server (IIS) installed Perform the following steps to install SUS with default settings: -
Download the SUS package. Using IE version 5.5 or higher, browse to the following Web site and download the Software Update Services setup package from the SUS page: http://www.microsoft.com/downloads/details.aspx?FamilyId=A7AA96E4-6E41-4F54-972C-AE66A4E4BF6C&displaylang=en. -
To install SUS SP1, double-click the SUS10sp1.exe file and click Next on the Welcome screen of the SUS Setup Wizard. Read and accept the End User License Agreement and click Next. -
Select Typical if you want to have all the defaults applied or select Custom to configure the SUS options now. Select Custom and click the Next button. -
You can store the updates locally or have clients update their files from a Microsoft Windows Update server. In the Update Storage section, select the Save the Updates to This Local Folder (by default, C:\SUS\content ) radio button and then click Next. -
By default, the All Available Languages radio button is selected, which results in more than 600MB of updates. If you don't need additional languages, select the English Only (about 150MB of updates) button. Select the Specific Languages radio button if you need to add additional languages. Select the English Only button and click Next (see Figure 7.7). Figure 7.7. You can conserve disk space by specifying a language on the Language Settings screen. 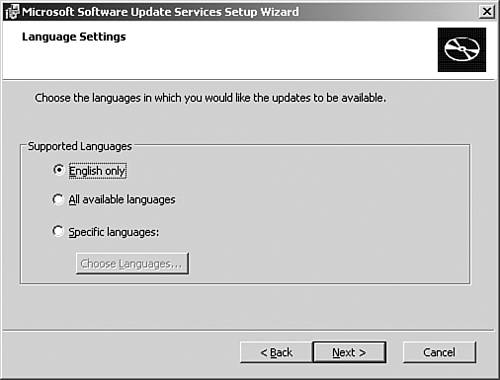 -
You can manually or automatically approve new versions. Select the Automatically Approve New Versions of Previously Approved Updates radio button and click Next to continue. -
The Ready to Install property page is displayed. Click the Install button to proceed. On the Installing Microsoft Software Update Service property page, SUS installs and applies the IIS lockdown tool to Windows 2000 SP2 Server, Advanced Server and earlier versions. Note the IIS lockdown tool is included with Windows 2000 Server (SP3 and later) and the Windows Server 2003 family. -
Click the Finish button to complete the installation. SUS setup adds a Start menu shortcut in the Administrative Tools folder and opens the SUS administration Web site in Internet Explorer at http://< yourservername >/SUSAdmin . | | You must be a local administrator on the SUS Server to install and view the Administration Web page. If you try to connect to the Administration Web site with a version of IE older than version 5.5, you'll see an error page reminding you to upgrade to IE 5.5 or later. If your network uses a proxy server to connect to the Internet, configure your proxy server settings on the SUS Administration Web page under the Select a Proxy Server configuration section. |
Configuring Client Automatic Updates To use the SUS server for updates, client computers must be running the updated Automatic Updates client. Windows 2000 Professional and Server (SP2 or earlier), and Windows XP Home and Windows XP Professional clients must update their operating system to use SUS. The update is available at http://www.microsoft.com/windows2000/downloads/recommended/susclient/default.asp. The administrator can configure Windows XP or Windows 2000 automatic client updates either by using the Automatic Updates tab in the System Properties dialog box of the System applet in the Control Panel or by connecting to a wizard after waiting at least 24 hours after connectivity to the update service has been established. The System Properties Automatic Updates tab configuration options are shown in Figure 7.8. Figure 7.8. You configure the Automatic Updates options in the System applet from the Control Panel. 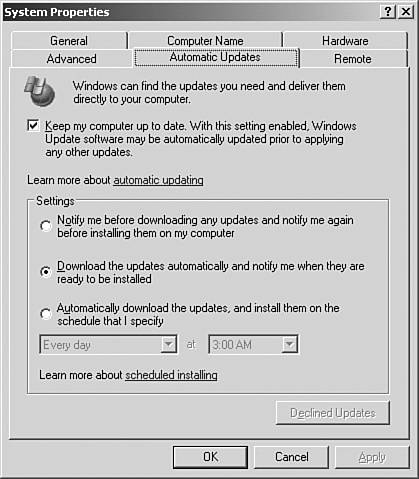 The following options are used to control how updates are applied: -
Notify before updates are downloaded and notify again before the updates are installed. -
Download the updates automatically and notify before the updates are installed. -
Download the updates automatically and install the updates based on a specified schedule.  | Know the difference between Windows Update and Automatic Updates. All Windows client computers and users can use Windows Update. The Automatic Updates service uses Windows Update to automatically obtain critical updates. |
Using Group Policy to Configure SUS Clients In a domain environment, using Group Policy is the preferred way of applying updates to your clients. Policies can also be configured using Windows NT 4 System Policy or by manually setting Registry keys.  | Remember that Active Directory Group Policy settings always take precedence over local group policies and user-defined options. |
To set up a group policy using Active Directory installed on Windows 2000 or Windows Server 2003, perform the following steps: -
Click Start, All Programs, Administrative Tools, Active Directory Users and Computers to open the Active Directory Users and Computers MMC interface. -
Right-click the OU or domain where you want to create the policy, and then click Properties. -
Click the Group Policy tab, and then click New. Type a name for your policy, and then click the Edit button. The Group Policy editor opens. -
Navigate to and expand the Computer Configuration folder. Right-click Administrative Templates, choose Add/Remove Templates, and then click Add. -
In the Policy Templates dialog box, select the wuau.adm template and click the Open button. Verify that your template has been added and then close the Add/Remove Templates dialog box. Note that steps 4 and 5 are not necessary on a Windows Server 2003. The wuau.adm is already installed, by default. -
Under Computer Configuration, expand the Administrative Templates folder, expand the Windows Components folder, and then select the Windows Update folder. Four policies that you can configure are displayed in the right pane: Configure Automatic Updates, Specify Intranet Microsoft Update Service Location, Reschedule Automatic Updates Scheduled Installations, and No Auto-Restart for Scheduled Automatic Updates Installations. -
Double-click Configure Automatic Updates and select the Enabled radio button. -
In the Configure Automatic Updates section, select one of the following options from the drop-down list box: -
Notify for Download and Notify for Install -
Auto Download and Notify for Install (default setting) -
Auto Download and Schedule the Install -
When you finish, click the Close button. -
Next, in the right pane, double-click Specify Your Intranet Microsoft Updates Service Location and select the Enabled radio button as shown in Figure 7.9. Figure 7.9. You can enable automatic updates via the Specify Intranet Microsoft Updates Service Location Properties screen. 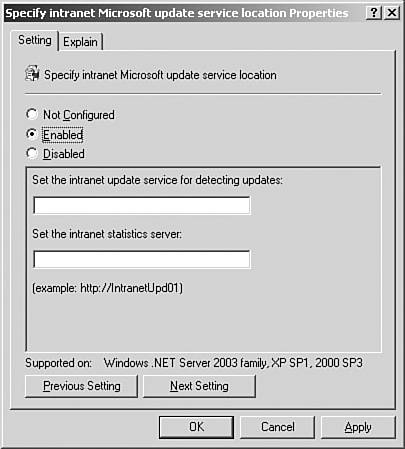 -
To specify a location for the SUS server that your Windows clients will be redirected to, type the URL in the Set the Intranet Update Service for Detecting Updates text box. Click the OK button when complete. Best Practices for Security Settings Follow these best practices for security settings to secure your network: -
Allow only administrators physical access to domain controllers -
Use the Principle of Least Privilege to perform administrative tasks -
Always test a new security policy before applying it to your network -
Remember the order of precedence when applying multiple security policies -
The account policy for your domain is the default domain policy -
Apply your security templates correctly -
When you configure Local Security Policy, use the proper tools -
Properly define groups and group memberships -
Properly secure data on computers -
Use complex or strong passwords throughout your organization -
Never download programs from untrusted sources -
Always run antivirus software and keep virus definitions up-to-date -
Always keep all software security fixes and patches up-to-date |
 |