-
You can add DNS during the installation of Windows Server 2003.
-
You can install DNS manually using the Add or Remove Programs applet, Add/Remove Windows Components in the Control Panel.
-
If you're setting up a domain controller (DC), another method is to install the Active Directory service. Because AD depends on DNS to operate , the AD Wizard searches for a DNS server. If the wizard doesn't find a DNS server, it installs DNS for you.
-
The Configure Your Server Wizard can be selected separately from the Administrative Tools menu. The Configure Your Server Wizard sets up various server roles, such as WINS, DHCP, or DNS for your server. You select the role; the wizard guides you through the rest of the installation.
-
You can also use the Manage Your Server Wizard interface that uses the Configure Your Server Wizard to set up server roles. Installing a DNS server using the Manage Your Server interface is straightforward.
-
Click Start, All Programs, Administrative Tools, Manage Your Server. The Manage Your Server window opens.
-
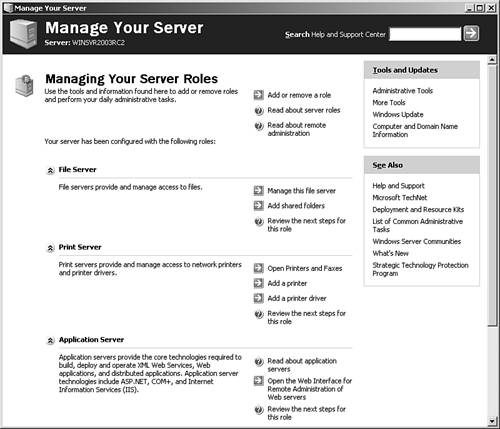
Also using the Configure Your Server Wizard, the Manage Your Server window component is all about managing various server roles. Server roles already defined are displayed in the left column, as shown in Figure 6.1.
Figure 6.1. The Manage Your Server window showing File Server, Print Server, and Application Server roles.
-
In the middle column, click the Add or Remove a Role button to start the Configure Your Server Wizard.
-
The Configure Your Server Wizard, Preliminary Steps dialog box opens and displays a list of reminders, such as making sure to attach all cables. Click the Next button to continue.
-
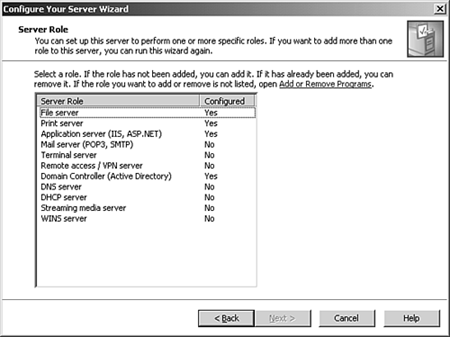
The wizard analyzes your server and displays a list of server roles with a Configured Yes or No status as shown in Figure 6.2.
Figure 6.2. The Configure Your Server Wizard, Server Roles dialog box.
-
Select the DNS Server role and click the Next button.
-
The Summary of Selections dialog box appears. Install DNS Server and run the Configure a DNS Server Wizard to configure DNS as listed in the Summary text box. Click the Next button to begin the installation process.
-
Setup begins. Note: You might be prompted for the Windows Server 2003 Installation CD-ROM. Click the OK button and insert your CD-ROM, and type in or browse to the location of the i386 folder installation files. Click the OK button to continue.
You might also receive the following prompt during the DNS installation: Internet Information Services (IIS) must be configured to enable Phone Book Service (PBS) requests. Click Yes to enable PBS requests . Click No to install PBS and IIS without enabling PBS. If you click No, you must manually configure IIS to accept PBS requests by using the IIS Security Wizard.
-
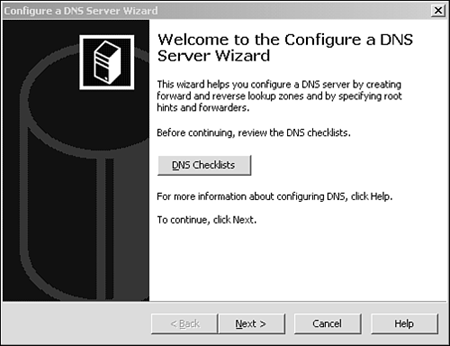
The Applying Selections dialog box displays in the background while the Configure a DNS Server Wizard Welcome screen displays in the foreground, as shown in Figure 6.3.
Figure 6.3. The Configure a DNS Server Wizard Welcome screen.
-
Notice the DNS Wizard configures both forward and reverse lookup zones along with specifying root hints and forwarders. You can also click the DNS Checklists button to review a checklist sorted by company size. Click the Next button to continue.
-
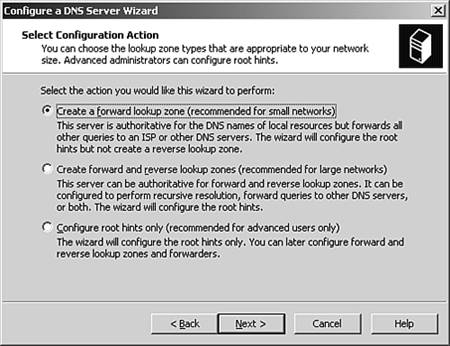
In the Select Configuration Action dialog box, you select the appropriate lookup zone types for your network as shown in Figure 6.4. For small networks, select the Create a Forward Lookup Zone radio button. For medium- and large- sized networks, select Create Forward and Reverse Lookup Zones. Select Configure Root Hints to configure just root hints. Choose an appropriate action and click the Next button to continue.
Figure 6.4. Select Configuration Action dialog box showing Create a Forward Lookup Zone selected.
-
If you choose the Create a Forward Lookup Zone option on the Primary Server Location screen, you can choose which DNS server will maintain your primary forward lookup zone. Your choices include either the server you're currently configuring or to have an ISP maintain the zone, with a read-only secondary copy residing on your server. Click the Next button to maintain the zone on the server that you're currently configuring.
-
At the Zone Name screen, you must provide a name for the zone for which the server will be authoritative . Type the name in the Zone Name field and click the Next button to continue.
-
At the Zone File screen, accept the default entry in the Create a New File with This File Name field to create the new zone file and click the Next button to continue.
-
At the Dynamic Updates screen, you can specify whether the new zone should accept zone updates and which types. Click the Next button to accept the default setting of Do Not Allow Dynamic Updates and continue with the DNS installation.
-
At the Forwarders screen, enter the IP address of another DNS server on your network that can be used to resolve DNS inquiries if this DNS server cannot provide an immediate answer to a client inquiry. Click the Next button to continue.
-
The Completing the Configure a DNS Server Wizard dialog box displays your settings for review. Click the Finish button. The Server Is Now a DNS Server dialog box appears. Click the Finish button. The Manage Your Server window now contains DNS as an added role. Close the Manage Your Server window.