| Networks today are becoming more difficult and complex to manage. System administrators often need access to their corporate wide area networks (WANs) from wherever they are. The Windows Server 2003 family includes many new remote access features that enable administrators to remotely manage their servers. The runas command, first introduced in Windows 2000, enables an administrator to perform a secondary logon that enables her to perform administrative tasks with a particular tool while still being primarily logged on as a typical user . New timesaving enhancements in Windows Server 2003 include the capability to create desktops shortcuts using the runas command. This chapter includes several methods used to connect to a remote server. One method is to use the improved MMC Routing and Remote Access (RRAS) snap-in tools. Another way is to use the Remote Desktop Connection (the new Terminal Services client) utility included with Terminal Server. Remote Desktop uses the new Remote Desktop Protocol (RDP) and displays the actual console session of a remote-accessed server. Configurations settings such as dynamically configuring the remote connection to match the available bandwidth and automatic reconnection improve the reliability of the administrator's remote session. Creating Desktop Shortcuts That Process the runas Command Administrators are always on the lookout for timesaving and more efficient ways to perform their duties . Administrators can remotely log in to their networks with administrative credentials using the runas command tool. Remote Computer Management and Active Directory Users and Computers management with administrative credentials can also be accomplished by using this tool. To create a desktop shortcut using the runas command, perform the following steps: -
Right-click an empty area on your desktop, choose New, and then click Shortcut. -
In the Create Shortcut Dialog box, type the location of the Item text box, and type runas along with the command parameters you want to use. See Table 4.1 for examples and parameters. -
Click the Next button, type a descriptive name for the shortcut, and click the Finish button. Table 4.1 shows some examples of the runas command. Table 4.1. Examples Using the runas Command | To Create a Shortcut To | Type | | A command prompt with administrative credentials | runas /user: ComputerName \administrator cmd | | Computer Management with administrative credentials | runas /user: ComputerName \administrator "mmc%windir%\system32\compmgmt.msc" | | AD Users and Computers with domain administrative credentials | runas /user: ComputerName \administrator "mmc%windir%\system32\dsa.msc" | | AD Users and Computers in another forest | runas /netonly /user: DomainName \UserName "mmc%windir%\system32\dsa.msc" | For example, if you want to connect to a remote server to perform computer management as administrator on a computer named winsvr2003rc2, you type the following in the Type the Location of the Item text box. The following syntax works if the domain or local machine name is winsvr2003rc2 : runas /user:winsvr2003rc2\administrator "mmc%windir%\system32\compmgmt.msc"  | The runas command isn't limited to just administrator accounts. Use this command when you're logged on as a member on another group . Also note that some programs do not support the runas command. |
 | When running the Microsoft Management Console (MMC), the user's credentials are not displayed. Exercise caution. |
Connecting to a Remote Server Using the MMC Snap-Ins Another method to remotely manage Windows 2000 Server and Windows Server 2003 is to use the Microsoft Management Console snap-in tools. Windows Server 2003 includes many built-in tools saved with an .msc extension. For example, Computer Management and AD Users and Computers are available in the Administrative Tools folder located in both the Control Panel and the Start, All Programs menu. To perform remote administrative management tasks on server computers using an MMC console, follow these steps: -
Click Start, click Run, type mmc in the Open text box, and then click OK. -
From the menu in the Console1 window, click File, Add/Remove Snap-in, and then click the Add button in the Add/Remove Snap-in dialog box. -
In the Add Standalone Snap-in dialog box, double-click the snap-in you want to use. For example, double-click the Computer Management snap-in. Figure 4.5 shows the resulting Computer Management dialog box with the Another Computer radio button selected. Figure 4.5. You can select another computer to manage via the Computer Management console. 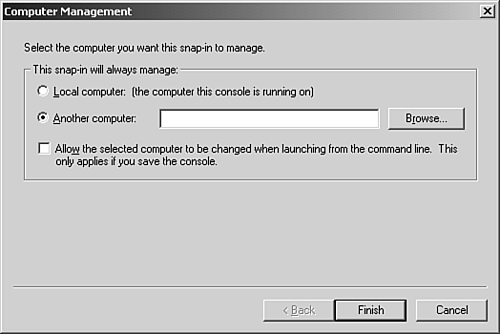 -
Click another computer, browse, or type the name of the server you want this snap-in to manage remotely, and click the Finish button. | | You can save typing time by clicking the Browse button that displays the Select Computer dialog box. Click the Locations button to display the entire directory. Next, expand the Entire Directory folder, select and expand the desired domain, select and expand either the Domain Controllers or Computers folders, and select the server you want to manage remotely. |
To perform remote administrative management tasks on server computers using a saved MMC console, perform the following steps: -
Click Start, Run, and type mmc in the Open text box. -
Select Open from the Console Programs menu. -
Browse to the folder that contains your saved console and then double-click the console to open. Connecting to a Remote Server Using the Remote Desktop Connection Utility Windows 2000 Terminal Services operates in either application mode or remote administration mode. In Windows 2003 Terminal Server, the remote administration mode is referred to as Remote Desktop for Administration . Terminal Services for Windows Server 2003 uses the Remote Desktop Protocol for communication to remotely display the actual console session of the remote server. New Remote Desktop Connection features include an improved user interface, the ability to easily switch between windowed and full-screen mode, and dynamic allocation of network bandwidth to match the client's remote session. The Remote Desktop Connection snap-in is used to manage Remote Desktop connections to the Windows 2003 family of server operating systems. This tool is an invaluable aid to administrators who manage several Windows 2000 or Windows 2003 servers or terminal servers. Administrators can easily switch between active server connections using the standard navigation tree in the Remote Desktop MMC snap-in.  | Make sure that you know the best tool to use for remotely managing servers. For managing and administering several servers, the Remote Desktop Connection utility is the best tool. The runas command-line utility is best used to manage one server and administer one activity when logged on to a user's PC. The MMC snap-in tools are best utilized to manage several activities on one server. |
Using a RDP client, such as Windows XP Professional, to connect to a terminal server includes the capability to use many of the local resources within the remote session, such as client file system, smart cards, audio, clipboard, printers (both local and network), and serial ports. This redirection of resources gives users many new advantages. To connect to a remote server using the Remote Desktop MMC snap-in utility in Windows 2003, perform the following steps: -
Click Start, All Programs, Administrative Tools, Remote Desktops. The Remote Desktops MMC console opens. -
In the left pane, right-click the Remote Desktops icon and select Add New Connection from the shortcut menu. Figure 4.6 shows the resulting Add New Connection dialog box. Figure 4.6. You can configure a remote server via the Add New Connection dialog box. 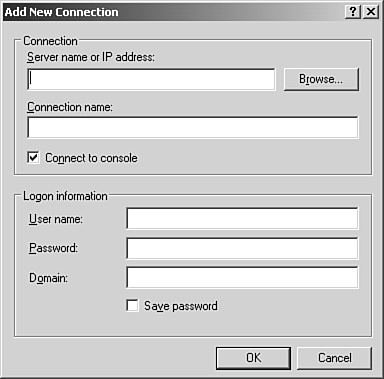 -
In the Add New Connection dialog box, type the terminal server name or IP address or click the Browse button. Type a meaningful connection name in the Connection Name text box. Make sure that the Connect to Console check box is checked. Enter your user logon name, password, and domain in the logon information text boxes, and click OK to continue. Server-side Remote Desktop client configuration options are available in the Terminal Services configuration program. To configure client remote session settings using Windows 2003 Terminal Server: -
Click Start, All Programs, Administrative tools, and then Terminal Services Configuration. -
In the left pane, select the Connections folder. In the right pane, right-click the RDP-TCP connection icon and choose Properties. -
Click the Remote Control tab, as shown in Figure 4.7, and select one of the following three options: -
Use Remote Control with Default User Settings -
Do Not Allow Remote Control -
Use Remote Control with the Following SettingsWith this option, you can request the user's permission for viewing or interacting with the remote session. Figure 4.7. You can configure client remote session settings via the RDP-TCP Properties dialog box. 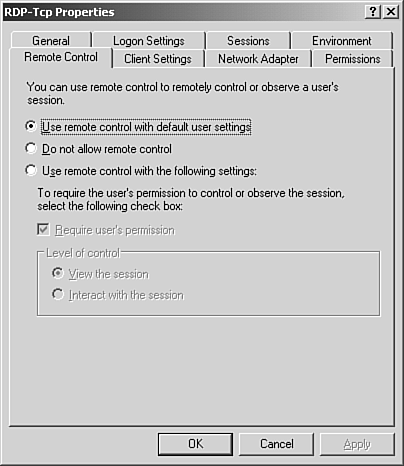 -
Click the Client Settings tab. The Client Settings tab contains the Use Connections Settings from User Settings check box, various settings for controlling the degree of color depth, and check boxes to disable various mappings. Client-side Remote Desktop client configuration options are accessed in the Remote Desktop Connection dialog box by clicking the Options button. To start a client remote session using Windows XP Professional, perform the following steps: -
Click Start, All Programs, Accessories, Communications, Remote Desktop Connection. -
In the Remote Desktop Connection dialog box, type the computer name of the Terminal Server you want to connect to. -
Click the Connect button to connect to the Windows 2000 or Windows 2003 Terminal Server. -
Type in your username and password and click the OK button. When complete, click the OK button. -
Your remote session is full screen and high color by default. The connection bar appears at the top of your full-screen session. Doubleclick in the pinned connection bar area to display your server's GUI in Windows screen mode. Click the maximize button in the window to return to pinned mode. Click the Windows X button to close the session. You're prompted to confirm closing the Terminal Services session. Click the OK button to close the session. Lower-speed bandwidth connections can be optimized to improve performance by choosing the proper connection speed on the Experience tab located in the Remote Desktop Connection dialog box. To configure client connection speed using the Remote Desktop utility, perform the following steps: -
Click Start, All Programs, Accessories, Communications, Remote Desktop Connection. -
In the Remote Desktop Connection dialog box, click the Options button to display client configuration options. -
Click the Experience tab and select the appropriate connection speed by clicking on the drop-down list box as shown in Figure 4.8. You can also uncheck unneeded components for your remote session in the Allow the Following check box lists. Figure 4.8. You can configure the proper connection settings for the remote connection via the Experience tab of the Remote Desktop Connection dialog box. 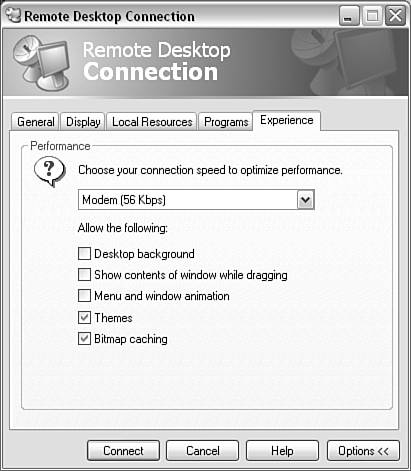 What happens if your remote session unexpectedly terminates? RDC will automatically try to reconnect to the Terminal Server when a network connection is lost. One last point worth mentioning is the new Remote Desktop Users group. Instead of adding individual users to a list in the Terminal Services configuration program, you can simply make them members of the Remote Desktop Users group. | | Add the Everyone group to the Remote Desktop Users group to allow everyone access to Terminal Server sessions. |
 |