8.3. Incorporating Video Flash animation is great for creating lot of things: cartoons, ads, presentations, tutorials, and interactive Web sites, to name a few. But sometimes, video footage is more effective. For example, video footage showing a live product demonstration, a kid blowing out the candles on his birthday cake, or an interview with a CEO can get a point across quicker than any other medium.
Note: One of the recent trends Flash is fueling is video blogging, or vlogging : adding video clips to plain- vanilla Web logs. You can find out more at sites like www.vidblogs.com and www.wearethemedia.com.
With Flash, you don't have to choose. You can import video files in a variety of formats (see Table 8-3) and incorporate them along with images, sounds, text, and interactive controls (such as buttons your audience can push to start and stop different sections of your video clips) to build unique multimedia animations. You can even apply effects to a video clip in Flash: for example, skewing and tinting. Because Flash isn't set up to let you edit video files more than a few seconds long, most Flash jockeys do all their video production and editing in other specialized video editing programs (such as those listed in the box on Section 8.3.2.1). Then they export their video clips as separate .flv files, which they tie to their Flash animations using a bit of ActionScript code. This technique works great if all you want to do is display a video in Flash along with Play/Stop buttons (the most common approach, and the one demonstrated on Section 8.3.2.1). Figure 8-11. The sound file you see here is a two-channel (stereo) sound, so you see two separate waveforms, one per channel. To crop the sound clip, drag the Time In and Time Out control bars left and right. Flash ignores the gray area during playback and only plays the portion of the waveform that appears with a white background; so here, Flash only plays the second half of the waveform. To create a custom fading effect, you can drag the envelope handles separately. The settings in this example tell Flash to fade out on the left channel while simultaneously fading in on the right channel. To preview your custom effect, click the Play icon. 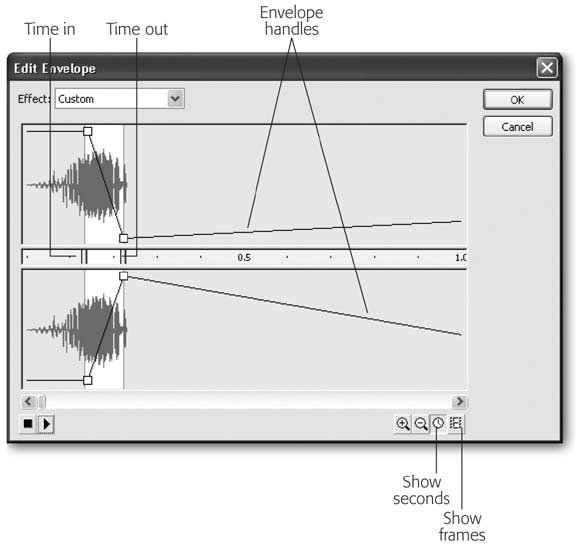
Table 8-3. Video File Formats You Can Import into Flash | File Type | Extension | Note | | QuickTime movie | .mov | You need to have QuickTime 7 or later (if you're running Mac) or QuickTime 6.5 or later (if you're running Windows) installed on your computer to import QuickTime movies into Flash. | | Audio Video Interleaved | .avi | You need to have QuickTime 7 or later installed on your computer (if you're running Mac) or, if you're running Windows, you need either QuickTime 6.5 or later or DirectX 9 or later installed on your computer to import AVI movies into Flash. | | Motion Picture Experts Group | .mpg, .mpeg | You need to have QuickTime 7 or later installed on your computer (if you're running Mac) or, if you're running Windows, QuickTime 6.5 or later or DirectX 9 or later installed on your computer to import MPEG movies into Flash. | | Digital video | .dv, .dvi | You need to have QuickTime 7 or later (if you're running Mac) or QuickTime 6.5 or later (if you're running Windows) installed on your computer to import DV movies into Flash. | | Windows Media | asf, .wmv | You need to be running Windows and have a copy of DirectX 9 or later installed on your computer to import Windows Media files into Flash. | | Macromedia Flash video | .flv | The easiest way to create a .flv file is by importing another type of video file into Flash, and then, by double-clicking the imported file in the Library, exporting the video again as a .flv file. (The box on Section 8.3.2.1 shows you two more options.) |
8.3.1. Preparing to Import Video Files Before you can import a video clip into Flash, you first have to have a video file stored in one of the formats Table 8-3 describes. But you also need to know up front how you expect to link the video file to your finished Flash animation file at runtime: by embedding the video file directly onto your Flash Timeline, by linking to the video file at runtime, and so on. This cart-before-the-horse requirement isn't quite as odd as it seems at first blush. Video files tend to be so huge that you can't always get away with embedding them directly into your Flash document the way you embed graphics and sound files (Section 8.1 and Section 8.2, respectively). So to keep the lengthy import process from being a complete waste of your valuable time, Flash doesn't let you import a video clip until it knows that you know how you'll be publishing, or deploying , the video-containing animation you intend to create.
Tip: Note : Chapter 14 tells you all you need to know about publishing Flash files, including Flash files containing video clips.
Your deployment options include: -
Progressive download from a Web server . In this option, you either find an .flv file or you create one (see the box on Section 8.3.2.1) containing the video clip you want to add to your animation. Then, in your Flash document, you create ActionScript statements (Section 9.1) that describe which .flv file to pull in at runtime and how you want your animation to interact with that file. (If all you want to do is display the video, add basic video controls, such as Play and Stop buttons. You can tell Flash to generate the necessary ActionScript code for you.) When you choose this option, you get to publish both your finished Flash animation and your .flv file to a regular, garden-variety Web server. -
Stream from Flash Video Streaming Service . This option is similar to Option #1, with one notable exception: Instead of publishing your finished Flash animation file and your .flv file to a regular Web server, you have to publish them to a special Web server running Flash Media Server (formerly Flash Communication Server). The Flash Video Streaming Service takes care of installing and running all the necessary server programs and hardware; all you have to do is pay for the service. -
Stream from Flash Communication Server . This option is similar to Option #2 above, except that you (or, more likely, your company's IT department) buy the server hardware, install the server software, and maintain the resulting system. -
Embed video in SWF and play in Timeline . This option represents the simplest way to embed video into your animation, but it only works for very short video clips (somewhere between 5 and 10 seconds or less). Any more than that, and the size of your animation file grows so large that you have trouble editing the file in Flash and your audience has trouble viewing it in their Flash Player. -
Linked QuickTime video for publishing to QuickTime . This option lets you import a QuickTime video file, add Flash graphics and animated effects, and then export the resulting hybrid animation as a QuickTime movie file. (QuickTime movie files run only in the QuickTime player or browser plug-in; they don't run in Flash Player.) 8.3.2. Importing Video Files Once you have access to a video file and a handle on how you're going to deploy your video-containing animation, you're ready to begin importing the video file into Flash. The import process varies slightly depending on which format video file you want to import (.flv, .mov, and so on), where that file is located (your computer, a Web server, a Flash Web server), and how you plan to deploy your finished video-containing animation (see "Preparing to Import Video Files" on Section 8.3.1). In this section, you see step-by-step examples of the two most common scenarios: importing a Flash video file stored on a Web server and importing a QuickTime file stored on your computer. UP TO SPEED
Creating a Flash Video File | | You may not be able to shoot video footage with your PC or PowerBook, but you can create digital video using nothing more than your copy of Flash 8 (or one of the other programs listed below). That's good news if you plan to use one of the first three animation-plus-video deployment options described on Section 8.3.2, all of which require your video clip to be in Flash video file format (.flv). To create a Flash video file, choose one of the following: -
Import another type of video file into Flash 8. Then, in the Library, double-click the imported file to export it as a .flv file. -
Use a third-party tool, such as Sorenson Squeeze for Macromedia Flash or Flix Pro 8 for Flash 8, that lets you import straight video capture or an existing video file and then export the clip as a Flash video file. -
Install a QuickTime-compatible video-editing program on your computer, such as Adobe After Effects (www.adobe.com), Apple Final Cut Express (www.apple.com/finalcutexpress), Apple Final Cut Pro (www.apple.com/finalcutstudio/finalcutpro), or Avid Media Composer (www.avid.com/products/composer). Then install QuickTime and a special type of Quick-Time plug-in called a Flash Video Exporter. (An exporter comes with Flash 8 Professional, but others are available from third-party companies such as On2, which you can find online at www.on2.com.) With the exporter and QuickTime installed, when you edit video in one of the video editing programs, the program lets you save the video in .flv format. |
8.3.2.1. Importing a Flash video file stored on a Web server (progressive download) When you import an .flv file stored on a Web server into your Flash animation, you get a bonus: Flash lets you add prebuilt video controls (Play, Stop, Mute, and other control buttons) to let your audience decide when and how to view the video clip. The best part is, you don't have to write any of the interactive ActionScript code yourself. Flash takes care of everything. (Don't worry if you don't have a video file stored on a Web server; there's an example file you can practice with, as you'll see in the following steps.) -
Select File  Import Import Video . Import Import Video . The Import Video: Select window you see in Figure 8-12 appears.
Note: Flash gives you another way to import a video file: by selecting File Import Import to Stage. Then, from the Import dialog box that appears, select a video file saved in one of the formats listed in Table 8-3.
Turn on the radio box next to "Already deployed to a web server, Flash Video Streaming Service, or Flash Communication Server" (Figure 8-12). In the URL box, type http://examples.oreilly.com/flash8tmm/building_implode.flv and then click Next . The Import Video: Skinning window you see in Figure 8-13 appears. Figure 8-12. You can import a video file stored on your computer or on a server. In this example, the Flash video file building_implode.flv is stored on a Web server. Because Flash makes assumptions based on the type of file you tell it you want to import and where that file is located (for example, .mov or .flv, your personal computer or a Web server), the Import Video dialog boxes that Flash displays after you click Next vary slightly. 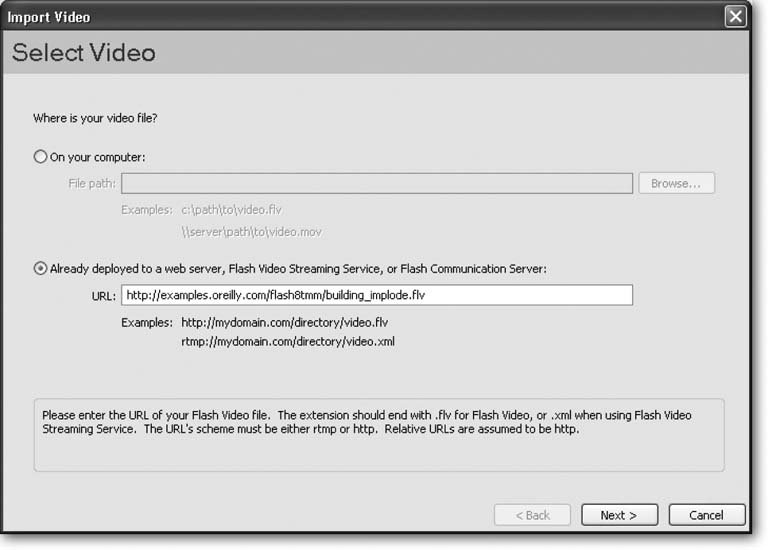 Figure 8-13. Choosing a skin (like ArcticOverAll.swf) tells Flash which video controls you want to display and how you want those controls to look. You don't have to tell Flash to add any controls (one of the options is None), but most of the time, you should add them so your audience can control video playback. If you want more complicated playback options, you need to write your own custom ActionScript code. 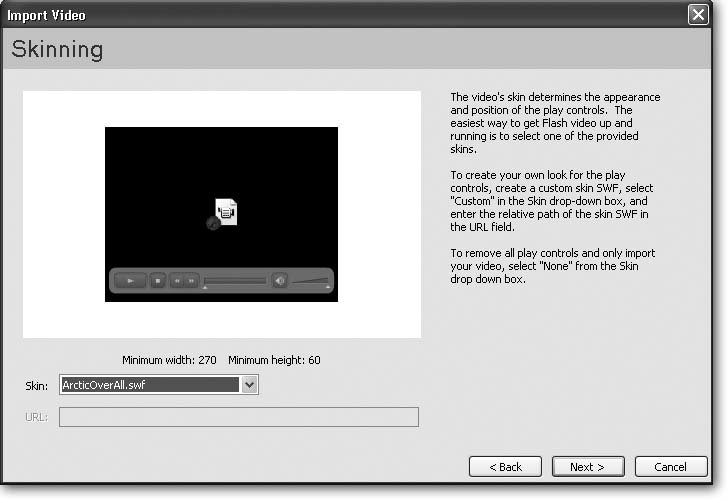 -
Click the arrow next to Skin and, from the drop-down box that appears, choose ArcticOverAll.swf . Flash shows you an example of the ArcticOverAll skin in the preview area. -
Click Next . Flash displays the Import Video: Finish Video Import dialog box you see in Figure 8-14. Figure 8-14. Before Flash imports your video, it shows you a couple of confusing last-minute instructions (and the ability to open the Help panel preloaded with still more confusing instructions). Fortunately, importing video and then deploying the finished video-containing animation isn't difficult. 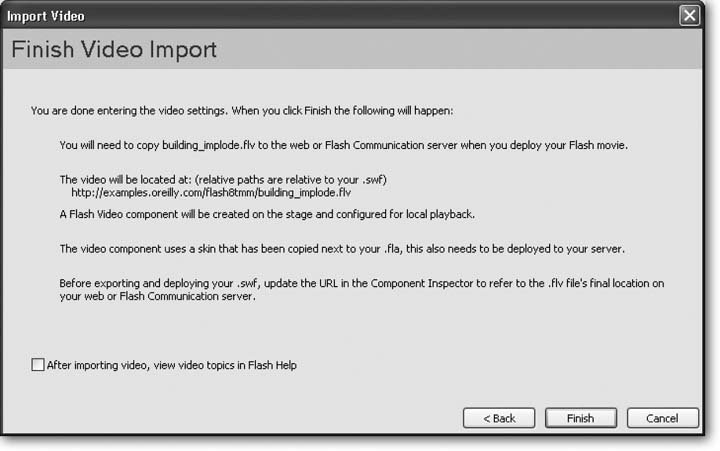 -
Click Finish . The Import Video: Finish Video Import dialog box disappears. Briefly, you see a Loading FLV Dimensions message box. Then Flash redisplays your workspace, where you see a copy of the imported video (complete with the skin you chose in step 3) in the Library, and on the Stage (Figure 8-15). Figure 8-15. As you can see in the Library, the video-containing skin you imported into your animation (and placed on the Stage) is actually a component. Flash customized the FLVPlayback component based on the information you gave it during the import process, so that when you test your animation, the Play, Stop, and other controls all work automatically. 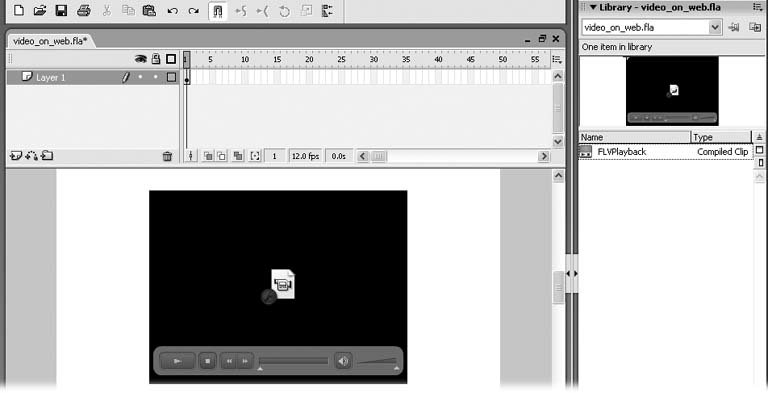 -
Choose Control Test Movie to test your imported video . You see the result in Figure 8-16. (To see a finished example, download video_ on_web.fla from www.missingmanuals.com/cds.) Figure 8-16. Thanks to the behind-the-scenes ActionScript code Flash creates for you during the import process, the controller buttons let you start, pause, replay, and mute the imported (linked) video right out of the box. You can use Flash's drawing tools to add images or text to the Stage surrounding the video or even apply effects (such as skewing) to the video itself; you can also add additional sound, as described on Section 8.2. But you can't edit or remove the sound attached to the original video: Flash treats the two as a single, uneditable entity. 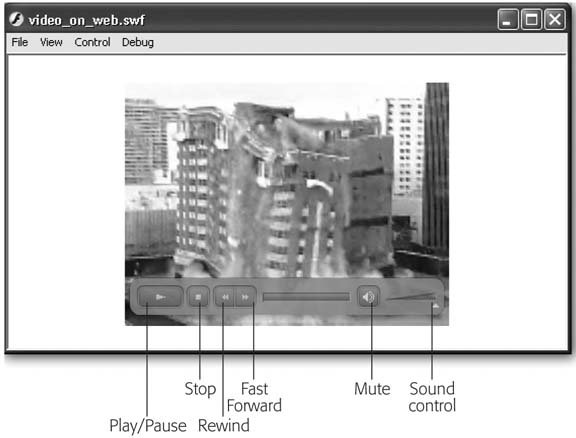
Note: To deploy the video-containing animation on a Web server, all you have to do is upload the finished animation file (video_on_web.swf) and the skin you chose (ArcticOverAll.swf) to the same directory on the same Web server where you stored the Flash video file (building_implode.flv). For more on publishing, check out Chapter 14.
8.3.2.2. Importing a QuickTime file stored on your computer (embedding) You don't have to have access to a Web server to import a video file into Flash. In fact, even if you do have access to a Web server, you might want to import a video file from your computer instead to save the hassle and time of uploading and downloading while you work out the kinks in your Flash animation. This example shows you how to embed a QuickTime file directly into your animation's Timeline.
Note: Embedding a video file can make your finished animation's file size balloon to epic proportionsespecially if you choose a lengthy clip or tell Flash during the import process to use a high-quality compression algorithm. And large file sizes can cause problems during playback: lengthy load time, dropped frames , audio that doesn't quite sync up, and so on. For tips on optimizing both video and your overall animation file size, check out Section 14.1, Chapter 14.
To import a QuickTime movie stored on your computer: -
Select File Import Import Video . The Import Video: Select window you see in Figure 8-17 appears. Figure 8-17. If you know the name and location of the QuickTime file you want to import, you can type it into the "File path " box. Otherwise, click Browse to open the standard Open window, choose a file, and then have Flash type the name for you. Although it's not obvious at first glance, the text at the bottom of this window is a hint meant to help you fill out the "File path" box. 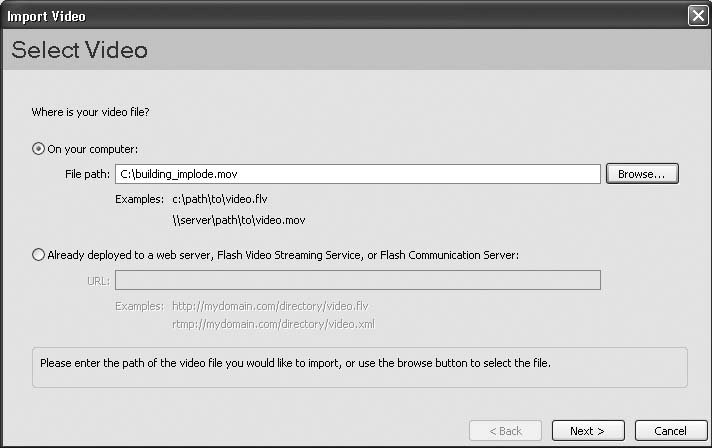 -
Click Browse . Flash displays a standard Open window similar to the one you use to open a Flash document. -
Click to choose the file building_implode.mov on your computer, and then click Open . Flash redisplays the Import Video: Select window, this time showing the "File path" box filled in with the name of the file you chose. -
Click Next . The Import Video: Deployment window shown in Figure 8-18 appears. -
Click to choose "Embed video in SWF and play in Timeline." To find out more about the other options on this window, flip to Section 8.3.2. You can also click the option to read the hint Flash displays in the right side of the window. -
Click Next . The Import Video: Embedding window you see in Figure 8-19 appears. Next, you'll change the settings in this window to import the movie clip and its audio track separately. Figure 8-18. Flash gives you several options for deploying the video-containing animation you're attempting to create. (Deploying is a combination of compiling an animation into an executable file format, and placing that fileand any other necessary files, like your video fileon a Web server where your audience can download them.) 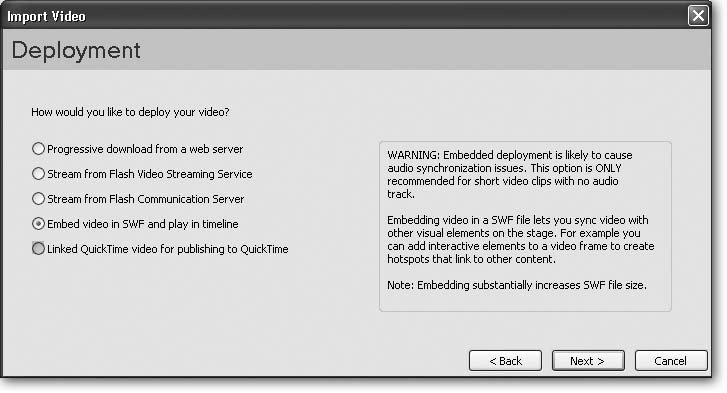 Figure 8-19. The options in this window let you import a video file as a graphic symbol, an embedded video symbol, or a movie clip symbol. Typically, you'll choose movie clip; they're the easiest to work with in Flash and give you the most flexibility, since they're not tied frame-for-frame to your main animation. You can also keep the video's audio track separate (as shown here) or combine the two. If you're not sure whether or not you'll need to edit the audio in Flash, go ahead and choose Separate anywayyou never know. 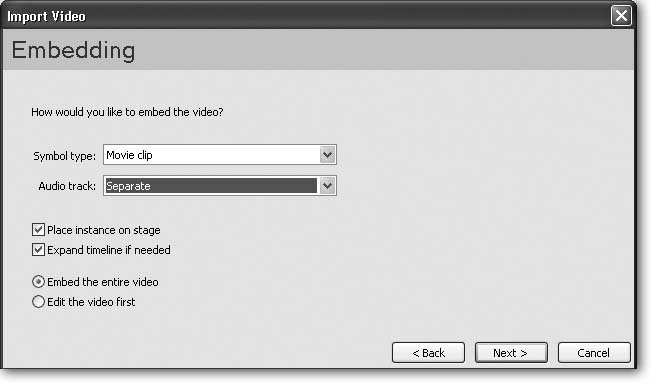 -
Click the arrow next to "Symbol type" and then, from the drop-down list that appears, choose "Movie clip." Then click the arrow next to "Audio track" and then choose Separate . The other options you can set in this window include: Place instance on stage . Tells Flash to import a copy of the video clip to the Stage in addition to the Library. Expand Timeline if needed . Tells Flash to create enough frames to hold the imported video clip. If you turn this checkbox off and your Timeline doesn't contain as many frames as the video clip you're trying to import, Flash truncates the video. Embed the entire video/Edit the video first . Choosing "Embed the entire video" imports the video file as is; choosing "Edit the video first" shows you options that let you slice and dice clips of the video and then piece them together on import (see "Editing Embedded Video," Section 8.3.3). -
Click Next . The Import Video: Encoding window shown in Figure 8-20 appears. You use this window to tell Flash how faithfully to reproduce the video clipfrom high quality, which represents the biggest file size hit, to low qualityand also to shorten the clip. Figure 8-20. Flash lets you choose the quality of the imported video clip. The higher the quality, the larger the file size. 400 kilobits per second is about midway between the two extremes Flash supports. Drag the triangle on top of the preview bar to view the video clip; drag the "In point" and "Out point" handles on the preview bar to crop the clip. 
Note: To see a slew of additional encoding and video editing options, including options for cropping and resizing your imported video and even specifying a different compression algorithm ( codec ) for the video and audio import, click Show Advanced Settings. "Editing Embedded Video," Section 8.3.3, walks you through the process.
-
Click Next . The Import Video: Finish window you see in Figure 8-21 appears. Now's your chance to review your choices before you go through with the import. -
Click Finish . A Flash Video Encoding Progress window appears (Figure 8-22, top). The longer the clip you're trying to import, the longer you see this window on your screen. Finally, when Flash finishes importing your video file, the window disappears and Flash redisplays your workspace (Figure 8-22, bottom). Figure 8-21. It's a long roadbut when you see this window, you're nearly finished importing your QuickTime movie. If you'd like to review or change any of the options you've set up until this point in the import process, click the Back button to step back through the Import Video widows. 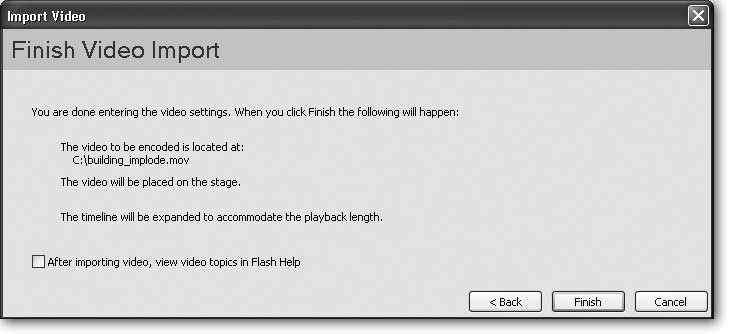 Figure 8-22. Top: How long Flash grinds away depends on the length of the video clip, the import quality you specified, and a raft of other variables .
Bottom: Here, you see the result of a successful video import: a copy of the video on the Stage, and a copy of the embedded video symbol in the Library. If you told Flash during the import process to save a copy of the video as a movie clip symbol (or to save the soundtrack separately), you see those symbols in the Library, too. 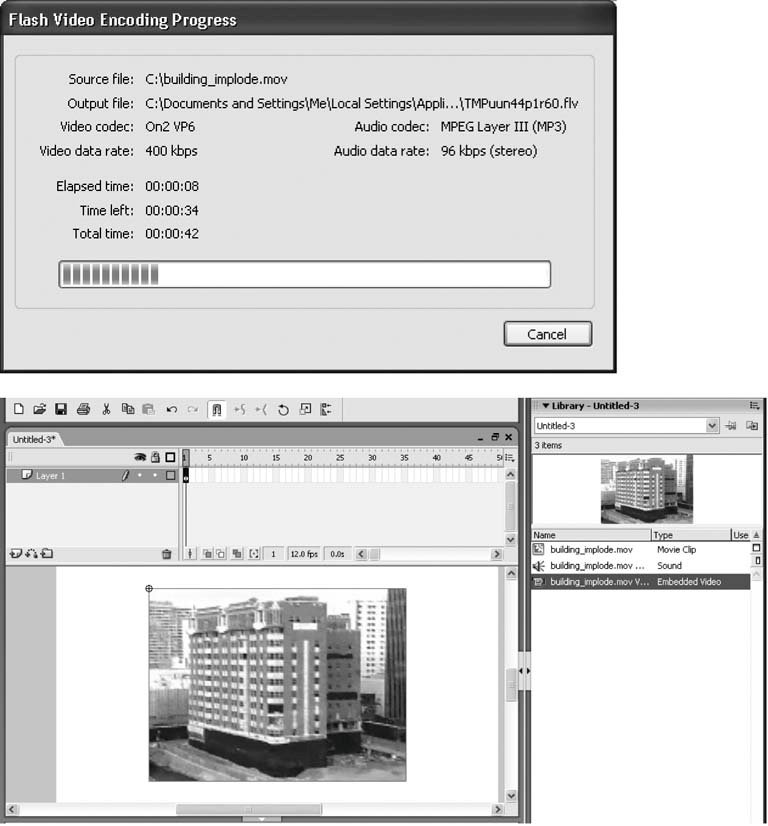
Note: Editing the movie clip symbol (Chapter 7) lets you add effects and change the imported video frame by frame, in the movie clip symbol's Timeline.
-
Test the animation by choosing Control Test Movie . The test window appears, showing the imported video clip. You don't hear any audio soundtrack because in this example you told Flash to save the audio separately. (To see a working example, download the file video_embed.fla from www.missingmanuals.com/cds.)
Note: To see how to add the building_implode.mov audio symbol to your animation, see "Adding an Imported Sound to a Frame (or Series of Frames)" on Section 8.2.2.
8.3.3. Editing Embedded Video If you choose to embed an imported video clip (as opposed to linking your Flash animation to a video clip at runtime), Flash lets you apply some basic edits to the video clip during the import process just before you embed the video clip into your animation. You can: -
Split a video clip into two or more smaller clips. -
Tell Flash how to encode video (and audio) clips when it comes time to save your video-containing animation. -
Crop (resize) your video display. The following sections show you how.
Note: See how to embed a video file on Section 8.3.2.2, "Importing a QuickTime file stored on your computer (Embedding)."
8.3.3.1. Split a video clip Flash lets you break a video clip into one or more smaller clips. This technique is also useful for trimming clips: for example, to cut off an intro or the last few seconds of a video clip before you place it on the Stage. To split a video clip: -
In the Import Video: Embedding window (Figure 8-19), turn on the radio box next to "Edit the video first", and then click Next . The Import Video: Split Video window appears. As you see in Figure 8-23, your video clip appears in the preview area of the window. -
Click the Create New Clip icon (the + sign) . Flash creates a new sub-clip and places it in the list. Figure 8-23. Click the Create New Clip icon to create a named subclip; then drag in "In point" and "Out point" sliders to define the length of the new subclip. 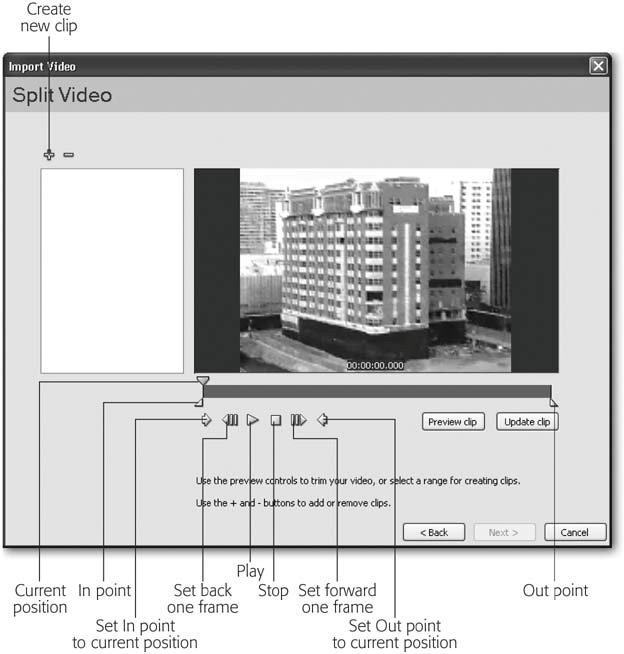 -
Rename the subclick by double-clicking the subclip name and typing in a new name . Shoot for a short but descriptive name, such as first_half . The name you choose is the name Flash uses when it creates the embedded video symbol (and movie clip symbol) that it puts in the Library after it finishes the import process. -
Click Play to preview the video clip . To back up the preview, click "Stop," and then click "Step back one frame." To slow down the preview, click "Stop," and then click "Advance by one frame." -
Drag the in and out points (Figure 8-23) to isolate just the part of the clip you want to keep .
Note: If you prefer, you can drag the "In point" and "Out point" sliders directly without previewing the clip first. Or, if you're previewing the video clip and happen to stop playback at the point where you want to add an in or out point, you can click "Set in point to current position" or "Set out point to current position," respectively.
-
Play the shortened version of the clip by clicking "Preview clip." In the preview area, Flash plays the shortened subclip you defined. -
Save the sub-clip by clicking "Update clip." Flash saves the newly created sub-clip in the list (Figure 8-24, left). Figure 8-24. Left: You can create as many subclips as you like. If you change your mind, you can always click to select a subclip and then click the Delete button to delete it.
Right: When you finish the import process, you see the results of your handiwork in the Library: separate symbols for each subclip you created. 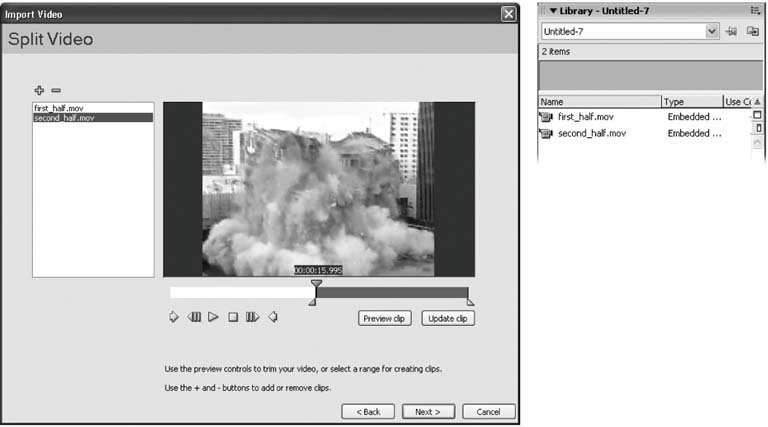 -
Continue importing the video file as usual (Section 8.3.2) . When you finish the import process, Flash places separate symbols in the Library for each subclip you defined (Figure 8-24, right). 8.3.3.2. Customize video and audio encoding Flash lets you customize the way it encodes your video and audio clips. As Figure 8-25 (top) shows, you can tell Flash which codec (compression format) you want it to use; you can also tweak certain compression settings, such as the frame rate you want your imported video to have. To see the options shown at left in Figure 8-25, click the Show Advanced button you see in the Import Video: Encoding window (Figure 8-20). Here's a list of the options you can customize: -
Encode video . Turning on this checkbox lets you set the video encoding options listed below. -
Video codec . Tells Flash which video compression algorithm to use. Your options are On2 VP2 and Sorenson Spark.
Tip: Note : A codec is a software program that translates video into a more compact file format (and then un translates it for playback). Folks who frequently deal with compressed video usually have a preference for one or the other of these third-party programs that come with Flash.
Figure 8-25. Top: On the Encoding tab, Flash lets you customize how you want it to encode (import and then publish) both the video and the audio portions of your video file.
Bottom: The Crop and Trim tabs have options that let you crop (resize) and trim (shorten) your video clip. All you have to do is drag the crop sliders and the "In point" and "Out point" handles; Flash automatically displays the cropped dimensions and the newly edited video length. For more on editing video in Flash, see Section 8.3.3. 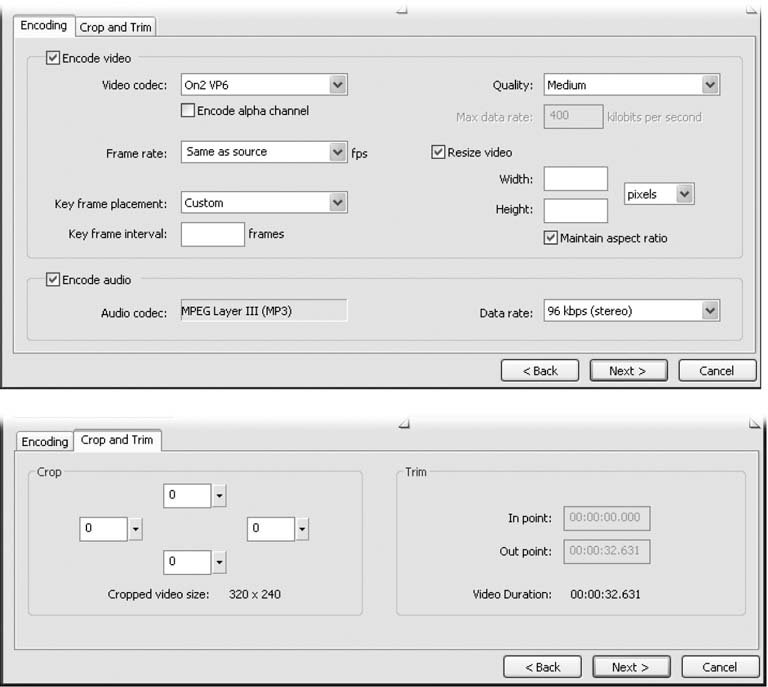 -
Encode alpha channel . Tells Flash to encode any transparency settings applied to the video file. -
Frame rate . Tells Flash how many frames per second you want your imported video to have. You can keep the frame rate of the original video clip or choose a new frame rate from 10 to 30. -
Key frame placement . Choosing Automatic tells Flash to import video key frames as it sees fit; choosing Custom lets you set the "Key frame interval" you want. -
Key frame interval . Tells Flash how many video key frames ( not Flash keyframes) to import. The lower the number, the lower the file size (and imported video quality) you end up with. -
Quality . Tells Flash how closely you want it to try to recreate the original video clip in terms of visual quality and frame rate. Your choices are low, medium, high, and custom. (The higher the quality, the larger your animation file.) -
Max data rate . Available only if you set Quality to custom (see above), this option tells Flash how many kilobytes per second you want your imported video to run at. (The range you can specify runs from 40 to 700.) -
Resize video . Turning on this checkbox enables the Width, Height, and "Maintain aspect ratio" settings described next. -
Width . Tells Flash how wide you want to your video display to appear, expressed either as pixels or as a percent of total display size. -
Height . Tells Flash how tall you want to your video display to appear, expressed either as pixels or as a percent of total display size. -
Maintain aspect ratio . Turning on this checkbox tells Flash to automatically adjust the Width box as you type a number into the Height box (and vice versa), letting you preserve the original shape of the resized video display. -
Encode audio . Turning on this checkbox enables the encoding option listed below. -
Data rate . Tells Flash how precisely you want it to recreate the video sound track, in terms of kilobytes per second (quality) and number of channels (mono vs. stereo). 8.3.3.3. Crop video display You can crop the display area your imported video appears in to make it smaller, either width- or height-wise (or both). To crop your video display: -
Click the Crop and Trim tab you see in the Import Video: Encoding window (Figure 8-25, top) . The Crop and Trim options you see in Figure 8-25 (bottom) appear. -
In the Crop area, drag the top, bottom, left, and right sliders to tell Flash how you want it to crop the video display . Flash displays the new dimensions beneath the sliders. In the preview area, Flash displays a dashed bounding box showing you the new dimensions.  |