3.3. Animating Automatically (Tweening) When you create a frame-by-frame animation, it's up to you to create every single keyframe and frame. And in cases where you want absolute control over every single image that appears in your finished animation, frame-by-frame animation is the way to go. Often, however, you can get by with a little less control. If you want to create a scene of a ball rolling across a lawn, for example, you can create one keyframe showing a ball on the left side of the lawn, another keyframe showing the same ball on the right side of the same lawn, and tell Flash to create a tween , or all the keyframes in between. Bingoscene done.
Tip: You can combine frame-by-frame animation with tweening. In fact, that's what a lot of professional animators do: Take care of the complex stuff themselves , and rely on Flash to fill in the spots that aren't as critical.
Tweening saves you more than just time and effort; when you go to publish your animation, it also saves you file size . That's because Flash doesn't save every single frame of a tweened animation the way it does with a frame-by-frame animation. Instead, for tweened animations, Flash saves only the keyframes you create, plus the information it needs to generate the tweened frames from your keyframes. And smaller file sizes are a good thingespecially if you're planning to put your finished animation up on a Web site. (You can find out more about file sizes, including tips for optimization, in Chapter 14.) DESIGN TIME
Dividing Your Animation into Layers : The Common Sense Approach | | When it comes to divvying your animation up into layers, there's no hard and fast rule. Some animators like to put every single element on its own separate layer; others take a more conservative approach. In general, the more layers you have, the more control you have over your animation, because you can change and position the content on each layer independently. But on the downside, the more layers you have, the more organizational overhead and potential confusion you haveand at the end of the day you may find you don't actually need all that control. While this is one of those areas that's more art than science, here are a few questions to ask yourself when you're trying to decide whether (and how) to break up your animation into layers. -
What's most likely to change ? If you know going into a Flash project that a particular design idea might change (for example, your team's still arguing over whether the ad you're developing should feature two people talking to each other or one person talking into a cell phone), by all means put those two people on their own layers so you can switch them out easily if you need to. -
What moves independently of the objects nearest it ? Any moving object that you position on or near other objects needs to live in its own layer. Eyes and mouths are good examples; you want to be able to fine-tune eye and mouth movement to create different expressions on your characters without having to redraw the entire face every time. Same with characters' legs (you want to leave yourself the option of changing your characters ' stroll to a sprint without having to redraw their bodies every time). -
What do you want to tween ? You can't place more than one tween on a layer. (Well, technically, you can , but you don't want to: Flash generates unreliable results for multiple tweens on a single layer.) So if you know you want to create a specific motion tweena star streaking across the sky, for exampleplace the tweened star on its own layer, whether or not it's positioned near any other objects on any other layers. |
In this section, you see examples of both types of tweening Flash offers: shape tweening and motion tweening. 3.3.1. Shape Tweening (Morphing) Shape tweening sometimes referred to as morphing lets you create an effect that makes one object appear as though it's slowly turning into another object. All you have to do is draw the beginning object and the ending object, and Flash does all the rest. For example, say you create a keyframe containing a circle. Then, 10 frames along the Timeline, you create another keyframe containing a star. You apply a shape tween to the frame span, and Flash generates all the incremental frames necessary to show the circle slowlyframe by frametransforming itself into a star when you run the animation. FREQUENTLY ASKED QUESTION
When to Use a Motion Tween (and When to Use a Shape Tween) | | There seems to be a lot of overlap between motion tweening and shape tweening. If I can tween motion with a shape tween and size, color , and rotation with either one, what's the real difference between the two? When should I use one over the other ? It's true, there's a lot of overlap between shape and motion tweens. Using both, you can tween straight-line motion (position), color and gradient, transparency, and transforms (scale, rotation, and skew). The important differences between the two are: Shape tweens work only on editable shapes ; motion tweens work only on symbols, grouped objects, and text blocks. Motion tweens are the only way you can tween nonlinear motion (for example, if you want to show an object moving in an arc, a squiggle , or a curlicue). So here's the bottom line: You must use a shape tween when you want to work with an editable object or when you want to show a shape change, from a simple square-to-circle redraw to a step-by-step morphing effect from, say, an acorn to a tree. You must use a motion tween when you want to show motion that doesn't follow a straight-line path (for example, an object that spins , swoops, or shrinks and expands). In all other cases, the choice is yours. |
Note: Shape tweens work only on editable graphics. If you want to tween a symbol (Chapter 7), you need to use a motion tween. If you want to tween a group of objects or a chunk of text, you need to ungroup the objects (Chapter 5), break apart the text (Chapter 6), or use a motion tween.
Shape tweening lets you change more than just an object's shape over a series of frames. Using a shape tween, you can also change an object's size, color, transparency, position, scale, and rotation. To create a shape tween: -
Select the frame where you want your tween to begin (for example, Frame 1 ). Flash highlights the selected frame. -
On the Stage, draw the shape you want to begin your tween . In Figure 3-10, the beginning shape's a raindrop. -
If the selected frame isn't a keyframe (if you don't see a dot in the frame), turn it into a keyframe by selecting Insert  Timeline Keyframe . Timeline Keyframe . Flash displays a dot in the frame to let you know it's a keyframe. -
Select the frame where you want your tween to end (for example, Frame 10 ). Flash highlights the selected frame. Figure 3-10. You can use any or all of Flash's drawing and painting tools to create your first image. Just make sure you don't group objects (Chapter 4) or convert your object into a symbol (Chapter 7); shape tweening works only on ungrouped , editable objects on a single layer. 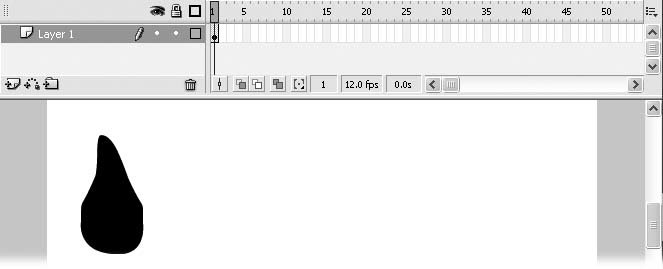 -
Insert an ending point for your tween (and a clean, fresh Stage on which to draw your ending shape) by selecting Insert Timeline Blank Keyframe . The Stage clears, the playhead moves to the selected frame, and Flash displays a hollow dot in the selected frame to let you know it's a keyframe.
Tip: As explained on Section 3.1.4.2, you can carry over your beginning image from the first keyframe and make changes to it by choosing Insert Timeline Keyframe (instead of Insert Timeline Blank Keyframe).
On the Stage, use Flash's drawing and painting tools to draw the shape you want to end your tween . Your ending shape can differ from your first shape in terms of position, color, transparency, rotation, skew, and size, so go wild. In Figure 3-11, the ending shape's a puddle. Figure 3-11. Flash grays out all the frames in a frame spanin other words, all the frames beginning with one keyframe up to (but not including) the next keyframeso you can spot them easily. As you can see here, each frame span ends with the end frame symbol, which looks like a hollow rectangle. 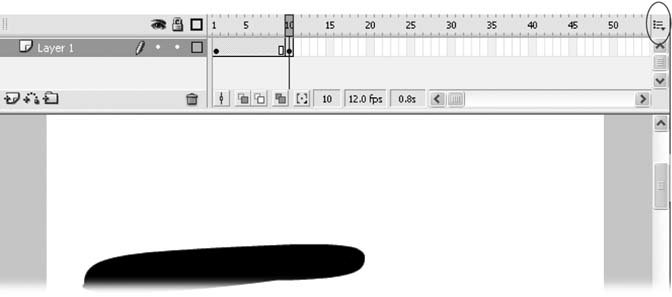 -
On the Timeline, click to select any frame in the frame span . Flash highlights the selected frame and the Property Inspector appears, as shown in Figure 3-12. (If you don't see it, select Window Properties and then, from the pop-up menu that appears, turn on the checkbox next to Properties.) To create a shape tween, from the Tween drop-down box, select Shape. (If the Tween drop-down appears grayed out, you haven't selected a frame; make sure that you're clicking in a frame and not just above, where Flash lists the frame numbers .) -
In the Property Inspector, head to the Tween drop-down box (Figure 3-12) and select Shape . Flash turns the frame span a nice lime color and inserts an arrow to let you know you've successfully added a shape tween. And in the Property Inspector, shape- related tween options (Ease and Blend) appear.
Note: If you have Tinted Frames turned off, Flash doesn't turn your frame span green to let you know you've successfully added a shape tween; instead, Flash applies a gray crosshatch pattern and turns the tween arrow blue. To turn on Tinted Frames, click the Options menu (the tiny icon you see on the far right of the Timeline, just after the frame numbers, as shown in Figure 3-11); then turn on the checkbox next to Tinted Frames.
Figure 3-12. As soon as you click a frame in your frame span, Flash displays the Property Inspector for frames.  -
If you like, set the Ease and Blend shape-tween options (Figure 3-13) . Ease tells Flash to speed up (or slow down) the tween. If you want your tween to start out normally but speed up at the end, click the drop-down arrow next to Ease and drag the slider that appears until a positive number appears. To tell Flash to start your tween normally but slow down at the end, drag the Ease slider until a negative number appears. (Zero means that when you play your animation, the tween appears to be the same speed throughout.) Blend tells Flash how picky you want it to be when it draws its in-between frames. If you want to preserve the hard angles of your original shape, click on the Blend drop-down box and select Angular; if you want Flash to smooth out the hard edges so that the tween appears smoother, select Distributive. -
Test your shape by selecting Control Play . Flash plays your shape tween on the Stage (Figure 3-14). 3.3.2. Shape Hints Flash does a bang-up job when it comes to tweening simple shapes: circles, squares, stars, rain drops . But the more complicated the images you want to tween, the harder Flash has to work to calculate how to generate the in-between images. WORKAROUND WORKSHOP
When Bad Things Happen to Good Tweens | | You can apply a shape tween only to an editable shape. You can't apply a shape tween to a grouped object, a symbol, or a block of text. But if you try, Flash won't exactly put itself out to let you know what's happening. Instead, when you test your tween, Flash mutely displays your beginning image, then a blank Stage (instead of tweened images), followed by your ending image. Clearly, something's not workingbut what ? Flash does offer a couple of hints, but you have to know where to look for them. -
In the Timeline, check to make sure the tween arrow appears in your frame span. If a dashed line appears instead, you know that Flash recognizes your tween but doesn't approve of it (although you still don't know why). -
In the tween section of the Property Inspector, check to see whether Flash is displaying a warning icon (a little yellow triangle with an exclamation point). If you see one, click it to display a somewhat-helpful pop-up message like the one shown here, which warns you that you're trying to tween a non-editable object. The fix? Do one of the following and then test your animation again: -
If your object is grouped, select it and then choose Modify Ungroup to ungroup it. (Unfortunately, Flash has problems applying multiple shape tweens to the same layer ; it gets confused trying to figure out which shape you want to morph into which other shape. So if you're trying to morph an image made up of several different shapes, you need to place each ungrouped shape on a separate layer [Chapter 8] and tween them all separately.) -
If your object's a symbol (this includes a block of text), you need to change it into an editable object. To change it, select your object and then choose Modify Break Apart. |
And if you think about it, that difficulty makes sense. Because complex beginning-and-ending images like a stylized acorn and tree (Figures 3-15 and 3-16) contain a bunch of editable lines, shapes, and colors, Flash has to guess at which elements are most important and how you want the morph to progress from the first keyframe to the last. Sometimes, Flash guesses correctly; other times, you need to give it a few hints. Adding shape hints to your tweens tells Flash how you want it to create each in-between frame, with the result that your finished tween appears more realistic more how you want it to be. In short, shape hints give you more (but not complete, by any means) control over the shape-tweened sections of your animation. Figure 3-13. You know you've successfully applied a shape tween when Flash displays an arrow in your frame span like the one shown here. You'll also notice that shape-related tweening options appear in the Property Inspector: namely, Ease (to speed up or slow down your tween) and Blend (to tell Flash to preserve hard corners and angles from frame to frame or smooth them out). To preview the in-between frames Flash generated for you, just select any frame in the frame span. 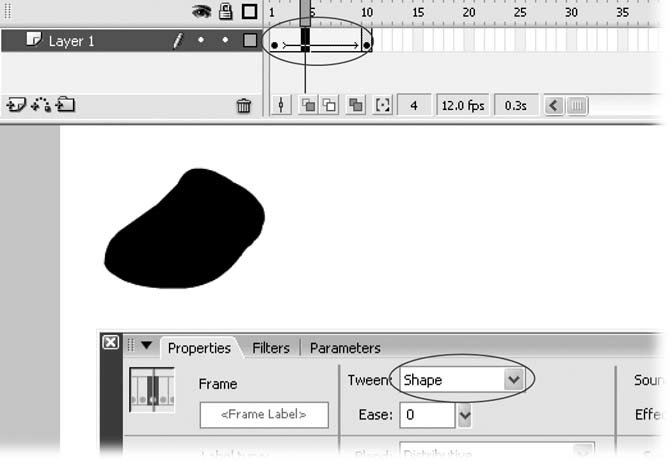
Figure 3-14. When you run your animation, your beginning image appears to morph into your ending image, thanks to the in-between frames Flash generates when you create your shape tween. Herebecause the pages of a book can't show motiononion skin outlines (Section 4.1.3) attempt to represent the animated tween you see on the Stage. 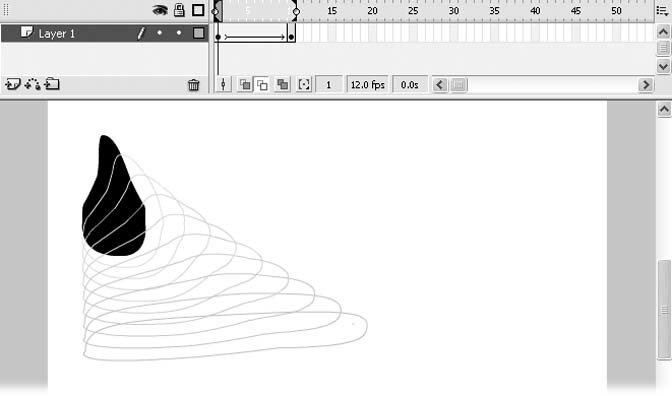
Figure 3-15. Top: The original acorn drawing: so far, so good.
Middle: Flash's first attempt at generating an in-between frame is a little scary.
Bottom: Clearly, the acorn is changing and growing, but that's about all you can say for this generated image. 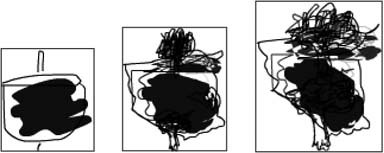
Figure 3-16. Left: You can almost make out the outline of a tree now.
Middle: This one's getting there
Right: And finally, at the end of the tween, Flash makes it to your original ending image. 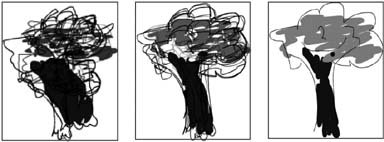
Note: Shape hints are especially valuable when you're working on an animation that moves at a relatively slow frame rate; in other words, in situations when each separate frame will be visible to your audience's naked eye.
To add shape hints to a shape tween: -
Select the first frame of your tween . Flash highlights the selected frame. -
Choose Modify Shape Add Shape Hint (or press Ctrl+Shift+H [Windows] or Shift- -H [Mac] ). Flash displays a hint (a red circle containing a letter from AZ) in the center of your shape, as shown in Figure 3-17 (top). Figure 3-17. Top: When you add a shape hint, Flash places it at the center of your object. All you have to do is drag it to the edge of your object.
Bottom: The more shape hints you use (and the more accurately you place them around the edge of your object), the more closely Flash attempts to preserve your shape as it generates the tween frames. Make sure you place the hints in alphabetical order as you outline your shape. If you find after several tries that Flash doesn't seem to be taking your hints, your shapes might be too complex or too dissimilar to tween effectively. In that case, you'll want to create additional keyframes or even consider replacing your tween with a frame-by-frame animation. 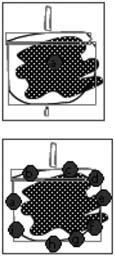 -
Drag the hint to the edge of your shape . Figure 3-17 (bottom) shows the result of dragging several hints to the edge of your shape. -
Repeat as many times as necessary, placing hints around the outline of the object in alphabetical order . The bigger or more oddly-shaped your object, the more hints you'll need. Placing a hint at each peak and valley of your object tells Flash to preserve the shape of your beginning object as much as possible as it morphs toward the shape of your ending object. -
Test your animation by clicking Control Play . The tweened frames of your animation conform, more or less, to the hints you provided. Figures 3-18 and 3-19 show you an example. Figure 3-18. Left: The original acorn is the same here as it was in Figure 3-15.
Middle: Compare this attempt at generating a first in-between frame to the one in Figure 3-15. It's not exactly a prize pig, but it's better.
Right: Already, you can see the form of the tree taking shape. 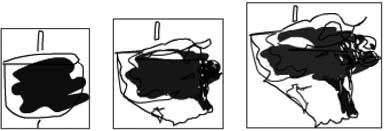
Figure 3-19. Top: Here, the already-pretty-well-shaped tree looks as though it's about to burst out of the acorn outline.
Middle: Compared to tweening without shape hints (see Figure 3-16), this tween appears much smoother; you don't see the Flash-generated squiggly lines that you see in Figure 3-16.
Bottom: The final frame of any tween appears the same, whether or not you use shape hints. 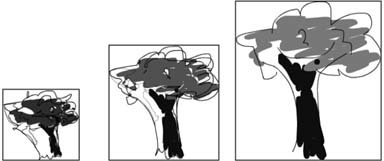
3.3.3. Motion Tweening Motion tweening is similar to shape tweening: To create both types of tweens, all you need to do is create a beginning image and an ending image and then tell Flash to generate all the "in-between" frames to create an animated sequence. And you can create a lot of the same effects using both types of tweens: You can create a series of frames that, when run, show an object changing size, position, color and gradient, transparency, rotation, and skew. But beyond that, there are two important differences between shape tweening and motion tweening: -
Tweenable objects . While shape tweening works only on editable objects, motion tweening works only on noneditable objects: symbols, grouped objects (Section 5.2.4), and text. And motion tweening, unlike shape tweening, limits you to one object per layer. (The single object can be a grouped object or a symbol containing multiple shapes; it just has to be a single object as far as Flash is concerned .) -
Nonlinear paths . With motion tweening, you can create a series of frames that show an object moving across the Stage in a nonlinear fashion: for example, swooping, diving, arcing, rotating, or pulsing . You can't do that with shape tweening. To create a basic (linear) motion tween: -
Select the frame and layer where you want your tween to begin (for example, Frame 1 in Layer 1) . Flash highlights the selected frame.
Note: Flash won't let you create a motion tween if you have more than one object (one symbol, one grouped object, or one text element) on the Stage. To motion tween multiple objects, you need to distribute each object to its own layer and then tween them all separately. The box on Section 4.3.1.3 shows you how.
-
On the Stage, draw the shape (or create the text) you want to begin your tween . In Figure 3-20, the beginning shape is a fly on the right side of the Stage. -
Convert the drawing to a noneditable form by selecting all the elements of your drawing and then choosing either Modify Group (to flatten all the elements into a single group) or Modify Convert to Symbol (to convert the editable drawing into a reusable symbol ).
Flash displays a box around the entire drawing to show that it's now a single, noneditable entity (Figure 3-20). -
If the selected frame isn't a keyframe (if you don't see a dot in the frame), turn it into a keyframe by selecting Insert Timeline Keyframe . Flash displays a dot in the frame to let you know it's a keyframe. Figure 3-20. You can't motion tween an editable object; you have to use a symbol, a grouped object, or a block of text. This restriction might seem capricious, but it's actually practical. If you drew a complex object consisting of seven different shapes and didn't flatten it into a symbol or a group, Flash wouldn't know which shape to move where. 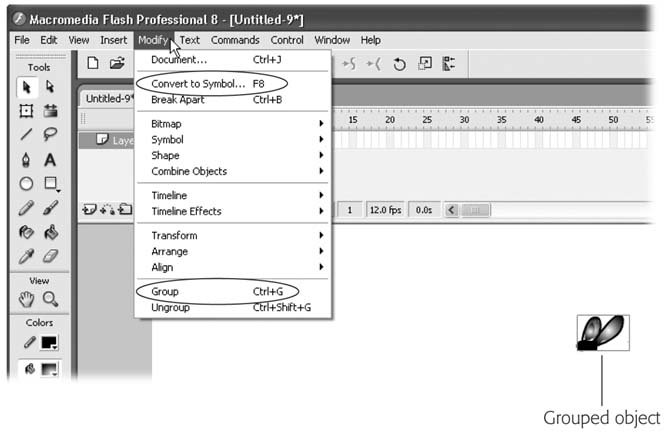 -
Select the frame where you want your tween to end (for example, Frame 10 ). Flash highlights the selected frame. -
Insert an ending point for your tween by selecting Insert Timeline Keyframe . The playhead moves to the selected frame, and Flash displays a solid dot in the selected frame to let you know it's now a keyframe, as shown in Figure 3-21. Figure 3-21. Here, you see a symbol being dragged from the left side of the Stage to the right side. Moving a symbol is the quickest way to create a motion tween, but it's certainly not the only way. Using the Properties, Color Mixer, and Transform panels, you can create a tween that morphs an object's color, transparency, rotation, scale, and skew. 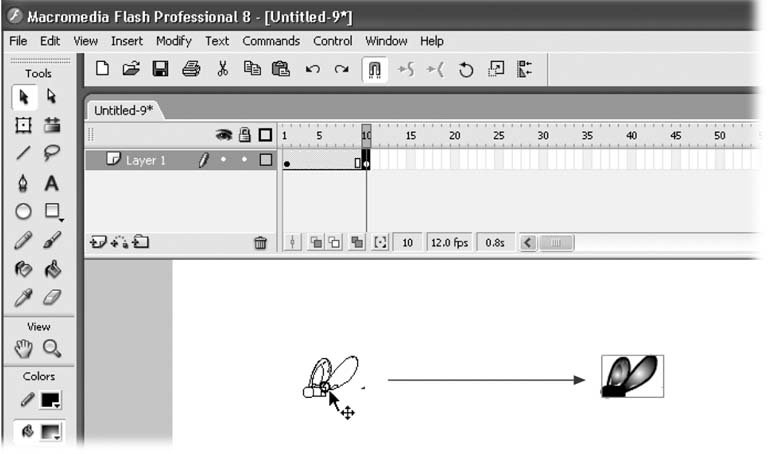 -
On the Stage, drag the object to somewhere else on the screen . You can most easily create a motion tween by carrying over your beginning image from the first keyframe and moving it, but you can create a much more sophisticated motion tween. To change the color, transparency, or size of your ending object, you can use the Properties, Color Mixer, and Transform panels. -
Select any frame in the frame span . Flash highlights the selected frame and the Property Inspector appears, as shown in Figure 3-22. -
In the Property Inspector, click the Tween drop-down box (Figure 3-22) and then, from the menu that appears, select Motion . Or, to tell Flash to do this step for you, right-click the selected frame and choose Create Motion Tween from the context menu that appears. Flash turns the frame span bluish-purple and inserts an arrow (Figure 3-23) to let you know you've successfully added your motion tween. And in the Property Inspector, motion-related tween options appear: Scale, Ease (Edit), Rotate, Orient to path, Sync, and Snap. Figure 3-22. Clicking in the frame span tells Flash to display the Property Inspector associated with that frame span. If you don't see the Property Inspector, select Window Properties and then, from the pop-up menu that appears, turn on the checkbox next to Properties. Finally, click the Tween drop-down box (circled) and, from the menu that appears, change None to Motion. 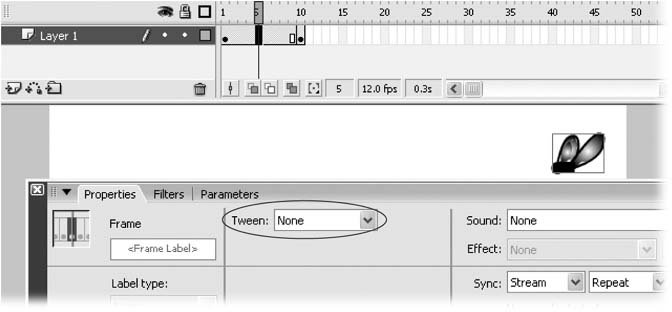 Figure 3-23. Flash adds a motion tween automatically (the instant you select Motion from the Tween drop-down box), so depending on the frame you selected to display the Property Inspector, the content on the Stage might change. For example, here, Frame 5 is selected, so the contents of Frame 5 (a tweened image of the fly halfway across the Stage) appear. 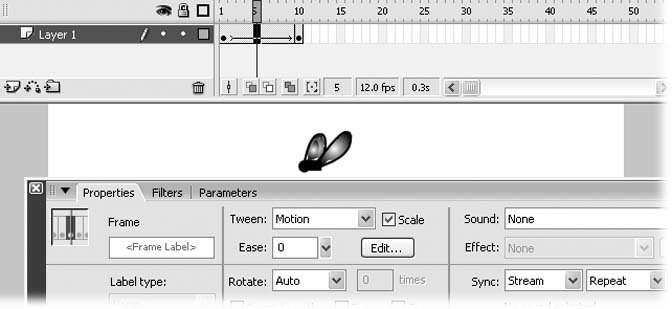
Tip: If you see a dashed line in the frame span (instead of an arrow), that's Flash telling you your motion tween is broken. Check to make sure you're tweening noneditable objects (symbols, grouped objects, or text blocks) and that you've created both a beginning and an ending keyframe for your tween.
-
If you like, set the Ease option . Ease tells Flash to speed up (or slow down) the tween. If you want your tween to start out normally but speed up at the end, click the drop-down arrow next to Ease and then drag the slider that appears until a positive number appears. To tell Flash to start your tween normally but slow down at the end, drag the Ease slider until a negative number appears. (Zero means that when you play your animation, the tween appears to be the same speed throughout.) If you're running Flash Professional, you can create a custom speed that varies throughout the tween. (Perhaps you're tweening a scene of a mouse running past a gauntlet of cats and want your mouse to speed up every time it passes a cat and slow down in-between.) To do so, click Edit. Then, in the Custom Ease In/Ease Out window that appears, drag the diagonal tween line to specify the relative speed for each frame of your frame span. When you finish, click OK.
Note: Because the other motion tweenrelated options are useful only in the context of specific motion-related effects, "Orient to path" and Snap are described beginning on Section 3.3.3.1; Scale and Rotate in Chapter 5; and Sync in Chapter 8.
-
Test your motion tween by selecting Control Play . Flash plays your motion tween on the Stage. 3.3.3.1. Motion guide layers (moving along a nonstraight path) The previous section shows you how to create a straight-line motion tween, where an object appears to move from one point on the Stage to another. This section takes motion tweening a little further by explaining how you can use a motion guide layer to create a nonlinear motion tween.
Note: In Flash, there are other kinds of layers besides the generic ones you learned to create earlier in this chapter. There are also guide layers to help you position objects precisely on the Stage (Chapter 4), mask layers to hide and display specific portions of your images (Chapter 6) for a peek-a-boo effect, and motion guide layers to create a nonlinear motion tween (these are the layers you get acquainted with in this section).
Using a motion guide layer to create a nonlinear motion tween is surprisingly easy. All you have to do is create a regular straight-line motion tween, as described on Section 3.3.3. Then, you create a special type of layer called a motion guide layer. On the motion guide layer, you draw the path you want your object to follow. You can draw a twisty line, a curve, or whatever you like. Then you drag your objects to the beginning and the end of the path, respectively. That's itdead simple. You see a step-by-step example below.
Note: You don't see the actual path when you run your animation; you see it only when you're editing your animation and testing it. You can think of a path as a kind of guideline that "shows" your objects how to move along a motion tween.
To create a tween along a nonlinear path using a motion guide layer: -
Create a basic, straight-line motion tween . The steps for creating one begin on Section 3.3.3. -
On the Timeline, select the keyframe that begins your tween . Flash highlights the selected keyframe as well as the name of the layer you're working in (the active layer). In Figure 3-24, the active layer is Layer 1. Figure 3-24. When you create a motion guide layer, Flash places it directly above the active layerand indents the active layerto give you a visual reminder that the motion guide layer controls the active layer. As you see in the following steps, the path you draw on your motion guide layer determines how the objects on your active layer behave during a motion tween. 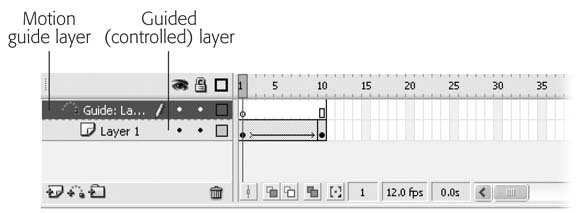
Tip: You can rename a layer from Flash's unimaginative Layer 1, Layer 2, and Layer 3 to something more meaningful, like Fly Motion. (Doing so will help you remember what each layer containsespecially useful if you create animations with multiple layers.) To rename a layer: On the Timeline, double-click the name of the layer you want to rename. In the editable name field that appears, type a new name and then press Enter.
-
On the Timeline, click Add Motion Guide (the icon that looks like a slinky, as in Figure 3-24 ). If you prefer, you can right-click the active layer and then, from the context menu that appears, select Add Motion Guide. Flash creates a motion guide layer, selects it, and places it directly above the active layer (Figure 3-24). -
With the motion guide layer still selected, draw a path (the line you want your motion tween to follow) on the Stage . The Pencil is an easy tool to use for this taskespecially with the Smooth option turned on, as described on Section 2.3.1.2. But you can use any of Flash's drawing tools to draw your path. Figure 3-25 shows you an example. Figure 3-25. You can use any drawing or painting tool you like to create your path. If the path you create is a closed shape (like a circle) Flash will decide which direction the tween should go. 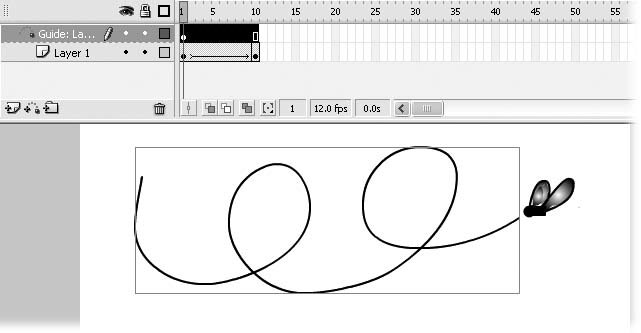
Tip: Some folks find it hard to concentrate on drawing a path with objects in the way. To temporarily hide the objects on the Stage: On the Timeline next to your non motion guide layer, click the Show/Hide All Layers icon (the icon that looks like an eye, as shown in Figure 3-24). After you finish drawing your path, click the Show/Hide All Layers icon again to redisplay the objects on the Stage.
-
In the nonmotion guide layer, click to select the beginning keyframe for your animation . Flash highlights the selected keyframe. -
Click the center of your image to select it and then drag the image until the center " snaps " onto one end of your path . Flash displays a little circle in the center of your image to help you center the image directly onto your path, as shown in Figure 3-26. Figure 3-26. If your eyesight's less than stellar , you might have a hard time positioning your image right on top of the path. But position it correctly you must, or your motion tween won't work. To help you find the right spot, select one of the frames in your nonmotion guide layer to display the Property Inspector; then turn on the checkbox next to Snap. This step makes finding the sweet spot on that path just a little bit easier. 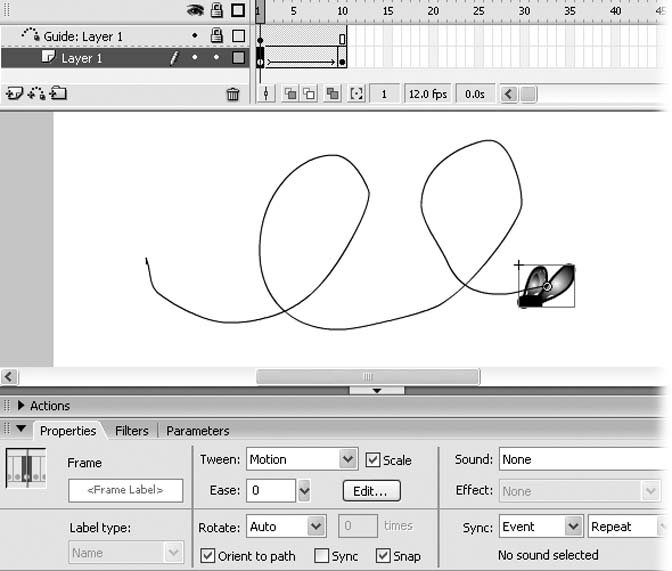
Note: If you don't position the center circle of your image precisely on the path, your motion tween won't work. (Your image doesn't have to be at the very end of the path, but it does have to be exactly on the path.) If you have trouble positioning your image, make sure you're selecting it by clicking in its center (that helps Flash position its helpful circle). If that doesn't help, select the first keyframe in your animation and then, in the Property Inspector that appears, turn on the checkbox next to Snap. Doing so tells Flash to widen the center circle it displays on your image when you move it near the path so that you know when to let go of the mouse.
-
Select the ending keyframe for your animation . Flash highlights the selected keyframe. -
On the Stage, click the center of your image to select it and then drag the image until the center "snaps" onto the other end of your path . Again, as you drag your image, Flash displays a little circle in the center of your image to help you position it directly onto your path. -
Test your guided motion tween by selecting Control Play . Flash plays your motion tween on the Stage, moving your object along the path you defined in step 4. Figure 3-27 shows you an example. Figure 3-27. Here you see the effect of a motion guide layer: The fly buzzes along according to a nonlinear, loopy pathmuch more realistic and interesting than a straight shot from right to left. But notice that the fly always faces straight ahead, even when it's upside down. If this isn't the effect you want in your motion tweens, check out the "Orient to path" section coming up next. 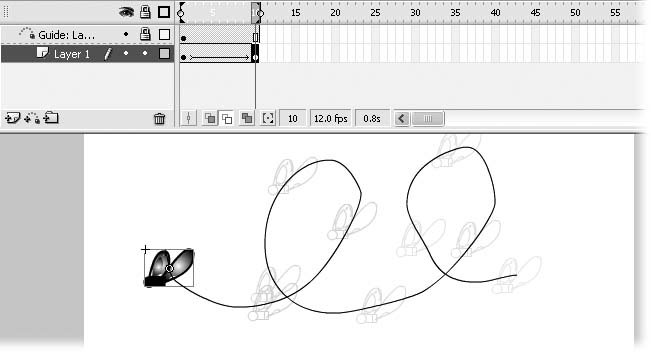
3.3.3.2. Orient to path If you've created a nonlinear path using a motion guide layer (Section 3.3.3.1), you may have noticed that the object stays right-side up as it moves along the patheven if the path's a loop-de-loop, like the one in Figure 3-27. That effect might be what you want. If it isn't, and you want your object to turn to face the path as it moves along, you can do so easily by turning on the "Orient to path" checkbox in the motion tween section of the Property Inspector (Figure 3-28). You see the effect of turning on the "Orient to path" checkbox in Figure 3-28. Figure 3-28. Turning on "Orient to path" in the Property Inspector (click any frame in your nonmotion guide layer to view Frame properties in the Property Inspector) tells Flash to turn the object as it moves along the path. You get a much more realistic motion tween. 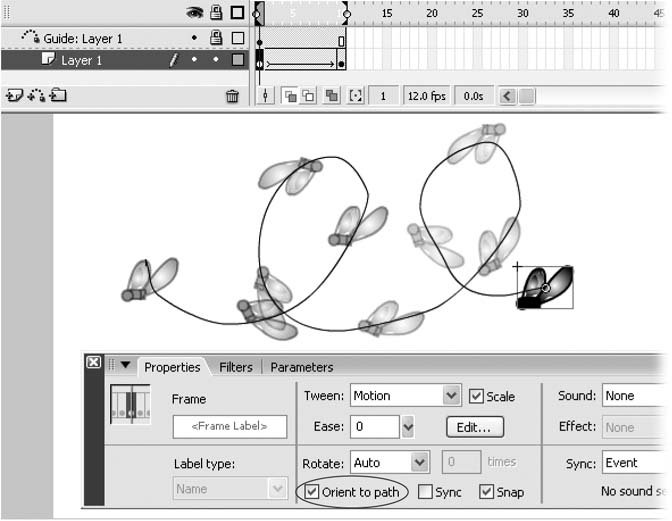
 |