2.2. Preparing to Draw Even if you're familiar with animation software (but especially if you aren't), you need to know a few quick things before you roll up your sleeves and dive into Flashsort of like the quick where's-the- turn -signal once-over you do when you jump into a rental car for the first time. In this section, you see how to get around the Stage and how to customize your Flash document's properties. You'll also learn a couple of basic Flash terms you need to understand before you use the drawing tools (which you see how to do on Section 2.3.1). But first you need to open a new Flash document page so that you can follow along at home. To do so, launch Flash and choose Create New Flash Document on the start screen. You can also create a new file using the Flash main menu. Here's how: -
From the main menu, choose File  New . New . The New Document window opens. If the window doesn't show the General tab shown in Figure 2-2, click that tab to make it active. -
In the Type list, select the type of new file you want to create and then click OK . The New Document window disappears and Flash displays a brand-new blank document. You can tell it's a new document by the name Flash gives it: for example, Untitled-1 . 2.2.1. Customizing Your Stage The Stage, as you may recall from Chapter 1, is your electronic canvas: it's where you'll be drawing your lines and shapes and adding your text. Figure 1-1 shows you the way the Stage appears the first time you create a new document in Flash. There's certainly nothing wrong with it, but you may want to make yours larger (or smaller) or add helpful positioning guides, such as rulers and gridlines. This section shows you how. DESIGN TIME
Tips from the Trenches | | Starting out on a learning curve as steep as Flash's can be daunting. Sometimes, it's helpful to hear what the pros thinkto get advice from folks from who've been there, done that, and want you to know that you can, too. Here are the top ten recommendations from the experts: -
Analyze other people's animations . As you begin to explore Flash content on other Web sites, think about it critically. Don't just focus on whether the result is dazzling or colorful , but also consider whether it's effective. What do you think it was designed to do? Get you to buy something? Get you interested in a product? Did it work? If not, why not? What detracts from the overall effect? Keep a notebook so you can apply what you learn to your own efforts. -
Don't sell yourself short . Don't think you can't create great animations just because you're not a professional artist with a background in design. You'll find that Flash helps you through lots of tough spots (like correcting your shaky lines and generating frames out of whole cloth), and frankly, you're probably not shooting for a Picasso- or Tarantino- level result anyway. You get better at everything with practice; Flash is no exception. -
Always start with a storyboard . Whenever you're working with anything but the simplest design (anything more than a couple of frames), create a storyboard (Section 2.1.2). It can be as rough or as detailed as you want; some folks just jot notes to themselves . But do it you must. Every minute you spend planning will save you hours of hair-pulling later. -
Practice, practice, practice . There are a lot of software programs out there that you can probably sit down and nail in 20 minutes flat. Flash isn't one of them. And while reading is a great way to begin learning Flash, no amount of book learning is going to substitute for rolling up your sleeves and actually producing an animation or two. (That's why this book contains hands-on examples for you to work through.) -
Join an online Flash community . Real-time help from knowledgeable Flash-ionados is a beautiful thing. Use the online resources outlined in Appendix A to join a Flash community where you can ask questions, get help, and share ideas. -
Don't throw anything away . You might be tempted to discard your mistakes. But if the "mistake" is interesting or useful, save it: you may be able to use it later for a different project. (While you're at it, write down a few quick notes about how you achieved the result so you can recreate it if you want to.) -
Spread yourself thin . Many Flash pros like to have several different projects going at once, all of various types, so they can switch around when they get stuck on one. Keeping a lot of balls in the air can be an excellent way to help you think about things from different angles, which will help develop your skills. -
Always test your work in a live environment . Don't rely on Flash's testing environment. If you're creating a Flash animation to display on a cell phone, test it on a cell phone before you go live. If you're targeting a Web site, upload your animation to a Web server and test it in a browser. -
Solicit (and incorporate ) viewer feedback . After you finish an animation, ask for feedback. Choose people you know will take the time to look at your work carefully and give you an honest evaluation. -
Never, ever sacrifice content for the sake of coolness . The purpose of tools like Flash is to help you get your message across, not to see how many special effects you can cram into a 5-second spot. Pay more attention to whether you're creating an effective animation than whether you're adding enough colors, shapes, or audio clips. |
Figure 2-2. In every case but one (Flash Project), selecting a document type and then clicking OK tells Flash to create a crisp, new document for you. (Flash projects are really nothing more than lists of other files with version control added so that multiple designers can work on the same Flash project without overwriting each others' changes.) 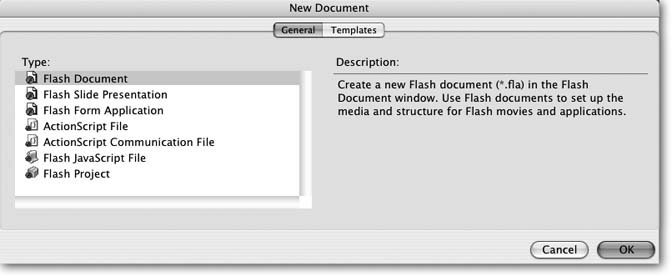
2.2.1.1. Change the size of the Stage The size of your Stage is also the size of your finished animation. The standard 550 x 400 pixel Flash Stage is a good compromise between large-enough-to-see-with-out- glasses and small-enough-not-to-hog-the-whole-screen. Flash automatically shows you this size Stage because 550 x 400 is the minimum decent screen size for someone running a computer with a typical resolution of 800 x 600. But you may not want to keep that size. In some cases, you'll actually need the Stage to hog the whole screen: for example, if you're designing an animation targeted for a very large size display monitor. In the case of the Lotta Caffeina banner ad, you want a wide, short Stage (typically somewhere around 640 x 40). If you're designing for those itty-bitty mobile devices, you'll want to shrink the Stage accordingly . The best way to ensure that your finished animation is the right size is to start with the right sized Stage out of the gate. You set the size of the Stage in the Document Properties dialog box (Figure 2-3), which you can open by using one of these methods : -
Right-click the Stage. From the shortcut menu that appears, choose Document Properties. -
Click the Size button in the Property Inspector (Section 1.4.13). -
Choose Modify Document. Then, in the Document Properties window, type the new height and width in the Dimensions boxes. Figure 2-3 shows dimensions of 200 x 200 pixels, which is about the right size for a small pop-up ad. Click OK to close the window and return to the now-resized Stage. FREQUENTLY ASKED QUESTION
Taking Advantage of Templates | | How can some template designers I've never even met possibly know what kind of drawings I want to put in my animation, or how long I want my animation to be, or what kinds of sounds I want to add? They can'tso how on earth can Flash templates save me time? The predesigned templates that come with Flash save you time on the grunt work associated with several commonplace kinds of animations. For example, the Interactive Advertising Bureau (www.iab.net) recommends certain dimensions for certain types of Web ads, including pop-up windows and banner ads. When you open up a template for a pop-up ad, for example, the Stage is already preset to the dimensions for a standard sized pop-up in a standard sized browser window. You don't have to research the issue, and you don't have to customize the Stage yourself. Or say you want to create a slideshow in Flash, complete with buttons that let folks click forward and backward through your pictures. Putting an interactive animation like this together from scratch would require a fair bit of work, but if you use a slideshow template, all you have to do is add your images and captions. The template takes care of the rest. On the downside, documentation for how each Flash template behaves and what you need to do to customize it is a bit skimpy. (When you select Help Flash Help and, in the Help window that appears, search for "Using Templates," you get some vague overall hints on what the templates to do and how to modify them, but no specific instructions.) To see the templates Flash offers, select File New to display the New Document window; then click the Templates tab. Here are the main categories: -
Advertising : Pop-up, skyscraper (skinny vertical), banner (skinny horizontal), and full-page ads. -
Form applications : Data input forms that you need to hook up to a server on the back end. -
Global phones : For Flash animations targeted for certain (Symbian) phones. -
Japanese phones : For Flash animations targeted for Japanese phones. -
PDAs : For Flash animations targeted for Nokia, Motorola, Sony, and other personal digital assistants (handhelds). -
Photo Slideshows : For Flash animations showing JPG images overlaid with Forward and Back controls. -
Presentations : Automatic ( noninteractive ) slideshows. -
Quiz : Simplified data input forms that allow the audience to page through multiple screens and answer yes/no questions. -
Slide Presentations : Similar to Photo Slideshows, but tailored for multiple images per frame. You can learn more about templates, including how to create your own, in Chapter 7. |
Tip: If you know you're going to be printing your work, you don't have to futz around with pixel dimensions; you can just turn on the Match: Printer radio button, which automatically resizes your Stage so that it prints out nicely on 8.5 x 11 paper.
2.2.1.2. Setting the background color Because the Stage is your canvas, the color of the Stage will become the background color of your drawing. If white's okay with you, you're in luck: A fresh new Stage always appears white. But if you want to create a drawing with a different-colored background, here's how you go about it: Figure 2-3. You use the Document Properties window to set the size and color of your Stage (which will also be the size and background color of your finished animation). When you type the dimensions, you can type out the units of measurement (px, or even pixels, for example). But it's not necessary: The value in the Ruler Units field tells Flash which unit of measurement you're using. 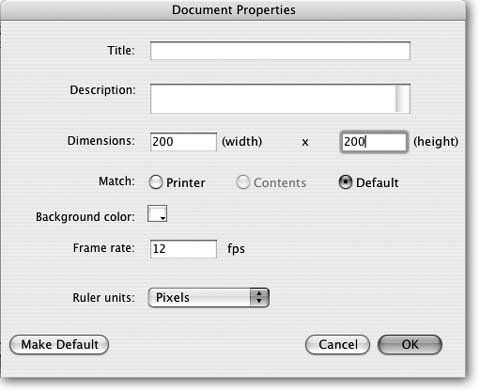
-
Select Modify Document (or press Ctrl+J in Windows; -J on a Mac ). The Document Properties window shown in Figure 2-4 appears. -
On the Background Color box, click the down-arrow and choose the color you want to use for the Stage (and for the background of your drawing). Then click OK . Flash turns the Stage lime green (or whatever color you chose in step 2).
Tip: Because background color changes the way foreground objects appear, you might want to experiment with the color of the Stage, beginning with one color and changing it as you add objects to the Stage until you get the effect you want. (You can change the color of the Stage at any time, even after you've completed your drawing.)
2.2.1.3. Add helpful measurement guides Even professional artists can't always draw a straight line or estimate three inches correctly. Fortunately, with Flash, they (and you) don't have to. Flash offers several tools that help you spot precisely where your objects are on the Stage and how much space they take up: rulers, a grid, and guides. You can see an example of these tools as they appear on the Stage in Figure 2-5. Here's what each tool does, and how to display each of them: -
Rulers . This tool displays a ruled edge along the left and top of the Stage to help you determine the location and position of your objects. To turn on Rulers, right-click (Windows) or Control-click (Mac) the Stage. Then, from the shortcut menu, choose Rulers Show Rulers. Figure 2-4. Changing the color of the Stage is an easy way to change the way your drawing looks. It can also make constructing your drawing easier. For example, if you're working with light-colored shapes, a nice dark background will help you see what you're doing bettereven if you end up changing the Stage back to a lighter color when you're finished. 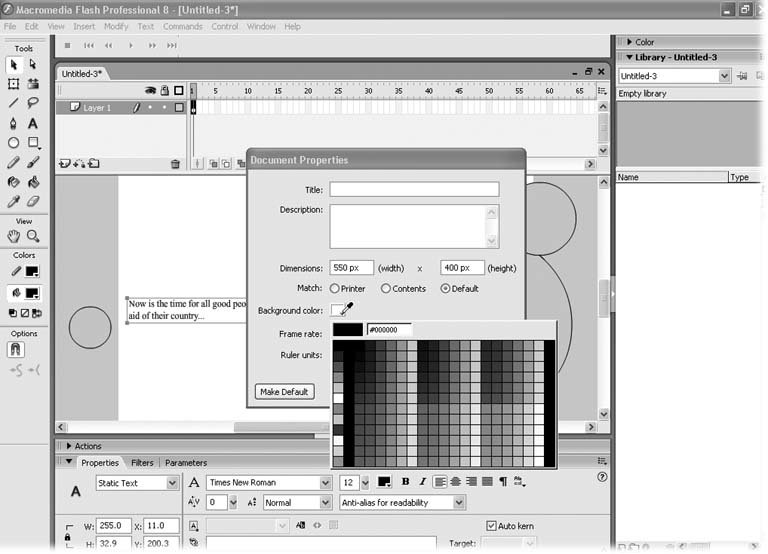 -
Grid . This tool divides the Stage into evenly sized squares, which is great for helping you get the location of objects exact. To turn on the Grid, right-click (or Control-click) the Stage. Then, from the shortcut menu choose Grid Show Grid. -
Guides . If you want a tool that helps with straightedge alignmentlike the gridbut you want more control over where the straight edges appear on the Stage, you want guides. To turn on guides, you first have to turn on rulers (see above). Then, right-click (or Control-click) the Stage and, from the shortcut menu, choose Guides Show Guides. A checkmark appears next to Show Guides to indicate theyre turned on, but you don't actually see any guide lines until you drag them onto the Stage. You can drag as many guide lines as you want down from the top ruler or over from the left ruler. To add a guide, click on a ruler (don't let go of the mouse) and drag your cursor to the Stage. Release the button when you get to the spot where you want your guide.
Tip: Grids and guides would be helpful enough if all they did was help you eyeball stuff, but Flash takes them one step further. If you turn on snapping and then drag, say, a circle around the Stage, Flash won't let you drop it just anywhere . Instead, Flash only lets you drop (position) the circle when it's lined up precisely with either a grid or guide mark. To turn on snapping, simply right-click (Control-click) the Stage and choose Snapping Snap to Guides (or Snapping Snap to Grid).
Edit Guides and Grid Edit Grid, respectively. 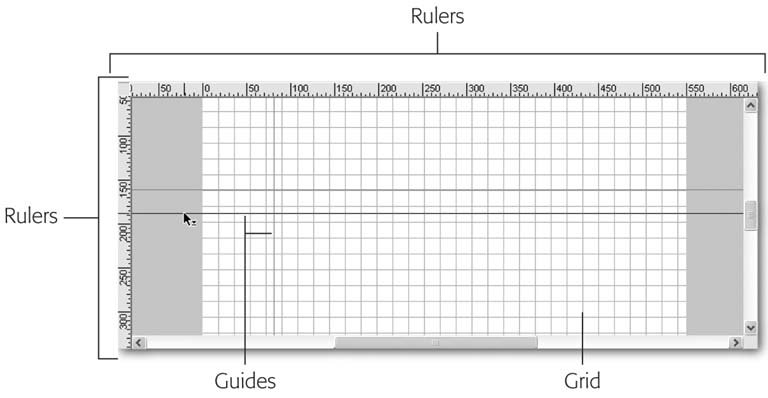
2.2.2. Choosing a Drawing Mode Flash's selection tools, as you'll see in the next section, behave differently depending on which of Flash's two drawing modes you choose: the merge drawing mode (which was the only way you could draw in Flash up till now) or the new object drawing mode (which is more like the familiar drawing modes in Adobe Illustrator, AppleWorks, or Microsoft Word). The way you work with your drawings on the Stage depends on the drawing mode you choose, too, so it pays to understand the differences between the two: -
The merge drawing mode . Flash assumes you want to use the merge drawing mode unless you tell it otherwise . In this mode, if you overlap one shape with another shape, Flash erases the overlapped portion of the first shapea fact you discover only when you move the overlapping shape, as shown in Figure 2-6 (bottom). Figure 2-6. Top: Say you're in merge mode and you drag a rectangle to overlap a circle, as shown here. Your only clue that you're in Flash's merge drawing mode is that the objects (or portions of objects) that you select appear to be covered by a dotted pattern.
Bottom: Drag the selected rectangle away, and you see that Flash has erased the overlapped portion of the circle. Notice, too, that Flash repositioned the rectangle's fill, but left the outline in place. That's typical in merge drawing mode, where Flash treats shapes not as complete objects, but as a collection of disparate elements. 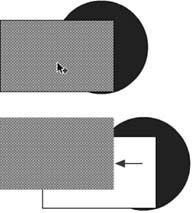 -
The object drawing mode . New in Flash 8, the object drawing mode tells Flash to think of shapes the way most humans naturally think of them: as individual, coherent objects. Overlapping shapes in object mode doesn't erase anything, and when you select a shape, you select the entire shapenot just the fill, or line, or portion of the shape you selected. Figure 2-7 shows you an example. Figure 2-7. Left: To activate Flash's object drawing mode, you first click the Pencil, Pen, Line, Brush, or any of the Shape tools; then you click the Object Drawing icon that appears in the Options section of the Tools panel.
Top: After you've activated the object drawing mode, you draw your lines, fills, and shapes as normalwith one difference. When you select an object, it's all-or-nothing: Flash displays a blue box around the entire selection with a blue selection box (as you see around the circle selected here).
Bottom: Unlike the shapes you create using the merge drawing model, the shapes you create in object mode retain their integrityeven when you overlap them and move them around. 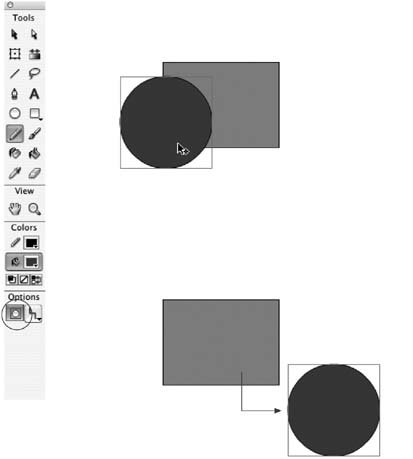
Note: The drawing mode you select isn't document-specific; it affects all of the documents you create in Flash. If you choose the object drawing model, for example, each time you create or switch to another open document, Flash assumes you want to use the object drawing model.
2.2.2.1. When to use merge drawing mode As shown in Figure 2-6 (bottom), when you overlap objects in merge drawing mode, Flash erases the overlapped portions of the objects. You'll probably want to stay with the merge drawing model if you fall into one of the following three categories: -
You're familiar (and comfortable) with an older version of Flash. (Merge was the only drawing mode before Flash 8.) -
You plan to create no more than one shape or object per layer anyway, so overlapping isn't an issue. -
You want to be able to select portions of objects, or create a deliberate "cut out" effect by overlapping objects and letting Flash do the cutting for you. Since Flash assumes you want to work in merge drawing mode, you don't have to do anything special to activate it the first time you use Flash. But if you (or someone you share your copy of Flash with) has activated object drawing mode (Section 2.2.2), here's how to tell Flash to return to merge mode: -
Click to select one of the drawing tools (Line, Pencil, Pen, Brush, Oval, Rectangle, or Polygon ). In the Options section of the Tools panel, Flash displays the Object Drawing icon (Figure 2-7, left). The icon appears white, showing that it's selected. -
Click the Object Drawing icon to deselect it . The icon appears gray after you've deselected it, indicating that you're in merge drawing mode. -
Using the drawing tool you selected, draw an object on the Stage . Flash lets you work with your drawing (select it, overlap it, and so on) using merge drawing mode. Section 2.2.3 explains how the selection tools work in this mode.
Tip: If you've already created an object in object drawing mode, you can break it apart by selecting it and then choosing Modify Break Apart.
2.2.2.2. When to use object drawing mode In the days before Flash 8, you had to create your objects on separate layers if you wanted to overlap them with impunity. In Flash 8, simply activate object drawing mode and bingoFlash lets you stack and overlap your objects on a single layer as easily as a deck of playing cards. Choose object mode if you want to work with entire objects (as opposed to portions of them). Here's how to activate object drawing mode: -
Click to select one of the drawing tools (Line, Pencil, Pen, Brush, Oval, Rectangle, or Polygon ). In the Options section of the Tools panel, Flash displays the Object Drawing icon (Figure 2-7, left). -
Click the Object Drawing icon to select it . The icon appears white after you've selected it, meaning you're in object drawing mode. -
Using the drawing tool you selected, draw an object on the Stage . Flash lets you interact with your drawn item (select it, stack it, and so on) using object drawing mode. In Section 2.2.3, you see how the selection tools work in this mode.
Tip: If you've already created an object in merge drawing mode, you can integrate it (in other words, tell Flash to treat it as a single, complete object just as though you'd created it in object drawing mode) by selecting the object and then choosing Modify Combine Objects Union.
2.2.3. Selecting Objects on the Stage Once you draw a line or shape on your Stage (which you see how to do on Section 2.3.1), you need to select it if you want to do anything else to it: for example, if you want to change its color, make it bigger, move it, or delete it.
Note: This section gives you a quick introduction to Flash's selection tools. Chapter 5 (Section 5.1) shows you the finer points of selecting objects.
As you can see in Figure 2-8, the Tools panel offers three selection tools you can use to select an object on the Stage. How these tools behave depends on whether you've created your drawings in merge or object drawing mode (see the previous section). Figure 2-8. Selecting an object on the Stage to work with should be easyand most of the time, it is; all you have to do is click the Selection tool (circled) and then either click your object or click near it and drag a selection box around it. But if your Stage is crowded and you're trying to pick out just one little tiny angle of a line or portion of a drawing to manipulate, you'll need to use either the Subselection tool or the Lasso tool. 
-
Selection tool . This tool lets you select entire shapes, strokes, and fills, as well as symbols and bitmaps. (If you've created objects in merge mode, the Selection tool also lets you select rectangular portions of those objects.) After you've made your selection, you can then work with itmove the object around the Stage by dragging, for example. Using the Selection tool in merge mode . To select a rectangular portion of a shape you've drawn in merge mode, click near the shape and drag your cursor to create a selection box around just the portion you want to select. To select an entire shape, create a selection box around the whole shape. To select a symbol, a bitmap, or one element of a shape (just the fill portion of a rectangle, for example, or just the outline of a star) simply click the symbol, bitmap, or element. Flash surrounds selected symbols and bitmaps with a rectangular outline; all other selections appear covered with a dotted white pattern. Using the Selection tool in object mode . To select an object created in object mode, click anywhere on it. A rectangular outline appears around the selected object. -
Subselection tool . The Subselection tool lets you reposition the individual points that make up your strokes and shape outlines. Using the Subselection tool in merge mode . To select a stroke or an outline created in merge mode, click the Subselection tool and then click the line you want to move or change. Flash automatically redisplays that line as a bunch of individual points and lines. (Technically, these doohickeys are called anchor points and segments ; see Section 2.3.1.3 for more details.) As you move your cursor over the selection, Flash displays either a black (move) box or white (edit) box. Drag a black move box to move the entire stroke or outline; click and drag a white edit box to edit it (to change the individual points and segments). Using the Subselection tool in object mode . The Subselection tool works the same way on objects drawn in object mode as it does in on objects drawn in merge mode except that on objects drawn in object mode, you can also select an entire object by clicking the Subselection tool and then clicking a fill. When you do, Flash displays a rectangle outline around the selected object, just as if you'd selected it using another selection tool. -
Lasso tool . The Lasso tool is the one to use when you want to select a weirdly shaped portion of an objectsay, you want to create a hand-shaped hotspot in the middle of a square bitmapor when you need to select a weirdly shaped object that's super-close to another object. Using the Lasso tool in merge mode . To select a nonrectangular portion of an object drawn in merge mode, first click the Lasso tool; then click near (or on) the object and drag your cursor (as if you were drawing with a pencil) to create a nonrectangular shape. Using the Lasso tool in object mode . To select an entire object drawn in object mode, select the Lasso tool, click near the object, and then drag your cursor around the object (as if you were drawing with a pencil) until the object is completely encircled.
Note: If you need to deselect an object after you've selected it (say, you changed your mind and don't want to change the object's color after all), you have three choices. You can press Esc, you can click somewhere else on the Stage, or you can select Edit Deselect.
2.2.4. Essential Drawing Terms In Flash, a cigar isn't just a cigar. A circle isn't even just a circle. Every single shape you create using Flash's drawing and painting tools is composed of one of the following elements, as shown in Figure 2-9: -
Strokes . A stroke in Flash looks just like the stroke you make when you write your name on a piece of paper. It can either be a plain line or the outline of a shape. You draw strokes in Flash using the Pen, Pencil, and Line tools. When you use one of the Shape tools (for example, to create a square or polygon), Flash includes a stroke outline free of charge. -
Fills . Flash recognizes two different kinds of fills : the marks you make with the Brush tool, and the interior of a shape (in other words, everything inside the strokes that form the outline of a shape). In a lot of cases, your shapes comprise both strokes and fills, like the shapes you see in Figure 2-9. You can create fill- and stroke-containing shapes in one fell swoop using Flash's shape toolsOval, Rectangle, and PolyStaror you can draw them by hand using the Pen, Pencil, and Line tools. Why bother to learn the technical terms "stroke" and "fill" when all you want to do is draw a smiley face? For one very important reason: Flash treats strokes and fills differently. You use different tools to create them and different tools to modify them. If you don't know the difference between a stroke and a fill, you won't be able to do a whole lot with the drawing and painting tools described in this chapter. |