The Annotation Toolbar
The Annotation toolbar provides a means of adding text annotations, frames, and drawings to your recordings. It gives you several different ways of meaningfully “marking up” your video content to make it more accessible to your audience.
System Stamps
The Annotation toolbar consists of six tools, the first of which is called Add System Stamp. This setting stamps one or more pieces of information onto your video. These are not visible at record time; they can be seen only when the video is played back. The details of what actually gets displayed are buried inside the Effects Options dialog.
Here are a few common ways of opening your Effects Options dialog:
-
From the Effects menu, choose Options….
or
-
Click the Options drop-down arrow in the Main toolbar. This option has the added benefit of allowing you to choose the exact tab you want.
or
-
Right-click the Camtasia Recorder system tray icon. From here you can either choose Effects > Options…, or choose Options and then click on the exact tab you want to bring up.
In this particular case, we want the Annotation tab of the Effects Options dialog.
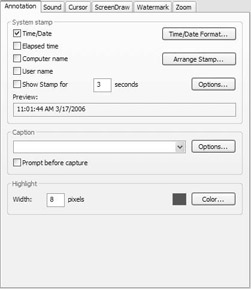
As you can see, we have four different system stamps from which to choose:
-
Time/Date. The current time and/or date. Useful for systems monitoring and usability testing, when you need to know exactly when something occurred.
-
Elapsed time. Shows how much time has passed since the capture began. Any time in which the Recorder was paused does not count. How long does it take to perform a specific action? Now you can document it, and compare it to how long it takes the competitor’s product to do the same thing.
-
Computer name. The name given to the computer as specified in the Windows System Properties. Good for monitoring systems and other kinds of testing where you’re likely to be working with a large number of computers.
-
User name. Shows exactly who is logged onto the machine at the time of recording.
For the Time/Date stamp, you have the possibility of adjusting the formatting for the stamp. Just click the Time/Date Format… button. The following dialog appears:
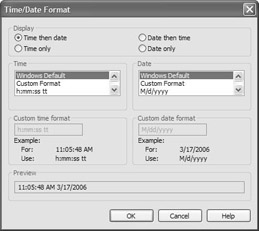
In the Display section, you have the option of choosing whether you want to display just the time, just the date, or both. If you opt for both, you can also stipulate the order. Time and Date also have their own sections from which to choose a particular format for their display. You can pick a format from the scrolling list, or choose Custom Format and create your own. Here’s a quick guide to the time and date formatting codes:
| Code | Definition | Example |
|---|---|---|
| Time Codes | ||
| h | Hour - single digit | 6:35:49 PM |
| hh | Hour - double digit | 06:35:49 PM |
| H | Hour - single digit (military time) | 9:03:14 |
| HH | Hour - double digit (military time) | 18:35:49 |
| m | Minute - single digit (seldom used) | 6: 9:49 PM |
| mm | Minute - double digit | 6: 09:49 PM |
| s | Second - single digit (seldom used) | 6:09: 7 PM |
| t | AM or PM (single character) | 6:35:49 P |
| tt | AM or PM (two characters) | 6:35:49 PM |
| Date Codes | ||
| M | Month - single digit | 3/05/2007 |
| MM | Month - double digit | 03/05/2007 |
| MMM | Month - three characters | Mar-05-2007 |
| MMMM | Month - full name | March 5, 2007 |
| d | Day - single digit | 3/ 5/2007 |
| dd | Day - double digit | 3/ 05/2007 |
| ddd | Day of the week - three characters | Jun-10-07 (Sun) |
| dddd | Day of the week - full name | Sunday, June 10, 2007 |
| y | Year - single digit (seldom used) | 3/5/ 7 |
| yy | Year - double digit | 3/5/ 07 |
| yyyy | Year - four digits | 3/5/ 2007 |
As long as you don’t inadvertently enter any of these codes, you can add all sorts of text (e.g., Date:) and symbols (slashes, commas, colons, hyphens, etc.) to punctuate your formatting. You can check your work by keeping on eye on the live preview at the bottom of the dialog. Click OK when you’re happy with the formatting.
If you’ve selected more than one system stamp to appear on the screen at once, note that you can easily change how the items are ordered. Just click the Arrange Stamp… button in the Annotation tab. Then select the desired system stamp, and click the Up or Down buttons to move this item upward or downward in the list order. The stamp will take the top to bottom order of these items and arrange them on screen from left to right. Click OK to continue.
Beneath all the system stamps, you have one more check box labeled “Show Stamp for __seconds.” Rather than risk annoying the user by showing an obtrusive system stamp for the whole duration of the video, you can check this box and enter a value into the Seconds field, which will get rid of your stamp(s) after the specified number of seconds have elapsed from the beginning of recording.
But you may be wondering, “Can I control what the stamp looks like? Font, size, color, all that jazz?” Actually, you can. Clicking on the Options… button in the System Stamp section will bring up the following dialog:
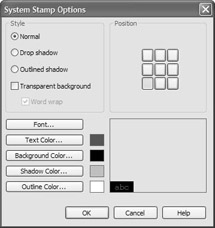
Change the options in this dialog to make your system stamps all pretty.
The System Stamp Options dialog offers numerous options for changing the look of your text:
-
Style. You can choose Normal text (no shadow), Drop Shadow (a small shadow appears beneath the text), or Outlined Shadow (shadow appears all around your text, providing a 3D effect).
-
Transparent Background. By default, the Recorder places a colored background behind your text to ease legibility (particularly for graphically detailed videos). Rendering the background transparent, however, gives the text more of a cinematic quality. In addition, selecting a transparent background allows lengthy text to wrap, which is useful if you’ve selected multiple system stamps.
-
Position. While Recorder doesn’t give you pixel-perfect control over a system stamp’s position, it does allow you to set it in one of nine sections of your video window. Just click the button of the desired screen section.
-
Font… Allows you to choose a font, style, and size for your system stamp text.
-
Text Color… Alters the color of your text.
-
Background Color… Provided you don’t have Transparent Background enabled, this will change the text’s solid background color.
-
Shadow Color… If you’ve chosen Drop Shadow or Outlined Shadow as your style, this is the color of your shadow.
-
Outline Color… If you’ve selected Outlined Shadow as your style, this will change the color of the outline.
You have a live preview of your options in the lower right-hand corner of the dialog. When satisfied with your choices, click OK.
As you can see, enabling Add System Stamp on the Annotation toolbar is just the beginning. It’s in the Effects Options dialog that things really get interesting. When you’re finished tweaking your settings, it behooves you to do a test recording so that you can see what the system stamp(s) will look like in the final capture before you actually do it. After all, there’s nothing more frustrating than spending 20 minutes recording a clip, only to discover that the system stamp looks terrible at its current settings.
Captions
The next tool in your Annotation toolbar is Add Caption. Captions function very similarly to system stamps, except that a caption can be anything you want. Let’s head back into the Annotation tab of your Effects Options dialog to see how this effect can be set.
In the Caption box, simply type in what you want the caption to say. When you enable captions by clicking the Add Caption button on your toolbar, this caption is emblazoned on your recording (during playback, not during recording):
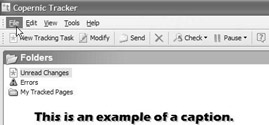
Captions can be anything your heart desires, from copyright information to special instructions to “Bob rulez!”
The Caption field also comes with a drop-down list from which you can select the most recently used captions, so if you have just a few that you use often, you’re not constantly having to retype them. Of course, you can also adjust the formatting of your caption, using the same kind of dialog as with your system stamps. Just click the Options… button inside the Caption section of the Annotation tab and adjust any settings as necessary.
There’s one additional option here that you might find handy. Clicking the Prompt before capture box will present you with a dialog when starting recording that lets you type in a new caption each and every time, using the currently entered caption as the default:

As you can see, this dialog has the same drop-down list for selecting recently used captions as well as an Options… button for adjusting the caption’s formatting.
| Caution | Unlike system stamps, a feature that is not replicated at all on the editing side, captions have been more or less supplanted by callouts in Camtasia Studio. I would use captions only if you want a particular message “welded” to the content, as captions are very difficult to remove later. I personally prefer to always have the option of editing or striking content at a later time, and the Callouts feature in Camtasia Studio supports this as well as offers a fuller array of capabilities in general (for more information about callouts, please see Chapter 11, “Editing Effects”). But if the difficulty in removing a caption is tolerable or even desirable for you (e.g., security reasons), then by all means, use captions. They, along with system stamps, are a quick and easy way of labeling individual video clips. |
Watermarks
The next button on the Annotation toolbar is the Add Watermark tool. If you’ve ever seen network television, then you’ve probably seen a great many watermarks already (in fact, most cable channels use them now, too). The CBS eye and NBC peacock are examples of watermarks[*]. They sit in the lower right-hand corner of the screen, branding the content, and you therefore have the constant reminder that the show you’re currently enjoying is broadcast into your home courtesy of them.
Now you can brand your videos in very much the same way. This is usually a corporate logo of some sort, but it can be just about any image you want. To give you a sense of the possibilities, Camtasia Studio comes with a sample watermark image to play with:
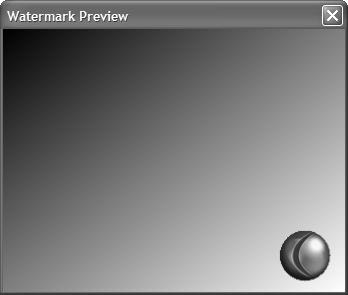
Now imagine your logo in place of the Camtasia Studio “C” . . .
While the watermark can be turned on and off through the Annotation toolbar, the real action once again is happening in the Effects Options dialog, this time on the Watermark tab:
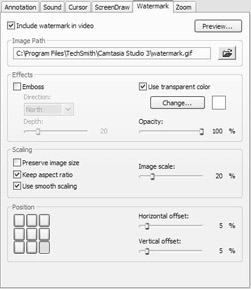
Obviously, the first thing we need to do is specify what file you want to use. If you’re looking at this dialog for the first time, you’re likely to see a path to the Camtasia Studio logo. You can change this by typing in a new path or by clicking the Browse button (with the folder icon) in order to navigate to your watermark. This can be any image file you like, as long as it’s in an accepted file format (BMP, GIF, JPG, or PNG). While any of these formats will work, I would strongly recommend using a 32-bit PNG image, as the watermark feature allows per-pixel transparency information in this format. Unlike other image formats that only offer whole-image transparency (if any at all), 32-bit PNG images have a special alpha channel that can assign a different transparency level to each and every pixel in the image. Confused yet? Basically, this means that whatever’s behind it, the watermark’s edges will never look jagged or have a weird color outline. This is particularly nice if your video has a lot of visual detail. You can create 32-bit PNG images in recent versions of higher-end imaging applications like Adobe Photoshop or Macromedia Fireworks.
At the top of the tab, you have a check box called Include water- mark in video. This merely enables or disables the watermark in your recordings; it’s the same as clicking Add Watermark on your Annotation toolbar. There’s also a small preview window that will let you see more or less what your watermark will look like. It comes up whenever you enter the dialog. If you closed it inadvertently, you may reopen it by clicking the Preview… button.
Now, let’s move on to some of the watermark effects. When you select an image to use as your watermark, you can alter its appearance, size, and location inside your video window. Let’s first look at the Effects section. For starters, you have the ability to display your image with an Emboss effect. Embossing the watermark makes it look like you made a stamp out of the image and then stamped it in foil. This can be combined with the built-in Depth (how strong you want the emboss to be) and Opacity (the watermark’s level of transparency) slider controls to produce a subtle, ghostlike effect. From the Direction drop-down list, you can choose one of eight directions for the light source. Depending on the levels of depth and opacity, the differences between these directions can be subtle or striking. View them all and then settle on the one you like best.
Of course, if you uncheck Emboss, the image actually looks a lot more like the image you remember. While the Depth control is strictly in the domain of embossed watermarks, you can still control the Opacity. If your image has a background you wish to be rid of (so that it appears to “float” on the screen rather than being confined to a box), click the Use transparent color check box, and then click Change… to select the color used for the transparency. For example, you’ll pick white if the background of your watermark is white (which it probably is). Poof! The background disappears.
Our next section controls the scaling of the image, where we can alter its size relative to our capture area. Clicking the Preserve image size check box will maintain the size of the watermark image at 100% of its original dimensions no matter what, and consequently, all other scaling options will be disabled. If unchecked, you can use the Image scale slider to increase or decrease the size of the watermark. Note that the percentages listed here indicate the percentage of total available space within the recording area, not the percentage of original image size. Setting the slider to 100% means that the watermark will consume 100% of the recording area on either the horizontal or vertical axis. Unchecking Keep aspect ratio will stretch the image to conform with both axes, but will probably end up making your water- mark look like its reflection in a funhouse mirror. Best to leave this option enabled. Lastly, when scaling your content, the watermark can be blown up to several times its original size, and this can make the resulting image look pixelated and jagged. To combat this, make sure Use smooth scaling is enabled. This will apply a special smoothing algorithm to reduce the jaggedness. I recommend keeping this option enabled unless it interferes with the transparency of your watermark image.
Now that we’ve changed the appearance and size of the water- mark, let’s complete the package by changing its position. Just as with system stamps and captions, you have nine buttons that will let you place your watermark in a general section of the screen. With water- marks, you can go a bit further, using the Horizontal offset and Vertical offset sliders to place your image more exactly. When centered on the vertical axis, the vertical offset will be disabled. The same goes for your horizontal offset when centering horizontally. If you place the watermark dead center on your recording area, both offset controls will be disabled.
Just like your system stamp and caption effects, you won’t see the actual watermark at record time. Also, do keep in mind that you have the same watermark options when producing in Camtasia Studio, which, once again, has the advantage of making your watermark editable. So, unless you’re branding your content for security purposes and don’t want anyone messing with the watermark under any circumstances, I’d highly recommend adding the watermark there. Then, you can move or resize the watermark, change it, or get rid of it entirely, based on your future whim.
Autohighlight and Highlight
When creating your videos, you may want to draw attention to a window, toolbar, or some other specific area of the screen. Imagine if you could place a colored box around that particular object so that your audience can focus just on that one item, like so:
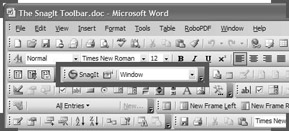
A colored box is great for cutting through the clutter and letting your audience know exactly which toolbar to look at.
With the next two tools on the Annotation toolbar, Autohighlight and Highlight, you can do just that.

(1) The Autohighlight tool. (2) The Highlight tool.
While similar, these two tools work a bit differently. The colored box from the Autohighlight tool is designed to follow your mouse cursor as it moves about the screen. Say you were creating a tutorial on the various toolbars of Microsoft Word, for example. The autohighlight box would appear around the toolbar upon which your mouse cursor was currently resting, and when you moved the mouse cursor to the next toolbar, the box would follow you, and the audience’s attention would focus on that toolbar instead.
Just enable Autohighlight and then start the recording as you normally would. Unlike the Annotation tools we’ve discussed thus far, you can actually see the autohighlight during record time. Once recording is in progress, the colored box appears and follows your mouse cursor from object to object. The autohighlight box will not display when recording is paused or stopped.
The Highlight option is slightly different, in that the colored box does not follow your mouse cursor. Rather, you choose the object you want to have the focus, thereby “setting” the highlight.
Here’s how to highlight an object:
-
With the Recorder open, click the Highlight button. A thin red rectangle will appear around the nearest object, and you can move it by mousing over the various objects on your screen. When over your desired object, left-click to drop the highlight in place, and the box will become its usual thickness and color (which you can change - more on this in a moment).
-
Record your presentation as usual.
-
The highlight box will remain in one spot during your recording and, unlike Autohighlight, can be initiated or canceled at any time, regardless of the Recorder’s current mode (recording, paused, or stopped). You can use this to your advantage if you wish to move the highlight box. Simply Pause the recording, and then uncheck the Highlight box. Then check it again, and select a new object. Resume recording. All the audience will see when playing back the video is the highlight suddenly moving from one object to another. This gives you the freedom of moving the box around without necessarily having it “joined at the hip” to your mouse cursor.
You may be wondering whether you’ll always be stuck with a red box at the default thickness. Good news: You won’t be. So let’s change some things around. Again, choose Options… from the Effects menu, this time returning to the Annotation tab. The final section in this tab is Highlight, where you can adjust two factors, which apply to both the Highlight and Autohighlight tools. First, you can change the width, which is the line width of your highlight box in pixels. Just enter a value into the Width field. Then, click the Color… button to adjust the box’s color.
When I really want to focus exclusively on a particular toolbar or some other element, I can use the Highlight feature to blacken out everything else on the screen for a few moments, so that only the toolbar (or whatever object you wish) is visible, like this:
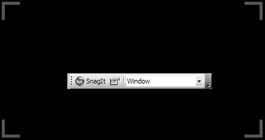
Here’s the same window from the previous example, except that this time, the SnagIt toolbar is the only thing visible.
Here’s how it works:
-
In the Highlight section of your Annotation tab (Effects Options dialog), set Width to 500[*] pixels, and Color to black (or some other color of your choosing).
-
Begin recording normally (with Highlight off). Then, just before you’re ready to discuss the object in question, pause the recording.
-
Enable Highlight and then click on the desired object. Now only your object is visible; the rest of the screen is black. Pause again when finished discussing the object.
-
Remove the highlight. If it happens that your Recorder window is also completely obscured by your highlight, you can disable the highlight by right-clicking the Camtasia Recorder system tray icon, then choosing Effects > Annotation > Highlight. If even your task bar is obscured by your highlight, a press of the Alt-Tab hotkey should reveal it.
-
Resume the recording when ready.
Here are a few more tips and caveats regarding the use of Highlight and Autohighlight:
-
Keep in mind that you can enable Highlight or Autohighlight, but not both at once.
-
If you click the Highlight button but change your mind before laying it down, a right-click will cancel the operation.
-
With both Highlight and Autohighlight, you’re relying on the Camtasia Recorder’s object detection capabilities, which are pretty acute at detecting windows and portions thereof. But if you can’t seem to highlight just the object you want, you can use the Callouts feature in Camtasia Studio to mimic a highlight during editing. While it cannot offer the convenience of Autohighlight in following your mouse cursor around, callouts are handy for drawing a quick bounding box and, unlike the highlighting features, can do so with pixel-perfect accuracy (plus you can edit or remove the box later if desired). So, if you’re trying to highlight a nontraditional object or group of objects, then callouts are probably the way to go. If you insist on using the Recorder for this effect, then you can draw a box using the Frame tool of the ScreenDraw function, which, as luck would have it, is the final tool on your Annotation toolbar.
ScreenDraw
When explaining a detailed procedure in your video, it may come in handy to start drawing all over the screen in order to make your point. Just like John Madden dissecting a complicated play, you can scribble notes, draw arrows, and highlight “players” (in our case, windows and toolbars are standing in for linebackers and tight ends). It’s incredibly easy to do, and fun to boot!
I used ScreenDraw to paint this graffiti all over my capture.
ScreenDraw is the final button on our Annotation toolbar. When glancing at it over in the Recorder, you may notice that it’s grayed out. The ScreenDraw function can only be enabled when the Recorder is in record or paused modes; you can’t do anything with it when Recorder’s at a full stop.
Let’s play with ScreenDraw a bit by trying the following:
-
Start a new recording. If desired, you can start out in paused mode in order to avoid having to make a long recording while you experiment. One cool thing about ScreenDraw is its ability to let you create drawings either during the actual recording or when paused, and each has its own effect. You can keep recording when drawing to show the actual process, à la John Madden. Or you can pause, draw, and then resume. To the viewer, it then looks as if the drawings just appeared like magic.
-
Click the ScreenDraw button on the Annotation toolbar.
-
Now, when inside the recording area (ScreenDraw only works inside the recording area), notice that your mouse cursor looks different. Click and drag the mouse. Congratulations; you just used the pen to draw a line.
-
But why stop there? Right-click within the capture area, and in the context menu that appears, notice that you have a number of tools available. Click Arrow. Notice that your mouse cursor has changed once again. Each tool has its own cursor to indicate which one you’re currently using.
-
When inside the context menu, you may have noticed that each tool had a letter next it. Press E, and then click and drag. You now have an ellipse.
-
These hotkeys don’t just select different tools; they can change the attributes of those tools as well. Press G, then 7, then T. Draw another ellipse. This one looks a lot different from the first, as it’s now green, has a line width (thickness) of 7 pixels, and is translucent (meaning that the lines in the ellipse shape are now see-through).
-
You also have a couple of tools for tidying up. Press U for undo, and the last shape you created disappears. When finished, press Esc to remove all your lovely artwork and exit ScreenDraw.
As you can see, the ScreenDraw tool relies very heavily on hotkeys in order to make your choices. You’ll find that it can be profoundly helpful to memorize these commands. While the context menu is always there to help if you get stuck, opening it can be impractical if you’re drawing while recording. Always looking to help out my fellow artists, I’ve put together a table of all the ScreenDraw commands and their corresponding hotkeys, so feel free to keep your book open to this page when drawing all over your screen:
| Command | Hotkey | Notes |
|---|---|---|
| Tools | ||
| Frame | F | Hold down Shift to draw a square. |
| Highlight | H | Width function is disabled, since highlights have no frame. |
| Ellipse | E | Hold down Shift to draw a circle. |
| Pen | P | |
| Line | L | |
| Arrow | A | |
| Width | ||
| Line width | 1-8 | Press any number from 1 to 8 to alter the border thickness. |
| Color | ||
| Blue | B | |
| Black | K | |
| Cyan | C | |
| Green | G | |
| Yellow | Y | |
| White | W | |
| Magenta | M | |
| Red | R | |
| Translucent | T | Lets the user see through the shape’s ink to whatever lies beneath it. Highlights are automatically translucent. |
| Clean-up | ||
| Undo | U | Removes last object. Repeat for multiple undos. |
| Stop drawing | Esc | Removes all shapes and exits ScreenDraw. |
When selecting the various tools, you likely noticed that the color and width of the various tools were all different. That’s because each tool has its own individual defaults. The Recorder ships with certain factory defaults, but these are ever-changing as you use the ScreenDraw feature. You see, Camtasia Recorder remembers your last chosen settings for each tool, and these effectively become the new default. In addition, it remembers the last tool you used, and this is the tool that will come up automatically the next time you start ScreenDraw. How thoughtful!
You can easily find out the current settings for each tool in your ScreenDraw arsenal by going back into your Effects Options dialog, this time choosing the ScreenDraw tab.

The current default tool will show up in the tab first, complete with a preview window that shows what the tool looks like at its current settings. In the Tool drop-down list, select any of the other tools. Notice how all the settings under the Tool field change. These are the defaults for that particular tool. You can adjust the color by choosing one from the Color drop-down list, and can also opt to make the color translucent by checking the Translucent box. In addition, you may adjust the width for all shapes except highlight, either by typing a number from 1 to 8 into the Width field or by simply using the field’s arrow buttons to increment the width. And finally, you have the option to disable keyboard and cursor effects during ScreenDraw. If you have turned on the keyboard and mouse cursor audio effects, you’ll probably not want your audience to endure all the clicking and clacking associated with drawing objects and using the keyboard hotkeys. After all, the sound effects are supposed to be instructive on using the application you’re currently capturing. These effects are therefore unnecessary and distracting when caused by your recording activities. That’s why it’s generally best to keep this setting enabled.
Here are a few additional things you’ll want to keep in mind when using ScreenDraw:
-
If you’re adding ScreenDraw elements at record time, you may not wish to have the various tools’ custom mouse cursors displayed to your audience. Hiding the mouse cursor (I’ll explain how later in this chapter) will also work on these custom cursors.
-
While there is a certain amount of overlap between ScreenDraw and the Callout tools in Camtasia Studio, they’re really used for different purposes. While I lean toward the effects offered by Camtasia Studio due to their nondestructive editing capabilities, ScreenDraw is one of the Recorder-based effects I still frequently use. Unlike callouts, ScreenDraw objects can actually be animated if drawn at record time. It’s a terrific effect.
-
In order to quickly start and stop ScreenDraw, I strongly recommend enabling the ScreenDraw hotkey. Choose Options… from the Tools menu, and then click the Hotkeys tab. In the ScreenDraw hotkey section, specify your chosen hotkey, along with any modifier keys. For full details on specifying hotkeys, please see Chapter 7, “Recorder Tools Options.”
[*]In the television “biz,” a watermark is called a “bug.” The software industry, however, avoids this term for obvious reasons.
[*]It doesn’t have to be exactly 500 pixels; it depends on your recording area. The trick is to have the box obscure your entire recording area (other than the desired object, obviously), but still leave the task bar and/or Recorder application window visible, as you’ll need one of those later to turn the highlight back off.
EAN: 2147483647
Pages: 146