| ColorCorrect combines Add, Mult, Gamma, ContrastRGB, ColorReplace, Invert, Reorder, and Lookup into one node, giving you the ability to tune the image in only the shadow, midtone, or highlight areas. ColorCorrect will also give your clients all of the needed controls to endlessly noodle with your shots. Not to worry; you are charging by the hour, remember?  Note ColorCorrect will break concatenation with connecting color corrections.
1. | Choose File > New Script and click No when prompted whether to save your script.
| 2. | FileIn the porthole.0001.iff clip from the Lesson05 folder.
| 3. | Click the Fit Image to Viewer button under the Viewer so that you can see the entire image.
| 4. | Attach a ColorCorrect node from the Color tab.
|
ColorCorrect Subtabs The ColorCorrect node is organized into the following seven subtabs: Subtab | Action |
|---|
Master | Applies the correction to the entire image. | Low Controls | Applies the correction primarily to the darkest portion of the image with the correction falling off as the image gets brighter. | Mid Controls | Applies the correction primarily to the middle range of the image. | High Controls | Applies the correction primarily to the highlights of the image, with falloff as the image gets darker. | Curves | Applies manual correction to the image using curves. | Misc | Performs secondary color correction, as well as Invert, Reorder, and preMultiplied control. | Range Curves | Displays the different image ranges (shadows, midtones, highlights), their control curves, and the final concatenated curve of the color correction. |
Master, Low, Mid, and High Controls The first four tabs are identical except for the portion of the image that they let you modify. Each has controls to Add, multiply (Gain), and apply a Gamma to the RGB channels, as well as to apply contrast on a per-channel basis (Contrast, Center, and SoftClip).  Buttons at the bottom of the tab let you toggle between RGB display and other color models. You can switch between RGB, HSV, HLS, CMY, and TMV (Temperature/Magenta-Cyan/Value). 1. | Click the HSV button at the bottom of the tab.
The numbers are converted to HSV space.
 | 2. | Switch back to RGB mode by clicking the RGB button.
Each color value has an AutoKey and a View Curves button associated with all three channels for that parameter. All three channels are treated equally.
Note When ColorCorrect is saved into a script, the values are always stored in RGB space. |
Working with Low, Mid, and High Ranges Here is the difference when working with Low, Mid, and High. This is the original image:  1. | Click the Mid Controls tab in the ColorCorrect1 node.
 | 2. | Adjust the Blue Gain to 1.5.
Blue is added only to the midtones of the image, which in this case is primarily the ocean.
| 3. | Select the High Controls tab.
| 4. | Adjust the Blue Gain to a value of 0.75.
Only the highlights of this image are adjusted, which makes the clouds a warm yellow color. You can also control the range of the image's shadows, midtones, and highlights by going to the Range Curves tab.
| 5. | Select the Range Curves tab.
 This tab displays your final color correction, as well as the Low, Mid, and High mask ranges, as curves. You can also use the display to switch the output from the normal, corrected image to a display of the low areas, the mid areas, or the high areas. A color display was used rather than one based on luminance, because different channels have different values.
| 6. | Click the View L, View M, and View H buttons.
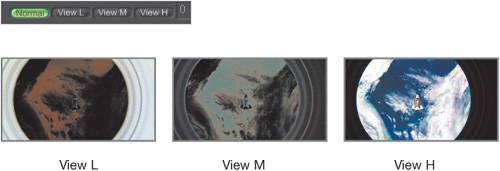 | 7. | To control the mask areas, turn off the Colors display and turn on the Ranges display at the bottom of the Range Curves tab.
 Here are the curves for the low, mid, and high values. These curves can be modified by adjusting the low and high parameters.
| 8. | Right-click the Parameters workspace and select Reset All Values.
|
Curves Tab The Curves tab lets you apply manual modifications to the lookup curve by mapping input colors to output colors. 1. | Click the Curves tab.
 | 2. | Click the bExpr radio button.
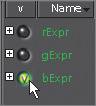 | 3. | Insert some new knots (or points) by Shift-clicking a segment of the curve and dragging the newly created points to correct the image.
 Color correcting using curves can yield results that are hard to duplicate with any other method.
|
Misc Tab 1. | Choose File > New Script, and click No when prompted whether to save your script.
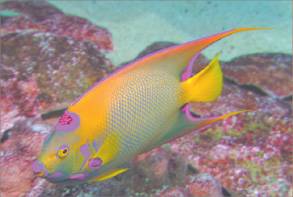
| 2. | FileIn the fish.0001.iff clip from the Lesson05 folder.
| 3. | Attach the fish clip to a ColorCorrect node.
| 4. | Click the Misc tab.
This Misc tab has several functions:
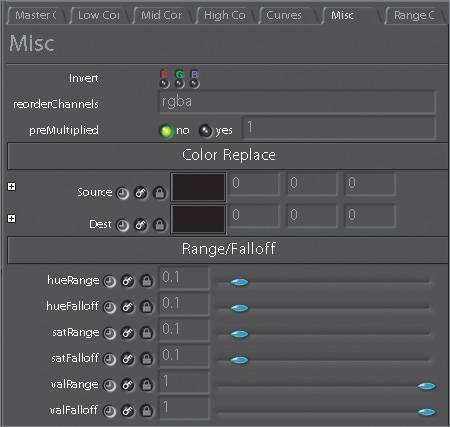 - Invert Inverts the red, green, and blue channels.
- reorderChannels By entering a string, you can swap or remove your channels according to the standard Reorder method.
- preMultiplied Toggle this on if your image is premultiplied (typically, an image coming from a computer-generated render), and this function will insert an MDiv before the calculations and an MMult afterward.
- Color Replace This is the same as the ColorReplace node located on the Color tab. It lets you isolate a color according to its hue, saturation, and value, and replace it with a different color. Other areas of the spectrum will remain unchanged. This is especially handy for spill suppression during keying operations.
Note There is a toggle to affect the alpha channel in the standalone ColorReplace node in case you also want to pull a mask of the affected source color. Next, you will isolate and replace the fish's blue border.
| 5. | Click the Source color swatch.
 | 6. | Click the bright blue part of the fish near the large yellow rear fin.
 | 7. | Now click the Destination color swatch and choose a shade of magenta from the Color Picker.
 The areas of the fish that were blue have only partially turned magenta. If you adjust some of the Range/Falloff parameters, you can get it just right.
| 8. | Adjust the satRange to a value of 0 and satFalloff to a value of 0.6.
 The blue areas of the fish should now look completely magenta.
 | 9. | Quit Shake.
|
|