Your mission, if you choose to accept it, is to create multiple animated rotoshapes of a woman walking in front of a car. The shapes that you create on a frame-by-frame basis will be used to place the woman in front of laser beams surrounding the car. This result of this roto exercise will be used in the MultiPlane lesson later in this book (Lesson 11).
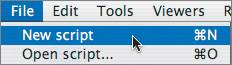
1. | Choose File > New Script and click No when prompted to save the script.
 |
2. | FileIn the woman and laser clips from the Lesson04 folder.
|
3. | Click the Fit Image to Viewer button to fit the image into the Viewer.
 Let's start by doing a quick composite of these two images.
|
4. | Click the laser clip once so that it is highlighted green.
|
5. | From the Layer tab, select Over.
|
6. | Connect the output of the woman clip into the right input of the Over node.
The laser beams are composited over the woman. Take a look at the composite in a flipbook.
 |
7. | On the Globals tab, click the Auto button to the right of the timeRange button.
|
8. | Click the Home button at the bottom-right corner of the interface.
 The Time Bar is automatically set to the Globals timeRange.
|
9. | Click the Flipbook icon.
As you can see, the laser beams are in front of the woman but should be behind her. To isolate and place her in front of the lasers, create a shape around her body.
|
10. | Close the flipbook when you are done playing the clip.
|
11. | From the Image tab, select a RotoShape node.
|
12. | Click the left side of the woman clip so that you can view it while drawing the shape.
It will be helpful to set the resolution of the RotoShape node to be the same as the woman clip.
|
13. | In the RotoShape1 node, set the Res parameters to 960x540.
I have no idea how this clip ended up at this bizarre resolution. But hey, did I mention that Shake is resolution independent?
|
14. | Go to frame 1 and click the AutoKey button under the Viewer.
 Tip There's nothing worse than rotoing a shape when you've forgotten to turn on the keyframe mode. Turning on the keyframe mode by clicking the AutoKey button ensures that any changes you make to your shape will be animated over time. At this point, you have a choice. You can either create one very complex shape around the woman, or create a number of less complex ones. What is the right way to do this? For those who chose one complex shape, I say get out of my sight. The rest of you can stay and play. Using one complex shape would become very difficult to deal with because of the motion of the woman's legs. The best way to roto this shot is to break the roto into individual shapesone for the head and arms (since they are not moving), one for the torso, and one for each leg.
|
15. | At frame 1, draw a shape around the woman's head and arms.
|
16. | Close the shape by clicking the first knot.
Your shape should look something like this:
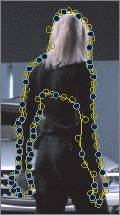 |
17. | Rename the RotoShape1 node Head_and_Arms.
 You need to create three additional RotoShape nodes.
|
18. | On the Image tab, click the RotoShape icon three times.
|
19. | Set the Res parameters to 960x540 in each of the new RotoShape nodes and rename them Torso, Right_Leg, and Left_Leg.
|
20. | View the woman clip by clicking its left side, and edit the Torso node by clicking its right side.
|
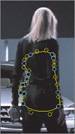
21. | Draw a shape around the woman's torso.
 |
22. | Click the right side of the Left_Leg node to edit it, and draw a shape around her left leg.
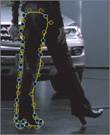 |
23. | Click the right side of the Right_Leg node, and draw a shape around her right leg.
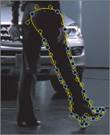 |
24. | You will need to adjust the shape every four frames or so.
Create as few keyframes as possible to animate the shapes, but enough so that the shapes properly follow the object. I like to set keyframes every eight frames or so, on frames 8, 16, 24, and so on. If I need more keyframes, I go back and set them every fourth frame by adding keyframes at 4, 12, 20, and so on.
|
25. | Continue to adjust the various shapes, being mindful to first click the right side of the particular RotoShape node that you want to adjust.
For your reference, or if you just like cheating, I have prepared a script of this exercise. You can use it as a reference and see where I have set keyframes.
|
26. | To see my script, choose File > Add Script, and select woman_roto.shk from the Lesson04 folder.
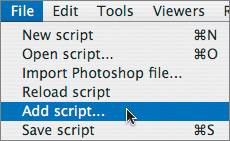 Add Script adds to your current script. Feel free to compare it with what you have done so far.
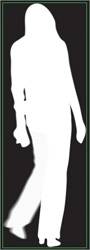
Tip If at any time the transform controls get in your way, Control-click and drag to move them. OK, it is hours later and you are finished rotoing the woman using multiple shapes. To see how well you have done, combine the various RotoShape nodes into one matte.
|
27. | Highlight the Heads_and_Arms node and select MultiLayer from the Layer tab.
 This MultiLayer node accepts an infinite number of input images, each layer containing its own unique settings to control compositing mode, opacity, and channels. It is handy for putting together all of the RotoShape nodes.
|
28. | Drag the outputs of the Torso, Left_Leg, and Right_Leg nodes to the plus sign (+) on the top of the MultiLayer1 node that appears when the cursor passes over it.
 |
29. | Create a flipbook of MultiLayer1, play the sequence, and close when done.
Because the image that you are rotoing is moving, it could benefit from a motion blur. Motion blur is the apparent blurring of moving objects while the camera shutter is open, creating the illusion of movement. Without motion blur, rapidly moving objects appear to strobe.
|
30. | Position the Time Bar at frame 30.
|
31. | Double-click the Left_Leg node and set the Motion Blur parameter to a value of 1.
Motion blur is added to the left leg.
|
32. | Do the same for each of the other RotoShape nodes.
Now, make a flipbook of the MultiLayer1 node to see the added motion blur on the moving shapes.
|
33. | Double-click the MultiLayer1 node, click the Flipbook icon, and play the sequence.
 |
34. | When you're done, close the flipbook.
|