| You can add or delete links through the Files panel site map. Note You can control which files display in the site map by choosing to show or hide individual linked files. Hiding files will cause them to be hidden only in the Map viewthey will still be visible in the Local Files list. You can also make changes to the files by adding or deleting links. To hide or show a linked file, right-click (Windows) or Control-click (Macintosh) the link you want to modify and choose Show/Hide Link. You can choose View > Show Hidden Files from the Files panel menu (Windows) or from the Files panel Options menu (Macintosh) to reveal all hidden files. The filename will be italicized to indicate that it is a hidden linkyou can then right-click (Windows) or Control-click (Macintosh) the hidden files and choose Show/Hide Link.
| | 1. | Choose Map and Files from the Site Map menu. Select the icon for the index.html file in the Map view pane, click the Point To File icon, and drag the Point To File icon to the icon for the index.html file in the about folder. Release the mouse button when the index.html file becomes highlighted.
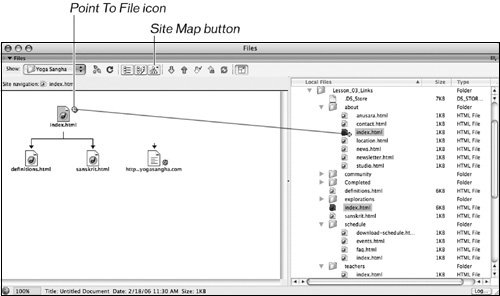 As you drag, the pointer becomes an arrow and a Point To File icon. A blue line is drawn as you drag from the top-level index.html file to the index.html file that is contained in the about folder. When you release the pointer, the index.html file located in the about folder shows up in the Site Map view. The link has been inserted into the top-level index.html document. If you open the top-level index.html, document you will see the link. As you drag, the pointer becomes an arrow and a Point To File icon. A blue line is drawn as you drag from the top-level index.html file to the index.html file that is contained in the about folder. When you release the pointer, the index.html file located in the about folder shows up in the Site Map view. The link has been inserted into the top-level index.html document. If you open the top-level index.html, document you will see the link.
Tip You can also add, remove, and change links by using the Site > Site Map View submenu, accessible through the Files panel menu (Windows) or through the Options menu on the right top side of the Files panel (Macintosh). | 2. | Repeat Step 1 to create links from the top-level index.html file to the remaining index.html files in the following folders: schedule, teachers, community, training, and explorations.
Pausing over a file displayed in the map will show a tooltip displaying the name and location of the file. Selecting a file in the map view will highlight the same folder in the Files view, and vice versa.
In this step, you linked the main page of the site, index.html, to main pages of each sectionthe index.html files that are located in each of the folders.
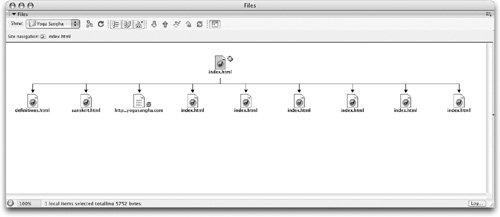 Links made this way will appear on the same lineone after the otherbeneath any pre-existing content in the document and will use the name of the file for the text of the link on the page. In this case, the filename index.html is not very descriptive so you'll apply the links to the navigation area in the next step. Links made this way will appear on the same lineone after the otherbeneath any pre-existing content in the document and will use the name of the file for the text of the link on the page. In this case, the filename index.html is not very descriptive so you'll apply the links to the navigation area in the next step.
| | | 3. | Open index.html in the Lesson_03_Links folder. Select the first index link at the bottom of the page. Then select the text in the Link field in the Property inspector. Select the word About in the list of sections just above the copyright information and paste the copied link into the Link field in the Property inspector.
In this lesson, you're creating the main navigational links at the bottom of the page in the index.html document. In a fully functional site, you would repeat this set of links in each document. Maintaining consistent navigational links throughout a sitein the same place on each pagemakes it easier for visitors to browse a site. In later lessons, you'll create the main navigation system that will be used at the top of all pages in the project site.
| 4. | Repeat Step 3 for the corresponding links and sections for the Schedule, Teachers, Community, Training, and Explorations sections. Delete the line of index links at the bottom of the page, save and close the file.
Be sure to look at the link location in the link text field on the Property inspector as you copy the links to apply the correct index link to the corresponding sectionif you closed Dreamweaver at any time between creating the folders earlier in this lesson and this exercise, the Files panel might have refreshed into alphabetical order. Therefore, the index links might not be in the same order as the list of sections.
The navigational links are now clear about the location to which they will take the visitor.
If the Start page opens, you can close it.
| | | 5. | Repeat Step 1 to create links from the index.html file in the schedule folder to all the other documents in the schedule folder.
In this step, you linked the main page of the schedule section, schedule/index.html, to the rest of the pages of the schedule section.
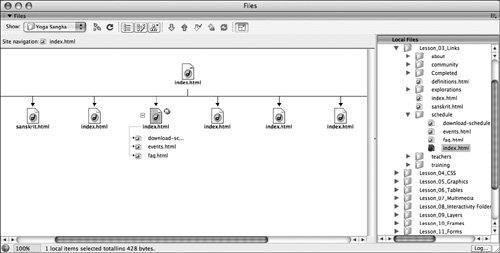 Pages that contain links are displayed on the site map with a plus (+) or minus (-) sign just to the left of the file. Clicking the plus sign displays a list of the links contained in the document, each with its own plus sign. Broken links (those that don't work) are displayed in red type. External links, such as e-mail links and URLs, are blue and are indicated with a small globe. Pages that contain links are displayed on the site map with a plus (+) or minus (-) sign just to the left of the file. Clicking the plus sign displays a list of the links contained in the document, each with its own plus sign. Broken links (those that don't work) are displayed in red type. External links, such as e-mail links and URLs, are blue and are indicated with a small globe.
| 6. | Repeat Step 5 for the files in the remaining folders: about, teachers, community, training, and explorations.
|
You now have a test site with many of the links that will allow you to browse through the site and test the navigation and site structure. To complete this test site, you'll need to add links from each index.html file in the six folders to the top-level index file, as well as adding links from each page in a folder to the index.html file in the same folder. After doing so, your site map would look like the following example. 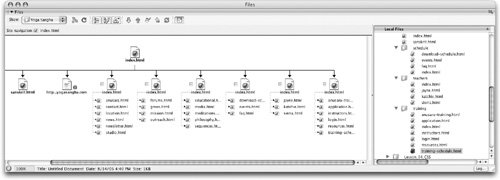 |