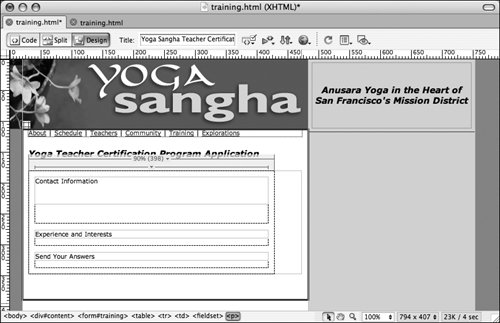
| Text fields are for gathering information that the user can type in. Single-line text fields are used for short concise answers such a word or phrase. Typical single-line text fields collect names, portions of addresses, and e-mail information from users. Single-line text fields are also used for basic searches, in which the visitor types words describing the desired information into the field. You must place all form fields and buttons within the red dotted lines; otherwise, they are not a part of the form. If you try to insert form fields outside the red lines, Dreamweaver displays an alert box with Yes or No options, asking whether you want to add a form tag. If you choose No, the field or buttons will not function as a part of any form. 1. | In the training.html document, place the insertion point in the text Contact Information. Use the tag selector to select the <legend> tag, press the right arrow key once, and press Return (Macintosh) or Enter (Windows).
Form objects must be inserted in the fieldset, but not inside the legend. If you were to place the insertion point at the end of the legend and press Return, a second set of legend tags would be created. There should not be a second set of legend tags.
 | | | 2. | In the Forms category on the Insert bar, click the Text Field button.
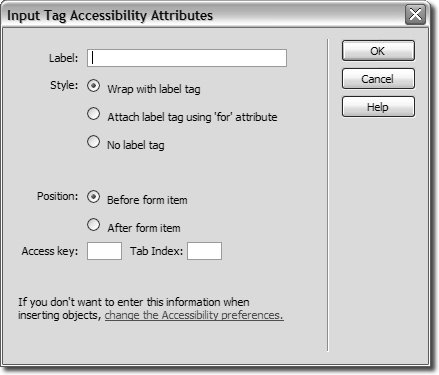
Tip You can also choose Insert > Form > Text Field.  The Input Tag Accessibility Attributes dialog box opens. The Input Tag Accessibility Attributes dialog box opens.
 Creating accessible forms from the beginning helps to reach a wider audience. It is important to include accessible attributes to enable users who might need to use assistive technology such as screen readers. If your forms do not include these attributes, it can be difficult for some people to fill out the form. By default, Dreamweaver will prompt you to include accessibility features when you insert forms.
Note If Dreamweaver does not provide the Accessibility Attributes dialog box automatically, you might need to turn the accessibility features on for form objects. To do so, choose Dreamweaver > Preferences (Macintosh) or Edit > Preferences (Windows). Select the Accessibility category and check the Form objects box; then click OK. 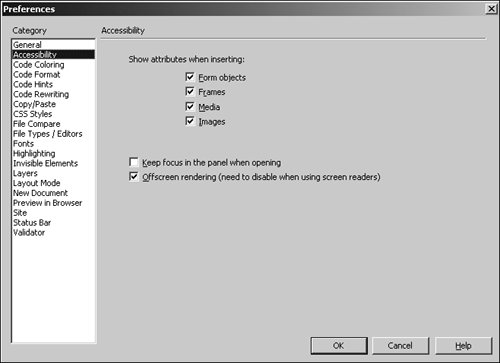 | 3. | Type Full Name: in the Label text field.
Labels provide clear information that specifies the purpose for all your form objects (text fields, checkboxes, and so on) so your visitors know what information they are supposed to enter into those fields. Without being identified with labels, forms can be very confusing. Labels are included in both the Document window as a visual description of the text field and as an attribute within the HTML code that identifies the corresponding text field. Use concise and descriptive labels whenever possible.
| | | 4. | In the Style section, select Wrap with label tag. In the Position section, select Before form item. Leave the Access key and Tab Index text fields blank.
The Wrap With Label Tag option surrounds form objects with a label tag. With this option selected, the form object should always remain next to the text label in the Document window. If the form object is moved, this option prevents it from being separated from the label tagnot using this option can cause a great deal of confusion for viewers using screen readers because the label will no longer be associated with a form object that has been moved. A text field created using this method appears in the code as <label>Full Name: <input type="text" name="textfield" /></label>.
The Attach Label Tag Using For Attribute option creates a stand-alone label that is identified with the corresponding text field through an id. Using this option allows you to separate the form object from the text that labels it in the Document window, which you might need to do for layout purposes. This method is more flexible because it continues to function properly regardless of whether the form object is separated from the corresponding text. If you are not sure which Style method to use, select this one. A text field created using this method appears in the code as <label for="textfield"> Full Name: </label> <input type="text" name="textfield" />.
The No Label Tag option bypasses the Label option. If you use this option, you can add labels later using the Label button in the Forms category on the Insert bar.
There are two additional accessibility attributes that are available:
- Access Key: The Access Key text field allows you to create a keyboard shortcut for the form object by specifying a character that visitors can use in combination with the Option (Macintosh) or Alt (Windows) modifier keys. Although visitors can use the Tab key to jump from one form object to the next, access keys can provide a much quicker way to jump immediately to any form object on the page. When creating access keys, take particular care to not use characters that might conflict with standard keyboard shortcuts. If you use access keys, it is a good idea to let your visitors knowprovide instructions at the top of the form or in a pop-up window (which you will learn to create in Lesson 11) and indicate the keyboard shortcut next to its corresponding text field. Keyboard shortcut indicators should be as clear and unobtrusive as possible. On the Macintosh keyboard, shortcuts are listed next to menu items with a visual icon representing the modifier key. In Windows, however, the appropriate character is underlined to indicate the shortcut. Whichever method you decide to use, be consistent and clearand let your visitors know by mentioning it in the instructions or help information.
- Tab Index: Many Web users use the Tab key when filling out forms; the Tab key provides a way to move through a form quickly by switching the focus from one form object or link to another. The order in which the Tab key changes the focus depends upon the order in which the object and links occur in the code. Although the default order in which the focus changes is usually what you expect, it is possible that the visual layout of a form might be presented so that the perceived order is different from the actual order of those objects in the code. In such cases, using the Tab Index field to specify the focus order by assigning numbers to form objects can help visitors to move through the form. Alternatively, you might want to apply the Tab Index only to fields that are required. When specifying a Tab Index, you need to start with 1, followed by 2, and so on. Do not skip any numbers.
If you do not use the accessibility feature when inserting form objects, you will not be prompted to specify a label. Although you can enter a label for the form object in the Document window, that text will not be contained in <label> and </label> tags unless you add those tags to the code manually or use the Label button in the Forms category on the Insert bar.
| 5. | Click OK to insert the text field.
The single-line text field is placed in the form along with the text label; both are automatically selected.
| 6. | Click in the Document window just to the right of the text field to deselect it and the label. Click the text field to select only the text field; then replace textfield in the TextField name text field on the Property inspector by typing fullName.
 Note Names are required for all fields. Dreamweaver assigns generic names automatically in a numeric order: textfield, textfield2, and so on. When the form is submitted, the name of the text field identifies the information that was entered into the field. In this case, fullName signifies that the information entered into this field is the visitor's full name. Do not use any spaces or special characters in the name and remember that names are case-sensitive when used with scripts such as CGI scripts or JavaScripts.
It is important to remember to name all your fields with short descriptive names. Suppose that you have two text fields on a page with labels next to them, prompting the user to enter a home phone number into one field and a work phone number into the other. If those fields are named textfield and textfield2, their names will not give you any indication about which number is the home number and which is the work number. On the other hand, by giving the fields more descriptive names, such as worknumber and homenumber, you can avoid confusion over the identity of the information. Visitors will not see or be affected by field namesnaming the fields is for the benefit of you and your Web team.
| | | 7. | With the text field form object still selected, click in the Char Width text field on the Property inspector and enter 40. Press Return (Macintosh) or Enter (Windows).
Char Width, or character width, is the number of visible characters that will display in the text field. The width of the text field increases the available space so that it can show approximately 40 characters. The initial width of the text field is approximately 24 characters. The actual dimensions of the text field vary from browsers to browser, based on the text size used for that text field, which might be defined through Cascading Style Sheets (CSS) or left to browser defaults. The height of the text field is also dependent upon the text size.
Tip You can apply a CSS style to a text field by selecting the desired style from the Class menu on the Property inspector when the text field is selected. | 8. | With the text field form object still selected, click in the Max Chars text field on the Property inspector and type 50. Press Return (Macintosh) or Enter (Windows).
Max Chars, or maximum characters, limits the total number of characters a user can enter. Initially, this text field is blank, and the number of characters a user can enter is unlimited.
If the Max Chars value is larger than Char Width, users can continue to type, and the text will scroll to the left within the field as the user types beyond the visible area. The scrollable area ends at the Max Chars value.
Note If your form sends information to a database, you need to make sure that the value for maximum characters matches the maximum set for the corresponding field in the database. | | | 9. | Place the insertion point on the Full Name text label in the Document window. Select the <label> tag in the tag selector, press the right arrow key once and then press Return (Macintosh) or Enter (Windows). Click the Text Field button on the Insert bar and type Email: in the Label text field on the Input Tag Accessibility Attributes dialog box. Verify that Wrap with label tag is selected in the Style section and that Before form item is selected in the Position section, leave the other fields blank, and click OK. Select the text field and use the Property inspector to set the name of the field to email, Char Width to 40 and Max Chars to 70. Press Return (Macintosh) or Enter (Windows), or click in the Document window to apply the change.
This field accepts the user's e-mail address.
It is important to create a new paragraph that exists outside the <label> tags that wrap around the previous form object; otherwise, the new form object can become nested within the previous object's label tags, or the tags might overlap or cause other difficulties. You can avoid this by selecting the <label> tags in the tag selector and using the arrow keys to move just outside those tags, as you have done in this step. It might help to use Split view while you are inserting these objects.
Tip Be careful when setting Max Chars for fields that accept information such as e-mail addresses and URLs. Users can't enter a complete URL or any other information if that information is longer than the Max Chars value because they can't type past the limit you set.  | 10. | With the email field still selected, type Enter Your Email Address in the Init Val text field on the Property inspector.
Init Val, or initial value, enables you to set text that will appear in the text field when the visitor loads the page. Init Val can help give the user an example of the kind of information that is being requested of them. Visitors can replace the initial value text with text of their own. Initial values are useful for prompting users to enter information or displaying example text. Although the user can change the text, use this option with caution. Users who want to get through the form quickly might accidentally skip a field that already has text in it, perhaps thinking they have already filled it out. Initial values might be a disadvantage if a visitor skips over the field because it looks as if it has already been filled out.
| 11. | Place the insertion point on the Email text label in the Document window. Select the <label> tag in the tag selector, press the right arrow key once and then press Return (Macintosh) or Enter (Windows). Click the Text Field button on the Insert bar and type Phone:in the label text field on the Input Tag Accessibility Attributes dialog box. Verify that Wrap with label tag is selected in the Style section and that Before form item is selected in the Position section, leave the other fields blank and click OK. Select the text field and use the Property inspector to set the name of the field to Phone, Char Width to 40, and Max Chars to 50. Press Return (Macintosh) or Enter (Windows), or click in the Document window to apply the change. Save the file and preview it in the browser.
|
Leave this file open for the next exercise. Note A regular text field displays the information in the browser as you type it in. A password text field looks the same as any other text field, but the text displayed onscreen is hidden by bullets or asterisks as you type. The password option only hides the text in the field from someone looking over your shoulder as you typeit does not encrypt or secure your data. To encrypt data, you must have secure server software running on the Web servertalk to your Web administrator for detailed information on securing data using SSL (Secure Sockets Layer). To create a password field, insert a standard single-line text field and select Password for the Type option on the Property inspector. This option causes asterisks or bullets to appear when a user enters data in this field. Password text fields can be only single-line text fields. The Max Chars value for passwords should be set at the limit for passwords on your server.
|