Editing Still Images
| < Day Day Up > |
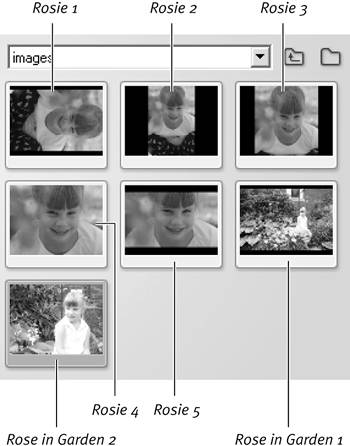
| Okay, the question on the table is this: Your digital camera takes shots at a princely resolution of, say, 2160 x 1440 pixels. The maximum DVD video resolution is 720 x 480. How do you resolve the difference? To answer this question, let's first get a bird's-eye view of how Studio works with still images and then explore the different ways you can crop your images so that you can present them most effectively in Studio. How Studio works with imagesStudio takes an admirably laissez-faire approach to images, basically displaying them as you place them in the movie. It doesn't try to fill the screen with your image, stretching it horizontally or vertically, or trim your image to fit; it simply makes your image larger or smaller to fit the screen without changing the aspect ratio. If this means that your image doesn't completely fill the 720 x 480 pixel DVD frame, so be it. At least there's no distortion. Studio also provides excellent visual cues about what your image will look like when it's finally produced. Let's take a look at Figure 5.13 to get a sense of how this works. Figure 5.13. The black bars beside Rosie 2 and Rosie 3 are Studio's way of telling you that the image resolution isn't optimal.
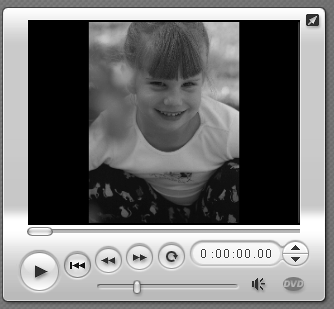
Rosie 1 is the original 2160 x 1440 pixel image, shot by turning the camera to the side to capture Rosie's glam pose Rosie 2 is the same image rotated 90 degrees to the left. If you click Rosie 2 to preview her in the Player, you see large areas of black to her left and right, which is precisely the way the image would appear in the final DVD or video (Figure 5.14). This is Studio's way of telling you that the image doesn't match the final resolution of your project, and Studio is not going to squish or otherwise distort the video to make it appear full screen. Note that these same black areas show up on the Still Images tab of the Album, providing the same message. Figure 5.14. Here's the big view of Rosie 2. let's get a bit closer.
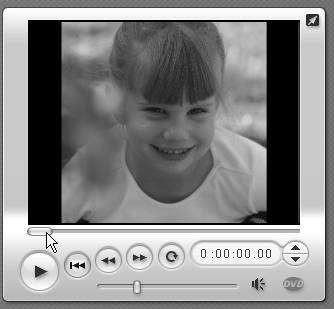
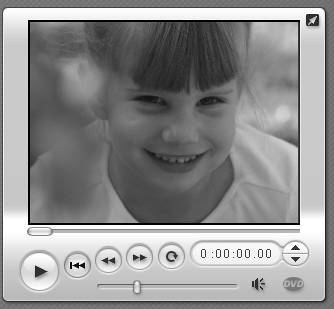
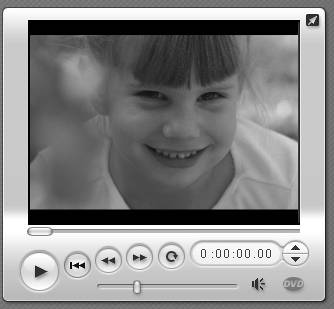
Optimizing RosieThe Rosie picture presents two opportunities. To go with the original impulse of the photographer, you can crop away the bottom of the image to get a bit closer while retaining the vertical, portrait look, as shown in Rosie 3 (Figure 5.15). She's a bit more prominent in the screen, but you still have those black areas on the sides. The other alternative is the full-screen, fetching face shot. Here the image has been cropped so that Rosie fills the entire screen, making all involved thankful that she takes after her mother, not her father (Figure 5.16). Figure 5.15. Rosie 3. I've cropped most of the bottom, making Rosie slightly bigger.
Figure 5.16. Rosie 4. Full-screen Rosie, providing a much closer look and filling the screen.
The obvious question is, what image resolution must you use to totally fill the Player window and eliminate those black bars? Since picture resolutions vary immensely among different cameras, the answer isn't a particular resolution, but a specific aspect ratio, which must be 4:3. What this means is that for every 4 horizontal pixels, you must grab 3 vertical pixels. To grab the image of Rosie, the capture resolution was 1120 pixels across and 840 pixels high. If you divide 1120 by 4, you get 280. Multiply 280 by 3 and you get 840. It's a pain, but keep a calculator open on your desktop when you're grabbing still images. Once you find the optimal horizontal resolution for your images, divide by 4, multiply by 3, and you've calculated the ideal height. Or find an image editor like Ulead Systems' excellent PhotoImpact XL, which does the math for you (Figure 5.17). The little Lock icon in the top tool panel constrains the crop tool to the selected shape, Digital Camera (4:3). Figure 5.17. The secret's in the tool: Ulead's PhotoImpact lets you constrain an image to a 4:3 aspect ratio, so that you can easily grab the best image. The other obvious question is, why can't you capture at an aspect ratio of 4:2.66, which is the aspect ratio for 720 x 480 pixels the ultimate resolution at which you'll be displaying the video? The complete answer is long, confusing, and involves arcane differences between how computers and televisions display video data. The quick, empirical answer is this: If you capture at the 4:2.66 aspect ratio and enter the result, Studio tells you via black bars at the top and bottom of the screen that you're not totally filling the screen (Figure 5.18). These bars aren't present when the 4:3 aspect ratio is used, so 4:3 must be the optimal setting (Figure 5.16). Figure 5.18. Your brain says 720 x 480 resolution, but those black bars above and below the image say no, no, no.
Finding the Rose in the GardenNow it should be easy to tackle the problem in the second example: a picture of Rose in her mother's garden. It's a wonderful shot of the garden, but this slide show is actually about Rose, not her mother's green thumb. (Figure 5.19). Figure 5.19. Here's Momma's garden, but where is the Rose?
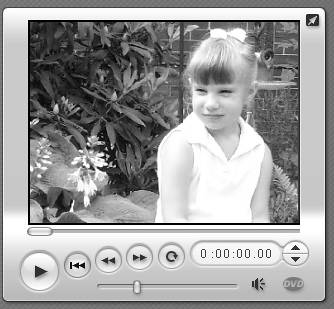
To zoom in on Rose, I cropped the image using the fixed aspect ratio of 4:3, while following the rule of thirds to place her in the back right of the image with look room on the left. This dramatically increases the size, making Rose much more prominent. (Figure 5.20). Figure 5.20. The benefit of working with megapixel images is that I can zoom in without distortion. Once again the screen is filled by cropping the photo to create an aspect ratio of 4:3.
|
 Tip
Tip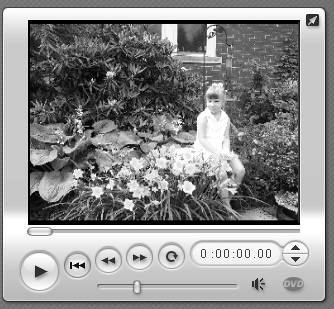
| < Day Day Up > |
EAN: N/A
Pages: 189
- Assessing Business-IT Alignment Maturity
- Linking the IT Balanced Scorecard to the Business Objectives at a Major Canadian Financial Group
- Measuring and Managing E-Business Initiatives Through the Balanced Scorecard
- Governance in IT Outsourcing Partnerships
- Governance Structures for IT in the Health Care Industry