| To capture images from your camcorder, you need to have everything connected, tested, and turned on (see Chapters 3 and 4). Operation is similar for digital video (DV) and analog camcorders, so this section covers both. Studio can also grab still images from movie files on disk, whether previously captured within Studio or sourced from another location. When it comes to capturing still images, DV cameras have one killer feature: the ability to pause on a single frame for multiple seconds without distortion. This makes frame capture from your DV camera frame-accurate. In contrast, most analog camcorders can't pause for more than a moment or two without some image distortion, making it difficult to capture the precise frame you're seeking. For this reason, when you have images you'd like to grab on DV tape, go ahead and grab them from the camera. On the other hand, if you have images on analog tape that you'd like to capture, the easier, faster, and more accurate approach is to capture the video to disk first and then grab the frame from the captured file. To capture still images from your camcorder 1. | Click the Edit tab at the upper left of the Studio interface.
Studio switches to Edit mode.
| 2. | At the top left of the Movie window, click the Camcorder icon to open the Video toolbox (Figure 5.1).
Figure 5.1. Click the Camcorder icon to open the Video toolbox. 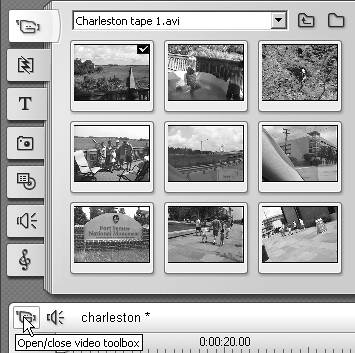
The Video toolbox opens.
| 3. | Click the Frame Grab icon to open the Frame Grab tool (Figure 5.2).
Figure 5.2. The Video toolbox contains the Frame Grab tool. Note that when you're using an analog camcorder, there are no camcorder controls. 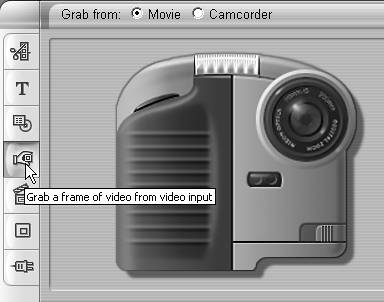
| 4. | Click the Video Input radio button, located at the top of the window, to capture from your camcorder.
| 5. | Use the Camcorder Controller controls to start your DV camcorder, or press Play on your analog camcorder to start the video rolling. Watch the video in the Player window; then do one of the following:
- If you have a DV camcorder, you can pause (not stop) at the exact frame you want to capture (Figure 5.3).
Figure 5.3. When you're using a DV camcorder, Studio provides software controls for getting to the desired frame. Let's get this one of Whatley at the Charleston Aquarium petting zoo. 
- If you have an analog camcorder, try pausing at the desired capture frame using camcorder controls. If the frame is clear and undistorted, you can move to Step 6. However, many analog devices can't pause on a frame without distortion, so you'll have to capture by playing the video in real time, and then pressing the Grab button as the desired frame passes by, which is obviously less accurate.
| 6. | Click the Grab button to capture the frame visible in the Player.
The frame appears in the Frame Grab window (Figure 5.4).
Figure 5.4. Click the Grab button, and Studio grabs the image. 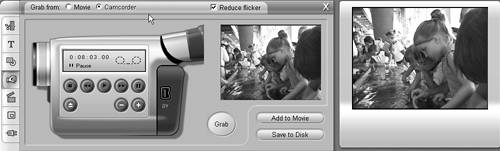
| 7. | Do one or both of the following:
- Click the Add to Movie button to add the frame to a movie.
Studio adds the movie to the Video track at the first blank location (Figure 5.5).
Figure 5.5. Click the Add to Movie button, and Studio places it in the Video track. 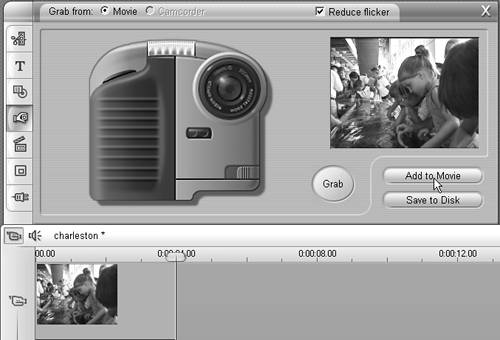
- Click the Save to Disk button to save the still image.
Studio opens the standard Save As dialog box, which is configured to store the frames on your default capture drive (Figure 5.6).
Figure 5.6. Or save the frame to disk. 
| 8. | In the Save as Type drop-down box, choose Bitmap Files. (For more information on choosing formats, see the tips that follow.)
| 9. | In the Save Grabbed Frame in This Size drop-down box, choose Original Size. (See the tips that follow for more information about choosing resolutions.)
| 10. | Name the file and click Save (or press Alt+S).
| 11. | At the top left of the Movie window, click the Camcorder icon to close the Video toolbox (Figure 5.1).
|
 Tips Tips
If you're capturing still images from an analog camcorder and the camera won't pause without distorting the image, you're better off capturing the video to disk and then grabbing your still image from the captured file, as detailed in the next task. Most camcorders don't include frame-advance controls on the camcorder body, but do on the camcorder remote, usually with other nice controls such as slow motion. Studio lets you save a still image in a number of formats (Figure 5.7). Generally, if you plan on using the image in your video production, choose bitmap (BMP), Targa, TIFF, or Windows Metafile format, which are all uncompressed. I like BMP because it's the format most widely recognized by other programs, giving me more flexibility if I decide to use the image again. If you're capturing an image to send via email, you might want to go with JPEG, since it produces a smaller, compressed file (though Studio doesn't have the optimization tools offered by most still-image editors). Figure 5.7. Among Studio's many format choices, your best bet usually is Bitmap Files (*.bmp); choose this option unless you have a strong need to use another. 
Studio also lets you save your still images at a number of different resolutions (Figure 5.8). Generally, if you plan on using the image in your video production, your best choice is Original Size, which stores the image at its actual capture resolution. Figure 5.8. You can scale your image up or down at will, but Studio scales it anyway, if necessary, once the image is loaded on the Timeline. To avoid potential distortion, save your image in its original size. 
To capture still images from a file on disk 1. | Click the Edit tab at the upper left of the Studio interface.
Studio switches to Edit mode.
| 2. | Drag the video containing the target frames from the Album to the Movie window (Figure 5.9).
Figure 5.9. To capture a frame from a video on disk, load the video into the Movie window. Here's the U.S.S. Clamagore, a WW II submarine serving as a Museum Ship at Patriots Point in Charleston Harbor. 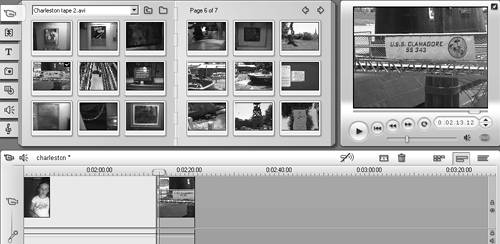
If you're in the Timeline view, drag the video to the Video track. In the other two views, it doesn't matter where you drag the file, so long as it's in the Movie window.
| 3. | At the top left of the Movie window, click the Camcorder icon to open the Video toolbox.
The Video toolbox opens, most likely to the Clip Properties tool.
| 4. | Click the Frame Grab icon at the left to open the Frame Grab tool.
| 5. | Select the Movie radio button at the top of the screen to grab frames from the Movie window (Figure 5.10).
Figure 5.10. Select the Movie button to capture frames from the selected movie. 
| 6. | Use the Player controls or the Timeline scrubber (Figure 5.11) to move to the target frame.
Figure 5.11. Use the Timeline scrubber or the Player controls to move to the desired frame, or the Jog controls to move one frame at a time. 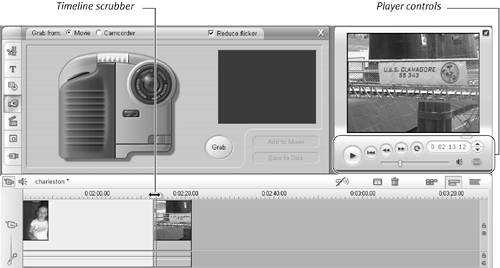
You can use the Jog controls to the right of the Player counter (up and down arrows) to move one frame at a time. If the Player controls aren't active, you didn't select the Movie radio button in Step 5.
| 7. | Click the Grab button to capture the frame visible in the Player.
The frame appears in the Frame Grab window (Figure 5.12).
Figure 5.12. Once again, click Grab, and you've got your frame. 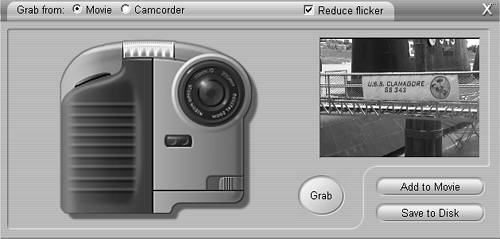
| 8. | Do one or both of the following:
- Click the Add to Movie button to add the frame to the movie.
- Studio adds the movie to the Video track at the first blank location.
- Click the Save to Disk button to save the still image.
Studio opens the standard Save As dialog box, which is set to store the frames on your default capture drive.
| 9. | In the Save as Type drop-down box, choose Bitmap Files (Figure 5.6). For more information on choosing formats, see the tips from the previous task.
| 10. | In the Save Grabbed Frame in This Size" drop-down box, choose Original Size. (See the tips from the previous task for more information on choosing resolutions.)
| 11. | Name the file and click Save (or press Alt+S).
| 12. | At the top left of the Movie window, click the Camcorder icon to close the Video toolbox.
|
Tips Still-image capture in 16:9 mode works just fine for disk-based files and when grabbing the frames from your DV camcorder via DV or analog connectors, with 16:9 images stored at 853 x 480 resolution. Note the flicker reduction option on the right of Figure 5.8. I tested this feature with multiple frame grabs, storing the files at number of different resolutions and formats. I found that flicker reduction helped slightly when capturing from a DV camcorder or a DV file, but hurt image quality significantly when capturing via an analog connection. However, this testing falls far short of a scientific study, and your results may vary. When you're grabbing still frames for your productions, try toggling the Reduce Flicker button on and off, and use whichever setting produces the best possible quality.
|