Adjusting the Incoming Audio Volume

 < Day Day Up > 

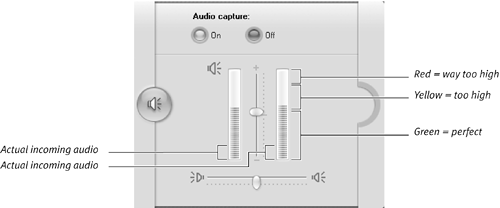
Pop quiz: You've just captured some analog video and you play it back to check the volume. Unfortunately, it's way too low. But why? Some of the possibilities follow:

  1. Your speaker system is too low.

  2. Your Windows volume control is too low.

  3. You didn't boost audio volume sufficiently during capture.

  4. All of the above.

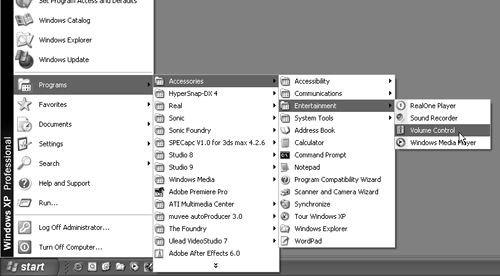
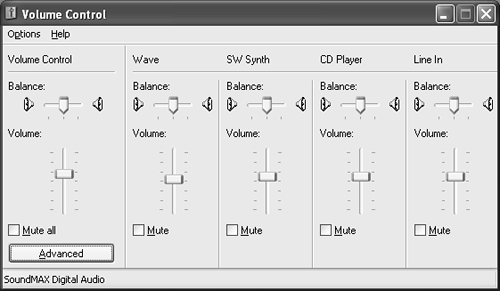
Hmmm. Tough one. The answer is, unless you checked your speakers and playback volume before capture, you don't really know. So don't roll your eyes and skip through the following steps; it's all about the process.

To adjust incoming audio volume

1.

Make sure that your system sound speakers are set at an appropriate playback volume. Disable any treble, bass, or similar boosts, since your ultimate viewer may not have the same tools.

2.

Open your computer's volume control by doing one of the following:

  • Click the Speaker icon in the Windows taskbar (Figure 4.19).

    Figure 4.19. Click the Speaker icon to open the Volume Control dialog box.


  • From the Windows Start menu, choose Programs > Accessories > Entertainment > Volume Control (Figure 4.20).

    Figure 4.20. Or take the long route to the Volume Control.


The Volume Control dialog box opens (Figure 4.21).

Figure 4.21. Whichever way you get here, make sure that the Volume Control slider at the far left of the Volume Control dialog box is set at approximately mid-level during capture.


3.

Make sure that the Volume Control slider, at the far left of the screen, is not muted and is set somewhere near mid-volume.

4.

Make sure the slider that controls your capture source (typically, Line In) is not muted. Studio will adjust the Line In volume as described in Step 8 of this exercise, but you may not hear (or capture) any audio if the control is muted here.

5.

Make sure that the Wave slider is not muted and is set somewhere near mid-volume.

This is the slider that controls the playback volume of the Wave audio captured with the video file.

Settings for all other sliders are irrelevant. I typically don't mute them because when I later try to play a CD or MIDI music, I forget I turned them off and spend 20 minutes trying to figure out why there's no sound.

6.

Close the Volume Control dialog box and return to Studio.

7.

Press Play on your camcorder.

8.

Use the Audio Volume control (on the Audio Options tab; see Figure 4.1) to adjust the volume during capture so that the lights occasionally reach into the yellow bar but never into the red (Figure 4.22). Be sure to test both high- and low-volume regions of the clip.

Figure 4.22. Adjust incoming audio volume until it's in the middle-to-upper regions of the green zone.


9.

After capture, periodically play back your captured files to check the audio volume level.

     < Day Day Up > 


    Pinnacle Studio 10 for Windows. Visual QuickStart Guide
    Pinnacle Studio 10 for Windows Visual Quickstart Guide
    ISBN: B001E08S6S
    EAN: N/A
    Year: 2005
    Pages: 189

    flylib.com © 2008-2017.
    If you may any questions please contact us: flylib@qtcs.net