Working with Auxiliary Files

 < Day Day Up > 

Auxiliary files are the files Studio creates when producing your project. These can include background audio files, narration tracks, DVD image files, and the other file detritus associated with project development.

A few points about auxiliary files. First, they can be quite large in size, easily 20 30 GB for a one-hour DVD project. For this reason, you probably want them on your largest drive, and not on your system (C:\) drive if at all possible. You probably also want them where you can find them, so you can delete them manually if necessary.

Second, you don't want to change the location of your auxiliary files from project to project, especially if you've got multiple projects under way. Though this option is presented as a "project" preset, it doesn't attach to a particular project.

So if Project A has 10 GB of auxiliary files (like the DVD files you've been planning to use to burn additional discs), and you change the auxiliary file location while working on Project B, Studio deletes all of the auxiliary files for Project A (and the auxiliary files for all other projects at that location, for that matter). While you can still run Project A, you've lost all the fruits of your previous rendering, which could add hours to your project rendering time.

Accordingly, my strategy for auxiliary files is this: I choose a folder on the root directory of my largest disk and store all auxiliary files in that location. I don't change this from project to project.

In the past, since Studio didn't have a command for deleting auxiliary files, I deleted them manually. This will probably change now that Studio has an auxiliary file delete function, described in this section.

To set the auxiliary file location

1.

From the Studio menu, choose Setup > Project Preferences (see Figure 2.40).

The Pinnacle Studio Setup Options dialog box appears (Figure 2.53).

Figure 2.53. Here's where you set the location of your auxiliary files.


The Folder for Auxiliary Files section of the dialog box at the lower right contains a yellow Folder icon.

2.

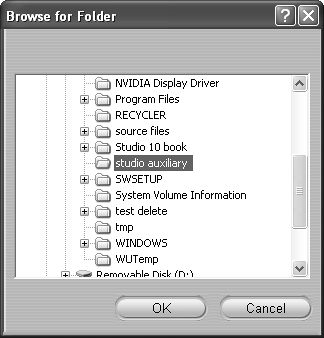
Click the yellow folder to open the Browse for Folder dialog box (Figure 2.54).

Figure 2.54. I always try to name this folder something creative, like the Studio Auxiliary folder.


3.

Click the desired drive and folder for your auxiliary files.

4.

Click OK to close the Browse for Folder window and return to the Setup Options dialog.

Tip

  • Note that Studio's Browse for Folder function can't create a new folder, so do that first in Windows Explorer if you need to create a new folder for the auxiliary files.


To delete auxiliary files

1.

From the Studio menu, choose Setup > Project Preferences (see Figure 2.40).

The Pinnacle Studio Setup Options dialog box appears (Figure 2.41).

2.

In the bottom right of the dialog, in the Folder for Auxiliary section, click Delete.

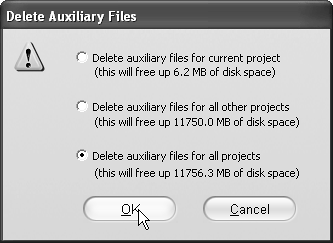
The Delete Auxiliary Files dialog box appears (Figure 2.55).

Figure 2.55. Studio can now delete your auxiliary files for you with this dialog box.


3.

Do one of the following:

  • Click Delete Auxiliary Files for Current Project.

  • Click Delete Auxiliary Files for All Other Projects.

  • Click Delete Auxiliary Files for All Projects.

4.

Click OK to close the dialog box.

Tip

  • The delete function only relates to files stored at the current selected location for auxiliary files. If you change locations for these files, the delete function won't go back and delete files at the old location, another reason to choose a single location and stay there.


     < Day Day Up > 


    Pinnacle Studio 10 for Windows. Visual QuickStart Guide
    Pinnacle Studio 10 for Windows Visual Quickstart Guide
    ISBN: B001E08S6S
    EAN: N/A
    Year: 2005
    Pages: 189

    flylib.com © 2008-2017.
    If you may any questions please contact us: flylib@qtcs.net