Flylib.com

Books Software


Selecting Your Capture Drive

 < Day Day Up > 

Selecting Your Capture Drive

Most video old-timers use systems with two or more hard disk drives: one for the operating system and applications and one for captured video and project files. This model arose in the days of underpowered computers and cranky, low-capacity disk drives that were barely up to the task of capturing video.

Things have changed since then. Most computers purchased since 2000 are more than capable of video capture and editing as is. Still, with 300-gigabyte (GB) drives costing under $300, most video producers should consider purchasing a separate drive, especially for long projects or DVD production.

To select your capture drive

1.

From the Studio menu, choose Setup > Capture Source ( Figure 2.25 ).

Figure 2.25. Choose Setup > Capture Source to access disk selection and test settings.


The Pinnacle Studio Setup Options dialog box appears, set to the Capture Source tab.

2.

In the Data Rate box (at the lower right of the Pinnacle Studio Setup Options dialog box), click the yellow Folder icon ( Figure 2.26 ).

Figure 2.26. Click the yellow Folder icon to select your capture drive and folder.


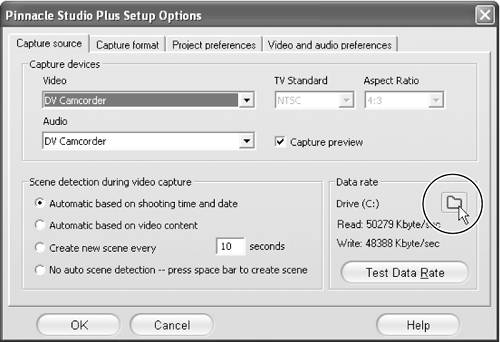
The Select Folder and Default Name for Captured Video dialog box appears.

3.

To change drives and select a destination folder on your preferred capture drive, click the Save In list box at the top of the screen ( Figure 2.27 ).

Figure 2.27. Click the Save In list box to change capture drives.


The list of available drives drops down.

4.

Click to select the target drive and folder ( Figure 2.28 ).

Figure 2.28. Select the target drive for your captured video.


Tips

  • Even if you're running a fast network at home, don't select a network drive as your capture disk. Performance is best with a local drive.

  • If you have multiple drives, sometimes it's helpful to label your capture drive "Video Disk."


To create a new folder and name your clips

1.

At the top of the Select Folder and Default Name for Captured Video dialog box, click the yellow Folder icon to the right of the selected disk drive.

When you hover the mouse over the icon, the Create New Folder Tool Tip appears ( Figure 2.29 ).

Figure 2.29. Click the Create New Folder icon to create a new folder.


2.

Studio creates a new folder, which you can name at will ( Figure 2.30 ).

Figure 2.30. Give your folders descriptive names so that you can remember what's in them.


3.

If desired, type the name of the captured file in the File Name box.

If you capture sequential files, Studio simply updates the file from Video 1 to Video 2, and so on.

{% if main.adsdop %}{% include 'adsenceinline.tpl' %}{% endif %}

Tips

  • Don't stress about what to name your files at this point, as you'll revisit this topic during the capture process.

  • Try to make your folder names descriptive; otherwise , six months from now you'll have trouble figuring out what's in them.


 < Day Day Up > 
 < Day Day Up > 

Defragmenting Your Capture Drive

Although most current computers (that is, those manufactured from 2000 onward) have enough power to handle digital video capture and editing, Studio includes a performance test so that you can be sure your computer has what it takes. Run this test as soon as you install Studio to identify any problems that may prevent smooth operation.

If you're using a disk that contains lots of data for your capture and edit drive, you should defragment the drive before performing this test. During normal disk operation, Windows copies and deletes files all over the drive, sometimes splitting up longer files when writing them to disk. Defragmenting the drive reunites all file components and packs the files efficiently together on the drive, opening up large contiguous spaces for the performance test and video editing projects.

The Windows Disk Defragmenter has a tool that lets you analyze the drive to see if it needs defragmenting. We'll skip that test and defragment anyway, just to be sure your disk is in the optimal condition to take the performance test—even if you're not in dire need of defragmenting, it can only help.

To defragment your capture drive

1.

From the Windows desktop, choose Start > Accessories > System Tools > Disk Defragmenter ( Figure 2.31 ).

Figure 2.31. The long and winding road to the Disk Defragmenter utility, a hard drive's best friend.


The Disk Defragmenter application window appears.

2.

Choose the video capture disk by selecting it in the application window; then click the Defragment button ( Figure 2.32 ).

Figure 2.32. Select your target drive and click the Defragment button to get started.


While you're waiting, go get a cup of coffee. You're pretty much done, but if you care to watch, here's what you should be seeing:

The program analyzes disk usage before defragmenting. Although you can't see it in the black-and-white screen shots, most of the small lines surrounded by white spaces are fragmented files that will be consolidated during the defragmentation process ( Figure 2.33 ).

Figure 2.33. The Disk Defragmenter first analyzes your file and then starts to consolidate files, compacting them to the inner tracks of the drive.


In the defragmented disk, which is ready for testing, all files are consolidated and efficiently packed, leaving plenty of contiguous disk space ( Figure 2.34 ).

Figure 2.34. The freshly defragmented disk has wide open spaces, perfect for efficient video capture.


Tips

  • Depending on the size of the drive and how much data is on the disk, defragmenting can take anywhere from 30 seconds to several hours, during which time you shouldn't use your computer. Keep this in mind before starting this operation.

  • Turn off all background programs and don't use the computer when you're defragmenting the drive. If any program writes data to disk while the system is defragmenting, the Disk Defragmenter may stop and then restart, extending the completion time significantly.

  • Large files slow the disk defragmentation process. If you have large video files or other files on the capture drive that you don't need, delete them and any other extraneous files before defragmenting.


 < Day Day Up >