Pinnacle Studio 10 for Windows. Visual QuickStart Guide
Authors: Ozer J
Published year: 2005
Pages: 24-26/189
Buy this book on amazon.com >>
 < Day Day Up > 

Using Make Movie Mode

You enter Make Movie mode ( Figure 2.16 ) by selecting the Make Movie tab at the upper left of the Studio interface (see Figure 2.6). This takes you to the controls for outputting your work.

Figure 2.16. The Make Movie dialog box is your last stop in the production process. Note the tabs at the upper left that let you select the output type.


Note that Studio customizes the Make Movie interface based on output type. In Figure 2.16, I'm about to produce a DVD of a recent trip to Charleston. As you can see, Studio shows a Diskometer-like view of the amount of space available on the DVD, and clicking the Settings button launches a dialog box with options specific to the selected output medium ( Figure 2.17 ).

Figure 2.17. Click Settings to see the detailed encoding options for the selected output medium (here we see the settings for DVD output).


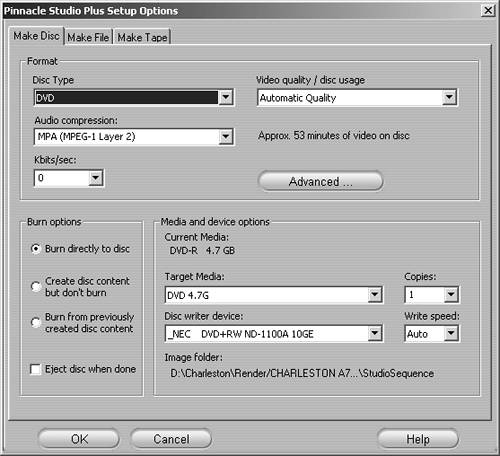
As indicated on the vertical panel on the left of the Make Movie tab (see Figure 2.16), you can also output to tape (see Chapter 13) and produce digital files, including AVI, MPEG, and streaming media formats (see Chapter 14).

 < Day Day Up > 
 < Day Day Up > 

Using Undo and Redo

Experimentation is a major part of the video creation process, which means trying and discarding lots of options. Studio makes this process painless with an exhaustive Undo/ Redo feature that saves up to 64 edit decisions made since the project was loaded for the current editing session. You can even save your project file and then undo previous edit decisions (a rare option in my experience) and, of course, redo them all if you change your mind again. Note that the redo and undo functions don't work on a movie once you've rendered it and output it to AVI, MPEG, or some other digital video format.

To undo an edit

  • To undo the immediately preceding edit that you've made, do one of the following :

    • Click the Undo icon in the upper-right corner of the Studio interface ( Figure 2.18 ).

      Figure 2.18. Video requires lots of experimentation, so Studio gives you several options if you change your mind, such as an Undo icon.


    • Select Edit > Undo.

    • Press Ctrl+Z on your keyboard to activate the Undo keyboard shortcut.

    Studio will undo the last edit—in this case, an inserted clip.

    Note that Studio stores edits sequentially, so if you want to undo the third previous edit, you must first undo the two most recent edits.

To redo an edit

  • To redo an edit, do one of the following :

    • Click the Redo icon in the upper-right corner of the Studio interface ( Figure 2.19 ).

      Figure 2.19. Changed your mind again? Simply click the Redo icon.


    • Select Edit > Redo.

    • Press Ctrl+Y on your keyboard to activate the Redo keyboard shortcut.

    Studio will redo the last edit—in this case, a trim end.

    As with edits, Studio stores Undo commands sequentially, so you must apply Redo commands sequentially if you want to reverse previously applied Undo commands.

 < Day Day Up > 
 < Day Day Up > 

Using Online Help

Studio includes extensive online help— essentially a digital version of the product manual. Studio also provides Tool Tips, those little flags that explain an icon's function when you hover over the icon with your cursor for a moment or two. If you find these irritating , Studio lets you disable them.

In addition, Studio provides keyboard shortcuts for many common activities. Studio offers an online list of shortcuts, which you can access as described in the following tasks .

To open Studio's Help screen

  • Do one of the following:

    • Press the F1 key.

    • Click the Question Mark icon in the upper-right corner of the screen (see Figure 2.14).

    • Choose Help > Help Topics ( Figure 2.20 ).

      Figure 2.20. Here's how you open Studio's online Help screen.


    Studio's Help screen appears ( Figure 2.21 ).

    Figure 2.21. What you get is essentially an online version of the manual.


To disable Studio's Tool Tips

  • Choose Help > Display Tool Tips ( Figure 2.22 ).

    Figure 2.22. If you find Tool Tips irritating, you can disable them.


    When you select Display Tool Tips, the check mark beside the Display Tool Tips menu item is removed ( Figure 2.23 ). You can reenable Tool Tips by selecting Display Tool Tips in the Help menu again.

    Figure 2.23. Tool Tips are disabled when the check mark is gone from the side of the menu item.


To view Studio's keyboard shortcuts

  • With Studio Help Topics open, select Keyboard Shortcuts at the bottom of the Contents menu.

    A list of keyboard shortcuts appears in the display window ( Figure 2.24 ).

    Figure 2.24. If you're a fan of keyboard shortcuts, Pinnacle makes them easy to learn by posting them in the Help file.


    Now let's take a look at the steps you should take before starting your initial project.

 < Day Day Up > 
Pinnacle Studio 10 for Windows. Visual QuickStart Guide
Authors: Ozer J
Published year: 2005
Pages: 24-26/189
Buy this book on amazon.com >>

Similar books