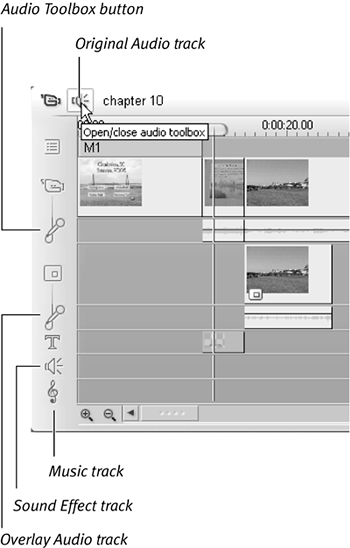
| Studio's timeline can handle up to four audio tracks (Figure 11.1), which operate as follows: Original Audio track. This track always starts with audio from the video file above it. If you lock the Video track, you can delete the original audio file and insert an audio file from the Album or drag one from any other track. Overlay Audio track. This track always starts with audio from the video in the Overlay track. If you lock the Video track, you can delete the original audio file and insert an audio file from the Album or drag one from any other track. Sound Effect track. Studio places narrations created with the Voice-Over tool in this track. By designation, Pinnacle also suggests that sound effects should be placed in this track, but you can place the sound effects in any open track. The Sound Effect track is referred to as the Sound Effect and Voice-Over track in some Studio Help files. Music track. Studio places files from both the CD Audio tool and SmartSound tool in this track, which can otherwise contain any audio file. It's referred to as the Back ground Music track in some Studio Help files.
Figure 11.1. Studio has up to four audio tracks: one for the audio included in the captured file, one for the Overlay track audio, one for sound effects and voice-overs, and one for music. At the top is the Audio Toolbox button. 
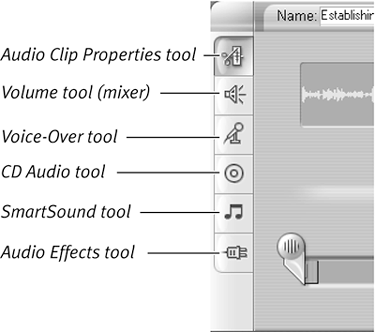
You can place any audio file from the Album in any track, but you should reserve the designated tracks for their namesake items if you plan to create narration or background audio files. Once Studio creates these files, it lets you move them to any track, thus providing additional design flexibility. Getting audio to the Timeline As we've seen, Studio populates the Audio track with audio associated with the video file. You can add only the audio from any video file by dragging the file from the Album to either the Sound Effect track or the Music track. (For details, see "Working with Audio Files" in Chapter 7.) Studio can also import WAV and MP3 files for dragging to the audio tracks. (For details, see the section "Working with the Sound Effects Tab" in Chapter 6.) The Audio toolbox Studio's Audio toolbox, accessed by clicking its namesake button at the top of the Movie window (Figure 11.1), contains the various tools used to create, edit, and mix audio on the respective tracks (Figure 11.2). Here are those tools (top to bottom): Audio Clip Properties tool: For trimming audio files. Volume tool (mixer): For adjusting the volume of the various audio tracks. Voice-Over tool: For recording narration segments placed on the Sound Effect track. CD Audio tool: For ripping CD audio tracks that are placed on the Music track. SmartSound tool: For creating background music placed on the Music track. Audio Effects tool: For adding audio effects to any audio track.
Figure 11.2. The Audio toolbox contains six tools. 
 Tip Tip
Create your audio tracks last, after all your video edits are finalized. That way, adjustments to the video tracks won't throw off the synchronization of the Music and Sound Effect tracks with the video.
|


 Tip
Tip