Flylib.com

Books Software


meet the timeline


meet the timeline

By now, you've reviewed your captured video, deleted the clips you won't use, and renamed those that you will. Now let's look at the Timeline, which is the palette upon which you'll create your video.

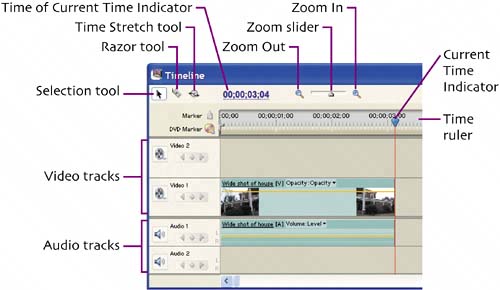
The Timeline can look intimidating, but it's actually pretty logical. As you add video, Premiere Elements displays the files on the Timeline, with the size of each clip determined by its duration, about three seconds for the clip in the Timeline above. As you add more video and still images to the project, Premiere Elements simply adds their durations to the Timeline, extending the project to the right.

Premiere Elements inserts video to the Video tracks and the associated audio to the Audio tracks. For simple projects, like that we're building here, you'll insert video and still images on Video 1 and titles on Video 2. Audio captured with the video will typically go on Audio 1, with background music and narration (if any) on Audio 2.


set in/out points

Suppose one of your captured clips is thirty seconds long, but you only want to include five seconds from the clip in the movie. Using the Set In Point/Set Out Point controls, you essentially tell Premiere Elements to start here (Set In Point) and stop there (Set Out Point).

Then you can drag only the video between those two points into the project. Here's how.


drag clip to the timeline

Then drag the clip from the Monitor to Video 1 and release.

Premiere Elements adds the video between the In and Out points to Video 1 and the audio to Audio 1. If you subsequently move the clip, Premiere Elements will keep the audio and video tracks "linked" to maintain synchronization unless and until you "unlink" the two tracks.


split clips on timeline

You can set In and Out points multiple times within a single captured clip, and Premiere Elements will save the settings for each scene inserted into the Timeline. However, if there are many separate scenes within one long capture file that you wish to include in your movie, it's faster to drag the clip to the Timeline, split it into separate scenes there, and remove unwanted frames by trimming on the Timeline.

For example, there are two scenes I'd like to include from the first captured clip; one the wide shot of the house, the second a shot taken while walking up the path to the front door.

Hold down the mouse button and drag the clip to the desired location.

Release the mouse button.

Premiere Elements inserts the video into Video 1 and the audio into Audio 1.


trim on the timeline

After splitting your clip, click the Selection arrow button on the top left of the timeline to restore the cursor to the Selection tool. If necessary, click the Zoom In button to zoom into the Timeline.

Click the mouse button.

When trimming the beginning of the first clip, drag to the right and watch the Monitor until the first frame you want to appear in the Movie appears.

Premiere Elements removes the frames at the start of the clip and shifts all subsequent clips to the left to close the gap. You can reverse the trim immediately by clicking Undo or at any time by dragging the edge back out.


trim between clips

We just trimmed the first video in the project, during which Premiere Elements displayed the normal Monitor display. However, when you trim between clips, Premiere Elements displays the Trim Monitor, which shows the last frame from the first clip on the left, and the first frame of the second clip on the right. This makes it easy to set up the ideal flow from clip to clip.

To display the Trim monitor, I'll trim the frames from the end of the first clip. Note that you don't have to do anything special to make the Trim Monitor appear, you just have to trim between clips.

Same basic procedure as before:

Hover your mouse over the edge you wish to trim.

While watching the Trim Monitor, click and drag the edge of the clip to the left until you reach the desired position.

When trimming from the end of a clip, wait until the last frame you want to remain in the movie appears in the Trim Monitor.