User Scenarios
| < Day Day Up > |
| Now that we've run through the basics and the tools, let's review some common user scenarios, starting with the two situations mentioned in All Lights Have a Different Color Temperature on page 41. To save you a flipping back, I'll recap them here. Situation 1: You're shooting indoors, using sunlight streaming in from a window as your key light, and a lamp in the room as a fill light. Options:
Situation 2: You're shooting indoors, lighting the scene primarily with fluorescent lights in the office ceiling, and using an incandescent lamp to reduce facial shadows. Options:
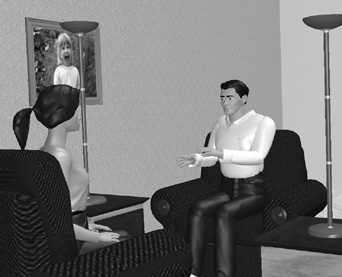
Situation 3: Your subject is wearing glasses. Options:
Figure 3.12. When your subject won't take off her glasses, position soft lights on either side, and in addition to the back light. Situation 4: Your subject wants to be shot against a window during daylight. Options:
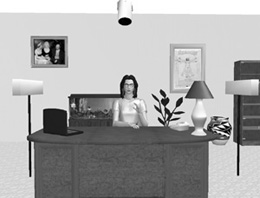
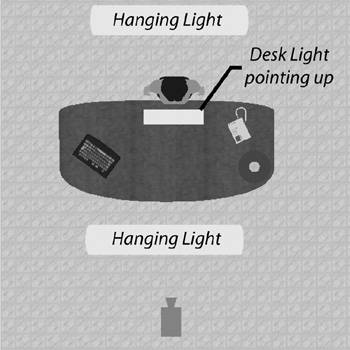
Situation 5: You have to shoot a subject in an office lighted by fluorescent lights. Options:
Figure 3.13. When shooting in an office with fluorescent lights, position the subject between the overheads and use a bounce card or small fluorescent light pointing upwards to remove facial shadows. Situation 6: You're shooting in a home or office where lamps provide the only available lighting. Options:
Professional Versus Homegrown LightingIf you compared the bulb from the shop lamp in Figure 3.7 to the bulb in a professional lighting kit say, the Lowel Tota-Light you would find minimal differences, though the Tota-Light, without stand, retails at about $170. To replace my $35 shop lamp with Lowel equipment I'd need to invest more than $300, and I'd still need to find stands. Or, I could spend $1,000-plus and get a four-light Lowel system with all the accessories. On its face, this may sound excessive. But it's worth noting that the Lowel system comes with a convenient carrying case that simplifies shooting on the go. The Lowel gear also has "barn doors" and other accessories that simplify directing the light, and convenient clamps and knobs for attaching umbrella reflectors and hoods. And rather than using paper clips and other ad hoc connectors to attach your diffusion materials to the lamp, you'll use a convenient stand. This all translates to convenience, time savings, and equipment durability. The truth is, I salivate over these types of lighting rigs and if I were a full-time videographer, I'd definitely buy one. However, for the type of intermittent shooting I do, I can get by with much cheaper equipment. Though my homegrown kit won't look as impressive to my customers as the branded gear, generally they care more about the quality of the video; if I'm careful, the customer won't know (or care) whether I used Lowel gear or a shop lamp from Lowe's. Two other pieces of lighting gear I couldn't live without are shown in Figure 3.15. The Rosco Diffusion Kit easily converts my halogen lamps to soft lights (for around $35), and the work lamp (right) with its own steel clamp, is marvelous for connecting to doors, lights, shelves, windows, cabinets, and pretty much everything else I've tried attaching it to. These clamp lights cost less than $10 and take both incandescent and compact fluorescent bulbs, providing great flexibility when attempting to match office lighting. Bruce A. Johnson's "Lighting on the Cheap," originally published in DV Magazine (www.dv.com/print_me.jhtml?LookupId=/xml/feature/2001/bjohnson0401), and "Creating a Low-Cost Fluorescent Lighting System" from Studio 1 Productions (www.studio1productions.com/Articles/FL-Lights.htm) both offer great advice on creating low-cost lighting systems. |
| < Day Day Up > |
EAN: 2147483647
Pages: 110