The Lighting Toolset
| < Day Day Up > |
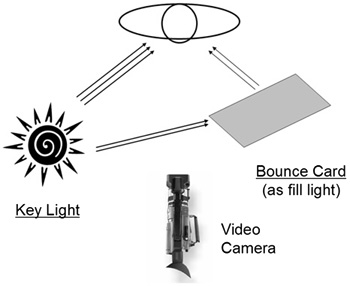
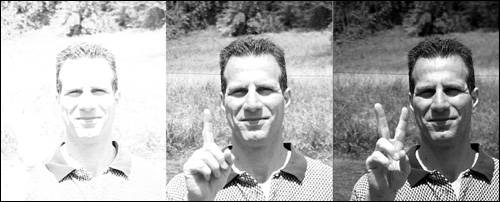
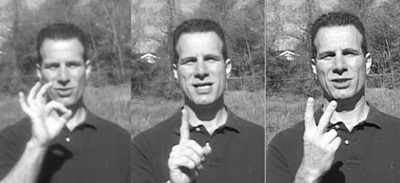
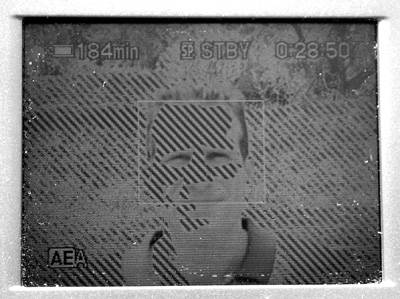
| Now, let's examine the tools at our disposal to help produce good lighting. Sources of LightUnless you're buying exotic professional lighting gear, your choice of bulb and fixture is limited to incandescent, quartz-halogen, and fluorescent. Let's briefly discuss each type. Incandescent BulbsThere are the common household light bulbs that screw into most lamps and light fixtures. Incandescent bulbs are also called tungsten bulbs because they use a tungsten filament; this is the element that glows and creates brightness or light glows when heated with electricity. Unlike fluorescent lights, incandescent bulbs run very hot, which contributes to their short life (750 to 1,000 hours). When the light burns out, the filament breaks into small chunks, creating the noise you hear when you shake the bulb. Some incandescent bulbs use heavy-duty filaments or different gases-side in the bulb, which can give you four times the longevity. Benefits and EffectsIncandescent bulbs give off a hard, yellowish light typically referred to as "warm" and have a very high CRI of 95. Overall, these bulbs are convenient because they're available in most offices and homes, but when they're your primary light source, be sure to white balance your camera accordingly. Halogen BulbsThese bulbs are also called quartz-halogen or tungsten-halogen (as shown in Figure 3.2). Basically, halogen bulbs use a tungsten filament like standard incandescent bulbs, but halogen gas in the bulb helps preserve the filament and boost the bulb's lifespan. These bulbs burn at more than 480 degrees Fahrenheit, which is too hot for a standard glass bulb, so they either require a quartz bulb (hence, the name quartz-halogen) or a special heat-resistant glass bulb. These bulbs burn so hot manufacturers recommend installing them with gloves as the skin's oil on the bulb can cause premature failure. The intense heat also makes halogen bulbs more of a fire hazard than incandescent bulbs, so be careful when using them around curtains, table cloths, or similarly flammable materials. Benefits and EffectsHalogen bulbs are generally more powerful than standard incandescent bulbs, which max out at about 100 watts. Halogens can be as powerful as 1,000 watts (120 volt) or 1,600 watts (240 volt). The ability to produce this power from a relatively small fixture makes halogen extremely efficient when you need lots of light, though you'll need a special fixture such as the shop light shown in Figure 3.7 to use higher-powered halogen bulbs. Halogen bulbs produce a hard light that is whiter and purer than incandescent bulbs, but shares the same high CRI. Fluorescent BulbsFluorescent bulbs run an electric current through a tube filled with argon and mercury gases; this combination produces ultraviolet radiation, and activates a phosphorous coating in the bulb to produce light. Fluorescents run cooler than incandescents or halogens, and last much longer. You can purchase fluorescent bulbs with a variety of color temperatures: from "daylight" bulbs that mimic the color temperature of the sun to 3,000K bulbs that are close to incandescent bulbs the CRI varying significantly from bulb to bulb. Benefits and EffectsCompact fluorescent bulbs fit into a standard lamp fixture, making them easier to use in the office and the home. All fluorescents output a soft light that is great for flat lighting, or serving as a fill light, but probably not sufficiently focused for key lights. Camera-Mounted LightsMost camera-mounted lights tend to be halogen bulbs. They produce a hard light that frequently engenders a deer-in-the-headlights look and is definitely hard on the subject's eyes. When a person is facing the camera, camera-mounted lights produce very flat lighting with no back light, which can create a very unattractive effect on the person being filmed. Benefits and EffectsThese lights are invaluable when shooting night or during parties and receptions, but are best used only when no alternative is available. Bounce Cards (Reflector Boards)Bounce card is the generic name for any surface that can reflect light from a direct light source typically to serve as a fill light as shown in Figure 3.8. As discussed above, bounce cards are also effective for bouncing light up from a lap or table to fill facial shadows. Figure 3.8. Use a bounce card as fill light by reflecting light from a strong, hard source. For casual use, a simple whiteboard from an arts & crafts store or any hard white object for that matter will work just fine. For heavy use, especially on the road, consider purchasing a professional reflector that you can fold up for easy storage. Professional reflectors, which generally cost less than $100, often have different colors on each side like white for sunlight and gold for sunset. Photoflex is a very popular manufacturer of reflector boards; check out their offerings at www.photoflex.com. Diffusion KitsDiffusion kits contain packets of cloth and other materials that change the character of the light produced by your light fixture. Some variations are artistic, but the ones I find most valuable are those that convert hard light to soft light by diffusing the beam from the source light. The Rosco kit I mentioned earlier has proven durable, easy to attach to my homegrown lighting kit, and heat-resistant even when used on 500-watt halogen bulbs. Essentially, the kit enables every light in my kit to provide both hard and soft light, making the $30 I spent well worth the investment. As a quick aside, some authors report using fabric-softener sheets to diffuse their light beams, but only after several drying cycles to eliminate the smell. As with all diffusion materials, you can't place them directly on the glass especially when stronger halogens are used because they can catch fire. Read more about diffusion materials and what's inside the Rosco kit at www.rosco.com/main.html. Gels (Filters)Gels are the plastic films placed in front of a light to change its characteristics. For example, if you were using the sun as the key light and needed a fill light to match its color, you would place a blue gel over a halogen or incandescent bulb to make it match the sun. Conversely, if you needed the sunlight streaming into the room to match the halogen lighting in the scene, you would place an orange or straw-colored gel over the window. Similarly, if bright light streaming in from a window produced too much backlighting, you could apply a neutral-density gel to reduce the light's intensity without changing the color. To be honest, I've not worked that much with gels, primarily because rolls of gel suitable for covering windows are expensive, and the brittle gel sheets are tough to attach to my ad hoc lighting gear. For indoor shooting, it's easier for me to match the color of my fluorescent and halogen bulbs. You can download the excellent Rosco Guide to Color Filters from the Technotes section of the company's Web site (www.rosco.com/main.html). LensesYou can also use lenses attached to the camera (or in some cases, embedded in the camera) to help control lighting. For example, Neutral Density filters (also called ND filters or gray filters) reduce the amount of light entering your camera, but don't change the color temperature. This gives much greater flexibility when working in direct sunlight, as shown in Figure 3.9. Figure 3.9. The Sony VX2000 has a two-step neutral-density filter to help tame direct sunlight. The image on the left shows the Sony VX2000 shooting with the ND filter disabled; as you can see, the video is so bright it's unusable. The middle figure shows the ND filter set to 1, while the figure on the right shows the ND filter set to 2. Note that the results produced by ND filters will vary depending on what shooting mode you're in. For example, in Figure 3.9, I'm in "aperture priority mode" (where I set the aperture manually), which prevents the camera from automatically adjusting the aperture to minimize the impact of the brightness. This maximizes the effect of the filter, which is what I was intending to show. In fully automatic shooting modes, the filter allows the camera to shoot much clearer images, because it lets the camera eliminate what the Sony manual calls "diffraction off the small aperture" shown in Figure 3.10. Whatever mode I'm in, my VX2000 blinks to tell me whether I should engage the ND filter and at which value a tremendous advantage over nonintegrated filters screwed onto the end of the lens. Whatever your filter/camera combination, you should experiment with the ND filter in all shooting modes before using it on a real shoot. Figure 3.10. In automatic exposure mode, the neutral-density filter increases sharpness, though your mileage may vary. Popular lens manufacturers, Tiffien, discusses ND filters on its Web site: www.tiffen.com/NEUTRAL%20DENSITY.htm. Zebra PatternThis is a camcorder feature rather than a true accessory, but a great tool for shooting inside and out. Briefly, as you can see in Figure 3.11, the camcorder shows a zebra pattern on certain parts of the image when it is overexposed. Using my VX2000, I can set this feature to 70 IRE, which shows whether the video is appropriately exposed for Caucasian skin tones, or to 100 IRE, which is pure white, or too "hot" for NTSC viewing. In Figure 3.11, the zebra pattern is set to 100 IRE. At this setting, the video will be way overexposed, as you can see from the image on the left in Figure 3.9. Figure 3.11. A zebra pattern lets you know when the image is overexposed. Just for the record, IRE stands for Institute of Radio Engineers, the folks who originally defined these video signal values. |
| < Day Day Up > |
EAN: 2147483647
Pages: 110