Setting the Scene-Executive Briefing
| < Day Day Up > |
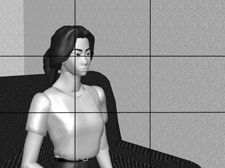
Setting the Scene Executive BriefingWith this as prologue, let's set the scenes, starting with the executive briefing scenario shown in Figure 1.8. There are six issues to consider in setting the scene, with the first four identical in all three scenarios. Figure 1.8. Setting the scene for the executive briefing and the Rule of Thirds as applied to a subject facing the camera.Whenever possible, scout the location beforehand (or at least ask about it) to identify any potential issues. Also, arrive as early as possible on the day of the shoot to give yourself time to assess and address environmental issues. Locating the Subject
Dressing the Subject
Managing the Background
Camera Height
Camera Placement
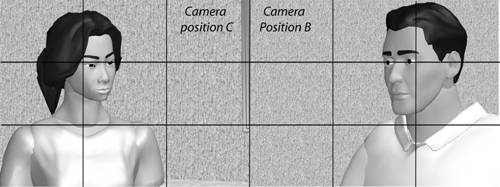
FramingAs I've mentioned already; framing refers to where the subject is located within the camera frame. In the executive briefing, the subject is placed in the center of the frame, as shown on the right in Figure 1.8, with the eyes roughly one third of the way down the frame. This is one application of the Rule of Thirds. Framing also describes how closely the camera zooms into the subject. Figure 1.8 is generally considered a medium long shot, since it shows the subject from the waist up. A medium shot is generally from the chest and up, and the closest you would want to frame an executive briefing. That's because close-ups are used to show emotion or the subject's reaction to what another person is saying. As no one else is talking in the executive briefing, and in the absence of a Tammy Faye Bakker-style confession, shots that display emotion shouldn't be an issue. InterviewIn the interview setting, most footage including that of the subject and the interviewer's noddies will be shot with the two parties facing each other, not the camera. For these shots, you'll position the camera as shown on the left in Figure 1.9. Figure 1.9. Setting the interview scene and using the Rule of Thirds to create "look room."To recap, Camera Position A is for the initial two-shot where you'll center the subject and interviewer in the camera. Then you'll move to Position B for the bulk of the interview, with the camera set up and pointing at the subject at about 30 degrees from the line between the subject and interviewer. When the subject is not directly facing the camera, the Rule of Thirds dictates how the shot is framed so that the subject's eyes are located at one of the four "saddle points," or those points in the frame where the lines intersect. In Figure 1.9, I've framed the shot to place the subject's eyes in the upper right saddle point, because that leaves "look room" toward the left, in the direction the subject is facing. This enhances the desired impression that the subject is looking at the interviewer. If you're using a separate cameraperson, shoot the two-shot from Camera Position A, then move to Position B. Shoot an establishing shot showing the subject and the chair, then zoom into medium-shot territory, shooting from the chest up. Zoom out a little if the subject moves his or her arms like John Madden, so the picture won't constantly cut off the motion. At intense or emotional points in the interview, don't be afraid to zoom into a close-up of the face, but linger for only a few seconds. Close-ups are interesting garnish, but shouldn't be a staple of your production. Once the interview is over, it's time to move the camera to Position C and shoot the noddies. When framing the picture, I place the interviewer in the upper-left saddle point, leaving look room on the right, or in whichever direction she is facing (Figure 1.10). During editing, when you cut from a shot of the subject to a shot of the interviewer, it looks like they're facing each other, which is the desired effect. Figure 1.10. Shooting the noddies, leaving look room in the other direction. DiscussionWhen shooting a multisubject discussion with one camera, use Camera Position A, as shown in Figure 1.11, a straight-on shot of the two (or more) participants. Frame the subjects in the center of the camera with their eyes positioned in the upper-third of the frame. Figure 1.11. The discussion shot head-on from Camera Position A.If you have additional cameras, position them across from the target (Camera B focused on the interviewee on the right, Camera C focused on the interviewer on the left), and a few degrees off center. When framing these shots, use the Rule of Thirds to position each subject's eyes at the back saddle point, leaving look room towards the front. This is shown in Figure 1.12. As in the interview settings, close-up shots of the subject's face are appropriate in small doses, but stick with medium shots (chest and up) for the bulk of the discussion. Figure 1.12. When working with multiple cameras, use the Rule of Thirds to place each subject's eyes in the back saddle point. Multiple-Camera ShootsThere's no doubt about it working with multiple cameras in a discussion scenario extends your creative options and makes both shooting and editing a lot more fun. If you have two cameras and someone to drive them, it's pretty simple to achieve, even with just one operator. Follow these pointers for the best results:
|
| < Day Day Up > |
EAN: 2147483647
Pages: 110