67 Understanding Square Pixels
#67 Understanding Square PixelsSometimes a little knowledge is a dangerous thing. For example, you probably know that your digital camera captures pictures in square-pixel format, but that your television displays images and video using rectangular pixels. So you might expect to have to adjust your pictures to make them look right when producing a slide show for TV viewing. Not to worryPremiere Pro knows the aspect ratio of your digital images, and how TV video is supposed to look, and adjusts images automatically.
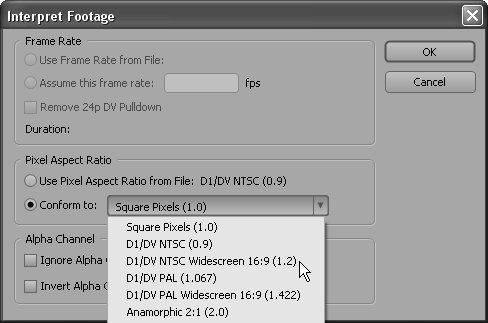
For example, Figure 67a is a video preview of my daughter Rose surrounded by circles that look convincingly circular. I shot the image with a digital camera, added the circles in Photoshop (holding down the Shift key) and imported the image into a 16:9 DV Premiere Pro project. As you can see from the preview, Premiere Pro knew the image was square-pixel and that I wanted the circles to stay circular, and it automatically made all the adjustments. Figure 67a. Circular circles, evidence that Premiere Pro automatically adjusted square-pixel input for 16:9 rectangular-pixel output.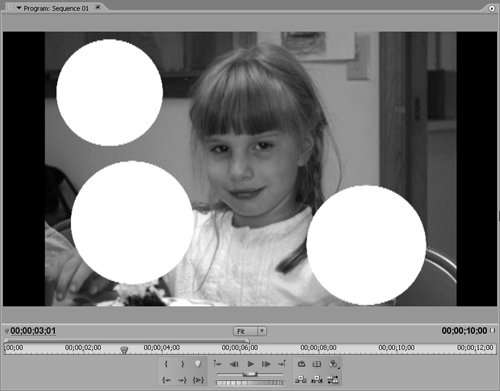 Notice the black bars to the left and right of the image. Premiere Pro produced these rather than stretching the image to fill the video frame, which would distort the image. In this situation, you can fill the screen (and eliminate the bars) by zooming in to the image using Motion controls in the Effect Controls panel. Figure 67b illustrates the one scenario in which Premiere Pro seems to lose its footing, specifically when you grab a video frame from a 16:9 video as described in #79. After importing this frame back into Premiere Pro, the circles are decidedly uncircular. Figure 67b. Our circles just turned into ovals. We definitely have an aspect-ratio misunderstanding.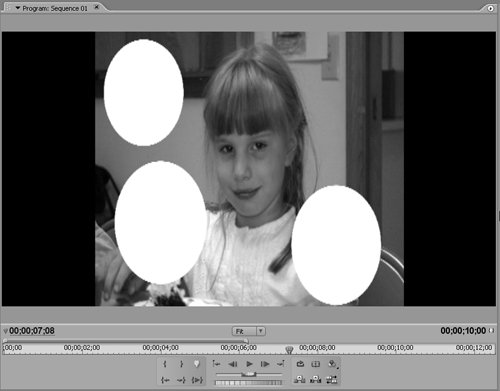 To fix this or any instance in which Premiere Pro appears to have selected the wrong pixel aspect ratio for video or still images, do the following:
|
EAN: 2147483647
Pages: 148