#59 Designing with the Titler's Design Primitives In Premiere Pro, one of the Titler's most useful functions is the set of design primitivessuch as circles, rectangles and ellipsesyou can use to create backgrounds that make your text titles readable irrespective of the video playing behind them. At a high level, you have to draw the shape, make it a color that highlights your font color, and if desired, make it translucent so it interferes with the background video as little as possible. Cut Your Design Time The new tool "New Title Based on Current Title" in the upper-left corner of the Titler is a great way to create multiple titles with the same look. Click the button to create a new title, which Premiere Pro will force you to name, then make your changes and move to the next. |
Here's how you build titles using primitives. 1. | In the Timeline, place the current-time indicator at the start location for the title you're producing.
| 2. | Open the Titler by pressing F9 or by choosing File > New > Title.
| | | 3. | In the middle-left section of the Titler, click the desired shape for your background object (Figure 59a). The example uses a rectangle.
Figure 59a. Here's the Titler in all its glory. Note the white rectangle under the Congressman. Note also that you can drag panels around, which is how the Alignment panels ended up on the right. 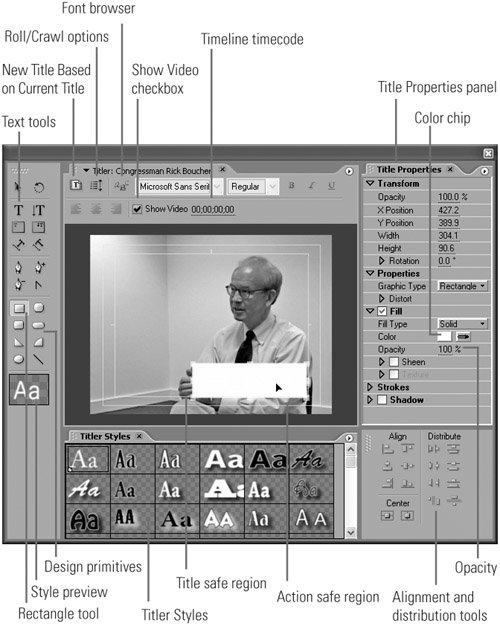
Vertical Text? Diagonal Too? Spend some time experimenting with the text tools in the upper-left corner of the Titler, which supply great options for diagonal and vertical text. Ditto for the Fill, Strokes, and Shadow options in the Title Properties panel in the upper-right corner. You'll learn that the Titler is an incredibly functional tool. |
| 4. | Draw the shape in the desired location. In the example it's a rectangle under the Congressman, placed within the title safe region, of course.
| 5. | To adjust the color in the Title Properties panel (in the example, the white title font needs a dark background behind it), click the color chip under the Fill property.
| 6. | In the Color Picker window, drag the selection circle to a dark gray color. Close the window.
| 7. | In the Title Properties panel, set the Opacity property under the Fill property to 50%.
| 8. | Add your text in the selected font, color, and size.
| | | 9. | Adjust your background to fit the text. Close the Titler window and your new or modified title will save automatically (Figure 59b).
Figure 59b. Here's the titlefast, easy, and highly readable, courtesy of the dark, translucent background. 
|
Import Logos into the Titler If you're creating a title around a logo, you can import the logo into the Titler by right-clicking inside the Design window and choosing Logo > Insert Logo. If you use your logo frequently, you can save the title as a template as described in #58. |
|