#53 Animating Clips in Premiere Pro We insert a lot of static objects into Premiere Pro, such as masks, titles, arrows, and other graphics. At times, we need them to adjust to the background video. For example, you may want a graphic arrow to remain pointing at a moving object, or a blur filter over someone whose identity you're attempting to hide. Or, to follow through with the example from the last three techniques (#50, #51, and #52), to keep the bride and her father in full color. Add Rotation to the Mix If you feel the urge to rotate your logo or other graphic element, use the Rotation parameter shown in Figures 53a and 53c. Click Toggle animation to make it active, and use keyframes to control speed and positioning. To rotate one revolution clockwise, enter 360 (which Premiere Pro will convert to 1x00). To rotate one revolution counterclockwise, enter 360, which Premiere Pro will convert to 1x00). |
You'll use the same basic toolsetPremiere Pro's Motion Controls and keyframesfor all of these tasks. Here's how: 1. | Click the clip containing the matte to activate it (on Video 3 in our example).
| 2. | Make sure the current-time indicator is set to the initial frame of the clip.
| 3. | Open the Video Effects panel, and click the Show/Hide Effects button next to the Motion controls to reveal its configurable parameters (Figure 53a).
Figure 53a. The positioning on the first frame. Everything looks perfect. 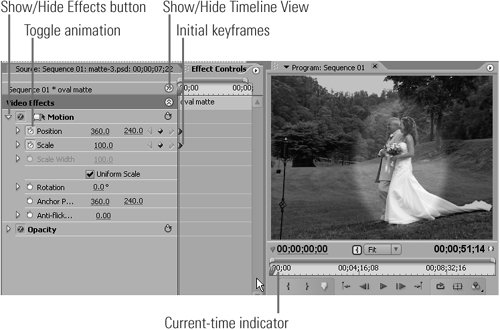
| 4. | Click the Show/Hide Timeline View to open the timeline to the right.
| | | 5. | Click the Toggle animation buttons next to the Position and Scale parameters to set your starting keyframes.
Go 3D If you want to move your image in 3D space, apply the Camera View effect (Video Effects > Transform folder), which lets you spin along the longitudinal or latitudinal axis. As with Premiere Pro's motion controls, all parameters are individually keyframeable for ultimate control. |
Note If you created your matte using the Premiere Pro titler on the first frame of the video, you shouldn't have to adjust the matte at the first keyframe. If you created it over a latter frame in the video, or in Photoshop, you may have to adjust the settings for the initial frame. | 6. | Drag the current-time indicator to the right until the shape no longer covers the targets in the background. In the example, at 10 frames in, the ellipse is too small (Figure 53b) and a bit too far forward.
Figure 53b. Ten frames in, the oval is too small. 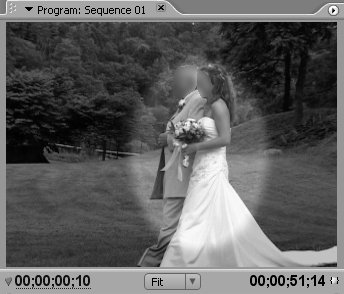
| | | 7. | To make the oval larger, drag over the scale value of 100 to the right (Figure 53c). To adjust positioning, drag over the Position X and Y values (default values are 360 and 240).
Figure 53c. Back on track. Instead of moving 10 frames at a time, you can also just drag the current-time indicator to the first frame where you lose alignment. 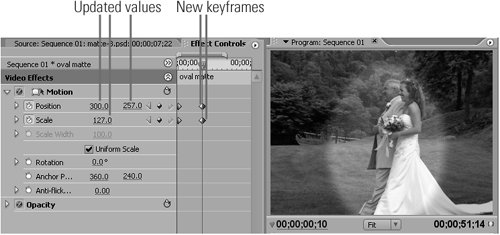
Note You don't need to create keyframes manually. If you move the video to a different frame and adjust any parameter with Toggle animation enabled, Premiere Pro will create the keyframe for you.
Smooth Motion When you preview your clip, the motion should be smooth from keyframe to keyframe. If not, right-click the keyframes and check the Interpolation methods used from keyframe to keyframe. Linear should work well, but if you've selected Hold, the motion will be very abrupt at each keyframe. |
| 8. | Repeat as necessary throughout the effect to keep the object and background video aligned.
|
|