#45 Producing a Picture-in-Picture Effect Picture-in-picture (P-i-P) is an overlay effect that starts with two clips at the same location on the timeline, one on top of the other. It's an effect that you'll use for performances, interviews, or any time you'd like to show footage from one video interacting with another. Fading the P-i-P In and Out Consider adding a short dissolve transition of 7-15 frames to the start and end of the P-i-P to smooth its appearance and disappearance. |
At a high level, you'll use Premiere Pro's Motion controls to resize the top clip, and then move it around to the desired location on the bottom clip. Then, optionally, you'll dress up the P-i-P with beveled edges and a drop shadow. Standardizing with Presets When using repetitive P-i-P effects, create presets to standardize the size, positioning, and other attributes of your P-i-P effect once you've adjusted the settings to your liking or to the requirements of your project. Otherwise, each will appear slightly different, detracting from the professional look of your video. |
1. | Select the top clip in the Timeline, and open the Effect Controls panel (Figure 45a).
Figure 45a. After shrinking the top clip, drag it to the desired location on the larger frame. Be sure most of your P-i-P clip is inside the Title Safe zone. With the View Zoom level set to Fit, I'm showing the entire frame so you can see the P-i-P in action. 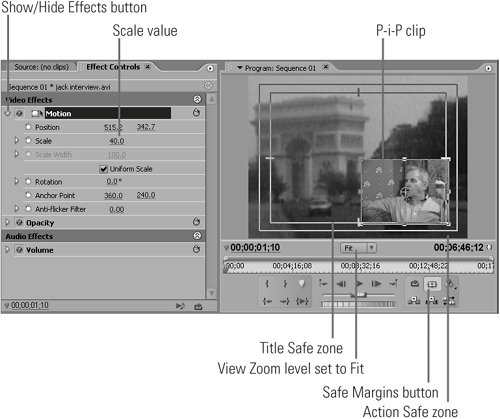
| 2. | Twirl the Show/Hide Effects button to expose the motion controls.
| 3. | Change the Scale value to 40.
| | | 4. | Drag the smaller window to the desired location within the larger frame. In the example, the P-i-P is in the lower-right corner. Your P-i-P is set; now let's dress it up.
Note If you're producing a DVD or other project for display on a 4:3 NTSC television, note that the outer 10-15% of the video may be excluded as "overscan." For this reason, click the Safe Margins button in the Program Monitor to expose the Title Safe zone (inner box) and Action Safe zone (outer box), and make sure the edges of your P-i-P are well within the Action Safe zone. Using the Title Tool to Create a Frame Say you wanted a blue frame around your P-i-P. What would you do? Premiere Pro doesn't allow you to create and paint edges around your video, but you can create a blue box in the title tool, place it under the P-i-P, and achieve the same result. |
| 5. | In the Effects Panel, click the Presets folder to open it, then select the Bevel Edges folder (Figure 45b).
Figure 45b. The P-i-P dressed up with beveled edges and a drop shadow. With the View Zoom set to 100%, I'm zoomed into the bottom-right corner of the frame so you can see the detail in the P-i-P. I also moved away from the Arc de Triomphe to provide a better background for seeing the P-i-P. 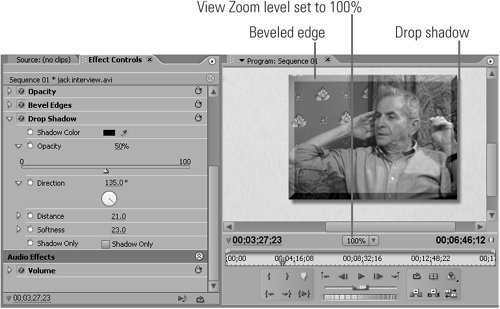
| 6. | Drag the Bevel Edges Thin preset onto the top track. Accept the presets.
| 7. | Click the Video Effects panel, select the Perspective folder, click the Drop Shadow effect, and drag it onto the top track. In the example shown in Figure 45b, I've adjusted the default setting to reveal the shadow to the bottom right of the P-i-Pnow displayed over another scene from the tripand zoomed in so you can see the details of the P-i-P with Safe Margins turned off.
Note Obviously, neither the beveled edges nor the drop shadows are required (and you can customize the parameters to suit your taste), but they add a nice touch of polish to the P-i-P. |
|