Incorporating JSPs into Portal
| | ||
| |
One of the great features of Oracle Application Server Portal is that you can use JSPs to provide content to your user community. Oracle Application Server Portal is a great content management and information aggregation tool. It allows a business to create a streamlined process to publishing and approving content for your internal or external sites. Combining Oracle Application Server Portal with JSPs is a fairly simple process. This section will outline the process for incorporating your custom JSPs into Oracle Application Server Portal.
Everything in Oracle Application Server Portal is hierarchical in nature. At the top level of the tree is the Page Group. A Page Group is a grouping mechanism used to organize the content of your site. Inside each Page Group , there is a one-to-many relationship with Oracle Application Server Portal pages; inside each Oracle Application Server Portal page, there is a one-to-many relationship with regions ; and inside each region is a one-to-many relationship to Oracle Application Server portlets. Developers can include many portlets that provide dynamic content in a single region. Using JSPs, developers can create portlets that generate dynamic content. You can even use the Struts Framework inside your portlets or convert existing Struts applications into Oracle Application Server Portal portlets. Oracle Application Server Portal also provides facilities to configure Partner applications (those built outside of Oracle Application Server Portal).
In order to create Java-based portlets, you must install the Oracle Application Server Portal Development Kit for Java. You can download the PDK for Java from http://portalstudio.oracle.com. The PDK allows you to create portlets that adhere to the Java Portlet Specification (JPS), which is based on Java Specification Request (JSR) 168.
| THE JSR 168 | Portlet Specification was designed to enable interoperability between portlets and portals. This specification defines a set of APIs for portal computing, addressing the areas of aggregation, personalization, presentation, and security. To get more information about JSR 168, go to: http://www.jcp.org/en/jsr/detail?id=168. |
The first step to understanding portlets is to understand the Show Modes available. Show Modes define the visualization and behavior of a portlet. There are eight basic show modes available, but you can also define custom Show Modes with JPS. The various modes are available as either JPS, Oracle Application Server Portal, or both. The eight basic types are
-
Shared Screen Mode View mode for JPS
-
Edit Mode JPS and Oracle Application Server Portal
-
Edit Defaults Mode JPS and Oracle Application Server Portal
-
Preview Mode JPS and Oracle Application Server Portal
-
Full Screen Mode Oracle Application Server Portal
-
Help Mode JPS and Oracle Application Server Portal
-
About Mode JPS and Oracle Application Server Portal
-
Link Mode Oracle Application Server Portal
When a portlet appears on a page with other portlets, it is in Shared Screen Mode. Anything that can be rendered inside a table cell can be rendered using Shared Screen Mode. When using this mode, you must remember that you do not have full control of the size and placement of the portlet. This is due to the varying browser width and user settings. For this section, we will focus on this mode. For additional information on various screen modes, see Oracle Application Server Portal Developer ˜s Guide 10g (9.0.4) Part No. B13922-01 (http://download-west.oracle.com/docs/cd/B10464_05/portal.904/b13922/toc.htm ).
To build and test our JPS compliant portlets, we will need the following items:
-
Portal Development Kit
-
Oracle Application Server 10 g or Oracle Application Server Stand-alone Version 9.0.4
-
Oracle Application Server Java Portlet Container Preview
-
Oracle JDeveloper 10 g Version 9.0.5.1 or 9.0.5.2
-
Portal add-in for Oracle JDeveloper 10 g
The first item that should be installed is Oracle Application Server 10 g and Portal or the Oracle Application Server 10 g Stand-alone server. To install Oracle Portal on Oracle Application Server 10 g , you must have installed the infrastructure.
| Tip | For detailed information on installing Oracle Application Server 10g, see the Oracle Application Server 10g Administration Handbook by John Garmany and Donald K. Burleson (Osborne Oracle Press Series, 2004). |
To install the stand-alone version, first obtain it from http://portalstudio.oracle.com. Once you have downloaded the zip file, extract it to a suitable location. For this example, we will use c:\poc4j. This version of OC4J requires JDK version 1.4.1 to be installed on your computer before it will run. If you do not have the JDK installed, obtain it from http://java.sun.com and install it.
To start the stand-alone server, navigate to the directory where it was extracted and change to the bin directory. The startup and shutdown scripts are in this directory. If you are on Windows, run the startup.bat to start the server and shutdown.bat to stop the server.
By default, the server is configured on port 8888. To access the server, you can point your browser to http://localhost:8888. If you wish to change this port, you may do so by editing the $OC4J_HOME/j2ee/home/config/http-web-site.xml file. Update the <web-site port= 8888 > entry to the desired port. If the server has started correctly, you will see the default page. From this page, you will be able to access the Portal Tools Home Page.
The Oracle Application Server Portal Development Environment
Oracle Application Server Portal has a rich development environment. There are wizards that allow rapid development and deploying of reports , forms, charts , calendars, menus , etc. While the wizards for these components have evolved along with the Portal product to include greater and varied options, they are still not perfect for every situation. You may have the need for functionality that cannot be provided by the Oracle Portal wizards. It is also possible that you have already spent a significant amount of time and effort developing JSPs and do not wish to recode your applications from scratch. In either of these scenarios, the integration of JSPs into Portal gives your development staff the ability to leverage existing work while gaining the benefits of Oracle Portal, such as a robust, easy way to implement security features, page caching, as well the ability to easily pass parameters and visual templates that give your JSPs a common look and feel.
Integration with early versions of Portal (and Portal s predecessor, WebDB) were frustrating at best and arduous at worst. In Oracle 9 i Application Server Release 2, the process of JSP integration with Portal became greatly simplified. Oracle Application Server 10 g continues that trend by providing the developer with various methods for integrating JSP technology with Oracle Portal pages. In addition to the ability to integrate JSPs with Oracle Portal, Oracle also provides a set of tags that permit the JSP to communicate with Portal objects (discussed in the section Portal-Specific JSP Tags ).
Types of JSPs in Oracle Application Server Portal
There are two types of JSPs that can be used with Oracle Portal. Oracle refers to these pages as external and internal JSPs.
-
External pages This refers to JSPs created and stored outside of the Oracle Portal environment. You can use any non-Portal tool or editor to create your JSPs. When it is time to integrate your JSP with Oracle Portal, a reference to the JSP file stored on disk is created. External pages offer the benefits of greater flexibility, and usually run faster than internal pages, but Oracle Portal does not provide them with any file management or security. The developer must manually configure file management and security for these external pages. The developer also must create a configuration file to reference the external JSP and modify configuration files on the server that will permit the external JSP to log into Portal.
-
Internal pages This refers to JSPs created with Oracle Portal s page wizards. The resulting JSP is uploaded and stored within the Oracle Application Server 10 g infrastructure database. Internal pages offer the benefits of easier creation and use Oracle Portal to manage and provide security for them.
Creating an Internal JSP
You will need to adjust few default Portal settings before you can create an internal JSP. In Portal, enter the Navigator by clicking on the Navigator link in the top right of the page. Click the Page Groups tab if it is not already selected. If you have an exiting page group you wish to work with, click the Edit Properties link next to that page group. If you wish to create a new page group, do so by clicking the Page Group link in the top left of the window. After creating the page group, click the link on the top of the page to edit the properties of the page group.
Click the Configure tab at the top of the Edit Page Group screen. At the top of that page, you ll see a section entitled Page Types and Template (Figure 14-1). By default, the only page types available for new page groups are Standard and URL. To create a JSP, we will need to add the JSP type to the list of available page types. Do this by clicking the Edit link next to Current Selection in the Page Types and Template section. You will see a screen similar to Figure 14-2. Select JSP in the hidden page types and click the greater than symbol to move it to the Visible Page Types list. At the bottom of the Configure tab of the Edit Page Group page is a section entitled JSP Access. Click the Edit link next to that section. On the following page, select the Allow External Access check box and type in a key (the key can be anything, but remember it for later). Click OK when complete. Click OK again to return to the Navigator.

Figure 14-1: The Page Types and Template screen in Oracle Application Server Portal

Figure 14-2: The Page Types section
Click the Contents link to enter the group objects page. Click the Create link next to Pages. JSP now shows up in the Page Type drop-down list for the page (Figure 14-3). Give your JSP a suitable name and click Next >. On the following screen, the developer is prompted to enter the JSP file that will make up this page. When the JSP is specified here, the file will be uploaded and stored in the database. The developer can modify the JSP later on, but the step to upload the file to the database will need to be repeated. Click the Browse button and locate your JSP file.
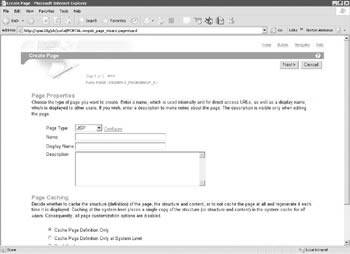
Figure 14-3: The Create Page screen with JSP selected
Note that on this page, you also have the option of specifying a Java Archive (JAR) or Web Archive (WAR) file. They are both files that have predefined directory structures and are made up of files that constitute an application. If you choose to specify a JAR or WAR file on this page, you must specify the initial JSP file within the archive, as an archive may contain multiple JSP files.
Click Next > to enter the Access page for your JSP. Leave the default values on that page and click Finish. You can now view the JSP by clicking on its name in the Navigator (Figure 14-4).

Figure 14-4: The JSP displayed in Oracle Application Server Portal
Portal-Specific JSP Tags
As we mentioned earlier, Oracle Application Server Portal provides a number of Portal-specific tags. These tags are used to extend your JSP s functionality so that it can run in the Oracle Application Server Portal environment and access Portal elements. The Portal-specific tags available to you are
-
< portal:usePortal > This must be the first Portal-specific tag in the JSP and must be in the declaration section of the JSP. Its presence indicates the desire to interact with Oracle Application Server Portal portlets within the JSP.
-
< portal:prepare > This tag is used to optimize portlet request by bundling portlet content requests for several portlets from the same portal instance. As an example, the following code would require three round-trips from the client to the server:
<showPortlet name = "StockQuotes"/> <showPortlet name = "CompanyInfo"/> <showPortlet name = "InvestmentPotfolio"/>
The prepare tag can be used so that only one trip between the client and server would be performed:
<portal:prepare> <portal:Portlet name = "StockQuotes"/> <portal:Portlet name = "CompanyInfo"/> <portal:Portlet name = "InvestmentPotfolio"/> </portal:prepare>
-
< portal:portlet > This tag can only be used within a <portal:prepare> tag (see preceding example).
-
< portal:parameter > This tag is used to set parameters for portlets.
-
< portal:showPortlet > This tag puts the content of an existing portlet onto a JSP. Example syntax:
For a default page group:
<portal:showPortlet name="StockQuotes" />
For a named page group:
<portal:showPortlet name="/Page1/StockQuotes" />
-
< portal:useStyle > This tag, placed in the <HEAD> section of your JSP file, specifies a style name defined in Portal. It generates a <LINK> that must be in the <HEAD> section of an HTML document.
-
< portal:getPageUrl > The tag returns the URL of the current page.
Oracle Application Server Portal has expanded its capabilities, making integration with JSPs a much easier task than it was with earlier versions of Oracle Portal and WebDB. The page wizards save the developer from having to hand-modify any configuration files on the server, which often led to access issues (telnetting to the server) and human error when editing configuration files by hand. The developer also now has access to Oracle Application Server Portal-specific tags that allow the interaction of JSPs and existing Portlets. Through this functionality, the developer has the ability to exploit all of Portal s advanced functionality (security, visual templates, etc.) without sacrificing the power and time already invested in JSP development.
| | ||
| |
EAN: 2147483647
Pages: 192