Simplifying Tasks with Macros
Simplifying Tasks with Macros
If you perform a task often, you can record a macro that automates the task. A macro is a series of commands and functions, stored in a Visual Basic module, that you can run with one step whenever you need to perform a task. You can record a macro in PowerPoint to combine multiple commands into one, to speed up routine editing and formatting tasks, or to make a dialog box option more accessible.
Before you record or write a macro, you need to plan the steps and commands that you want the macro to perform. After you record a macro, it is listed in the Macro dialog box, and you can run it from there.
In this exercise, you will record a macro and then run it. You will then delete it.
OPEN a new, blank presentation, and if necessary, close the task pane.
-
On the Tools menu, click Options , and on the View tab, select the Slide Layout task pane when inserting new slides check box (if it is not already selected), and click OK .
-
On the Tools menu, point to Macro , and then click Record New Macro .
The Record Macro dialog box appears.
-
In the Macro name box, type InsertTitleOnlySlide .
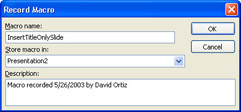
Tip Macro names cannot contain spaces.
-
Click OK .
The Stop Recording toolbar appears, containing nothing but a Stop Recording button.
-
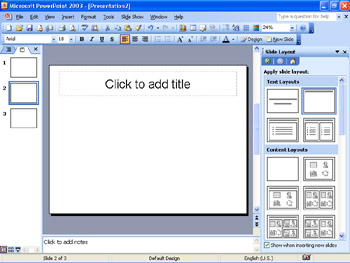
On the Formatting toolbar, click the New Slide button.
PowerPoint inserts Slide 2 with the Title and Text layout and opens the Slide Layout task pane so that you can change the layout of the new slide if the default is not what you want.
-
In the Text Layouts area of the Slide Layout task pane, click the Title Only layout.
The layout of Slide 2 changes to reflect your selection.
-
On the Stop Recording toolbar, click the Stop Recording button.
The Stop Recording toolbar closes .
-
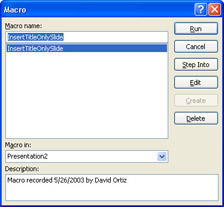
On the Tools menu, point to Macro , and then click Macros .
The Macro dialog box appears, with InsertTitleOnlySlide highlighted in the Macro name area.
-
Click Run .
The Macro dialog box closes, and PowerPoint executes the macro, inserting a new Slide 2 with the Title Only layout, and renumbering the old Slide 2 to Slide 3.
Tip If you know how to program in Visual Basic, you can use the Visual Basic Editor to edit a macro you have recorded. To edit a macro, click Macro on the Tools menu, click Macros to open the Macro dialog box, click the macro you want to edit, and then click Edit to open the macro in Visual Basic Editor. You can also open the Visual Basic Editor without opening an existing macro by pointing to Macro on the Tools menu and then clicking Visual Basic Editor on the submenu. (You can also use the Visual Basic Editor to write a new macro from scratch.)
-
On the Tools menu, point to Macro , and then click Macros .
The Macro dialog box appears, with InsertTitleOnlySlide highlighted in the Macro name area.
-
Click Delete .
PowerPoint asks you to confirm that you want to delete the macro.
-
Click Delete again.
-
In the presentation window, click the Close Window button, and then click No when you are prompted to save changes to the presentation.
| |
You can use supplemental programs, called add-ins , to extend the capabilities of PowerPoint by adding custom commands and specialized features. PowerPoint add-ins might be available on The Microsoft Office System 2003 CD-ROM or on the Microsoft Office Online Web site. Otherwise, you can obtain add-ins from independent software vendors , or if you are proficient in Visual Basic, you can write your own add-ins by using Visual Basic Editor.
To use an add-in, you must first install it on your computer and then load it into your computer s memory. PowerPoint add-ins have the file-name extension .ppa .
| Tip | To conserve memory and maintain PowerPoint s running speed, it s a good idea to unload add-in programs that you don t use often. When you unload an add-in, its features and commands are removed from PowerPoint, but the program itself remains on your computer for easy reloading. |
To install and load an add-in program:
-
On the Tools menu, click Add-Ins .
-
Click Add New .
The Add New PowerPoint Add-In dialog box appears.
-
Click the down arrow to the right of the Look in box, and then click the folder where you have stored PowerPoint add-in programs.
-
In the list of file and folder names, click the add-in you want.
-
Click OK .
-
In the Available Add-Ins list, click the add-in you want to load, and then click Load .
-
Click Close .
The Add-Ins dialog box closes, and the add-in is available for use in PowerPoint.
To unload an add-in:
-
On the Tools menu, click Add-Ins .
-
Click the add-in you want to unload.
-
Click Unload to remove the add-in from memory but keep its name in the list, or click Remove to remove the add-in from the list entirely.
-
Click Close to close the Add-Ins dialog box.
| |
EAN: N/A
Pages: 145