Formatting with Styles
A style is the collection of formatting applied to a particular block of text. Every paragraph you write is formatted with a style. When you create a new text frame in a publication, Publisher by default applies the Normal style to any paragraphs you type. The Normal style formats text in the Times New Roman font and makes it 10 points in size , and it left aligns and single spaces each paragraph. You can change this default formatting by applying different formats one by one, or by applying a style that includes all the formats.
As you might have noticed while working in the publications you have created, each of Publisher s design sets comes with a collection of built-in styles. When you click in a paragraph or select any of its text, the style currently applied to the paragraph or the text is displayed in the Style box on the Formatting toolbar. You can apply any available style by clicking it in the Style drop-down list.
If none of the available styles meets your needs, you can define a combination of formatting as a custom style and then apply that style in the same way. In this topic, you ll explore two ways of creating styles that you will apply to the paragraphs of the flyer.
Creating a Style from Existing Text
Follow these steps to see how to quickly create a new style using the formatting that already exists in the flyer s text elements:
1. Select the Join Us title text, and click the Style box at the left end of the Formatting toolbar once to highlight the name of the current style.
2. Type Flyer Title as the new style name, and press Enter .
The Create Style By Example dialog box appears, as shown in this graphic:
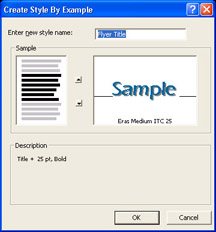
3. Verify that the new style has the correct formatting, and then click OK .
Publisher creates the style, adds its name to the Style list, and displays Flyer Title in the Style box to identify the style applied to the active paragraph.
4. Click an insertion point in the Exclusive Tour Features heading, click the down arrow to the right of the Style box, and click Flyer Title in the drop-down list.
Publisher changes the style of the heading so that its formatting is consistent with the title. After you see the effect of changing the style, you decide you don t like it.
5. Click the Undo button on the Standard toolbar to reinstate the previous formatting.
Creating a Style from Scratch
Now let s turn our attention to the main text paragraphs of the flyer. Suppose you want to change the font, add a little space before each paragraph, and adjust the spacing between lines. Follow these steps to create a new style with all of those elements:
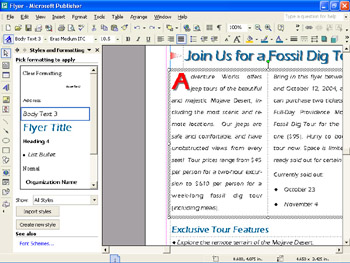
1. Click an insertion point in the first body text paragraph of the flyer, and click Styles and Formatting on the Format menu.
The Styles and Formatting task pane appears, as shown in this graphic:
| |
After you create a style for use in one publication, you don t have to recreate it for use in others. Instead, you can import the style. Open the publication where you want to use the style, click the Import styles button in the Styles and Formatting task pane, and in the Import Styles dialog box, navigate to the appropriate publication file, and doubleclick it to import its styles into the current publication. To import styles from a file created in another program, click the arrow to the right of the Files of type box in the Import Styles dialog box, select the program the file was created in, navigate to the file, and then double-click it. (If the file type is not listed, you can t import its styles into Publisher.)
| |
In the Styles and Formatting task pane, you can apply an existing style; add a new style; modify, rename, or delete the selected style; or import styles from a different publication.
2. Click the Create new style button at the bottom of the Styles and Formatting task pane.
Publisher displays the Create New Style dialog box shown in this graphic:
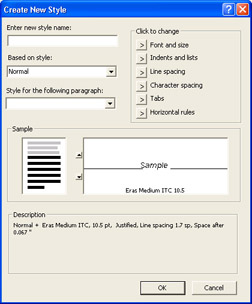
3. Type Flyer Text in the Enter new style name box, and then click the Font and size arrow button in the Click to change area to display the Font dialog box.
4. Make sure the font is set to Eras Medium ITC , change the font size to 11 , and click OK .
5. Next click the Line spacing arrow button in the Click to change area.
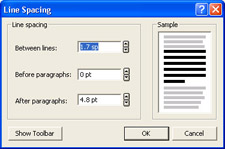
Publisher displays the Line Spacing dialog box shown in this graphic:
| |
To modify a style, first open the Styles and Formatting task pane, click the arrow to the right of the style you want to modify in the Pick formatting to apply area, and click Modify. Make the necessary formatting changes in the Change Style dialog box, and then click OK to implement the changes. When you redefine a style, all occurrences of that style in your current publication are updated.
You can also make formatting changes directly to the text containing a style and then click Update to match selection on the affected style s drop-down menu. All the paragraphs containing this style will be updated to reflect the changes.
| |
6. Change the Between lines setting by typing 1.5 sp (for line spaces). Then change the Before paragraphs setting to 3 pt and the After paragraphs setting to 0 pt .
7. Click OK twice to close both the Line Spacing dialog box and the Create New Style dialog box.
Applying a Style
You apply a style to instantly format words and paragraphs, But sometimes you might want a particular paragraph to have some but not all of a style s formats. In that case, you must decide whether to apply the style and then manually change the format that isn t quite right, or whether to apply the formats individually. Follow these steps to see the difference:
1. Click an insertion point in the first paragraph, and then click Flyer Text in the Pick formatting to apply list of the Styles and Formatting task pane.
Publisher applies the formatting of the new style to the paragraph. Notice that the style also includes the drop cap you applied earlier, but has dropped the shadow effect from the drop cap character. You can reapply it if you want by reopening the Font dialog box and selecting the Shadow check box (we did for appearance s sake).
2. Now click an insertion point in the second paragraph (but not the sold-out bulleted list or its title). Repeat step 1 to apply the new style to the second paragraph.
Publisher applies the formatting of the new style to the second paragraph. You don t want the drop cap to appear in the second paragraph, but you want to retain the drop cap as part of the style for the first paragraph. You could modify the style, but doing so would remove the drop cap from the first paragraph as well. You ll fix this dilemma easily in the next step.
| Information about | Modifying styles, page 75 |
3. With the insertion point anywhere in the second paragraph, click Drop Cap on the Format menu, and click Remove in the Drop Cap dialog box.
Publisher closes the Drop Cap dialog box and removes the drop cap from the second paragraph.
Now you want to make the line spacing of the Currently sold out text and its small bulleted list more consistent with the new Flyer Text style. Applying the new style to this bulleted list is not a good idea, because it will overwrite the list s formatting. Complete the following step instead.
4. Select the Currently sold out text and its two bullets, and click Line Spacing on the Format menu. Type 1.5 in the Between lines box, press the Tab key, type 3 , press the Tab key again, type , and then click OK .
5. Save your work, and if you are not continuing on to the next chapter, close Publisher.
EAN: N/A
Pages: 76