Reading and Responding to Messages
When you receive your first message, you ll want to read it and perhaps send a response. In this topic, we show you efficient ways to do that.
| |
To have information, such as your name, job title, company name, or web site address added to the end of your messages, you can create a signature. (Avoid cutesy pictures or sayings, because they become tiresome quickly.) You can create multiple signatures for different types of correspondence and then select the one you want for a particular message, or you can specify that one signature appears at the end of all your messages by default. To create a signature, click Options on the Tools menu, click the Mail Format tab, click the Signatures button, and then click the New button. Type a name for the signature, and click Next . Enter your signature, using the buttons below the text box to format the signature. Click Finish, and click OK. To have your signature appear in all your messages, click the Signature for new messages box s down arrow, click the name of the signature in the drop-down list, and click OK. To have your signature appear only when you specify, click <None> in the drop down list. Then the process for adding your signature to a specific message varies depending on whether Word is your default e-mail editor. If it is, click AutoText on the Insert menu, point to Signature, and click the signature you want. If it isn t, click Signature on the Insert menu, and click the name of the signature you want to include.
| |
| |
The first column of the header pane displays an exclamation mark if the sender has indicated that the message is of high priority. A down arrow indicates that a message is of low priority. The second column displays symbols indicating the status of each message. The most common symbols show whether the message has been read ”an open envelope ”or not read ”a closed envelope. Other symbols show that you have replied to or forwarded a message. The third column displays a flag icon if the message has been flagged. The fourth column displays a paper clip icon if the message has an attachment.
| |
Reading a Message
If you re connected to your mail server, you now have some new message headers displayed in the Inbox. If you aren t connected, log on, send the messages stored in your Outbox, and retrieve any new messages. Then follow these steps:
-
On the Standard toolbar, click the Send/Receive button.
If Outlook is set up for more than one mail service, click Send/Receive on the Tools menu, and then click either the service you want or All Accounts. Outlook tells you it is checking for new messages and sending outgoing messages. (Internet e-mail users might have to enter a user name and password first.)
When Outlook is finished, it displays the number of unread messages in parentheses next to the Inbox icon on the Outlook bar and displays an envelope icon in the status bar. It might also sound an alert to announce the arrival of the messages, and it might disconnect you from your mail server. Whether you are permanently connected to your mail server or you have to manually retrieve your messages, the message header pane now looks like the one shown here:
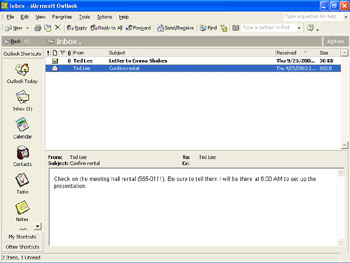
Until you read a message, its header is in bold type. Icons to the left of the header tell you more about the message.
-
Click the header of the message with the attachment (the one with the paper clip).
Outlook displays the message contents (but not the attachment contents) in the preview pane.
-
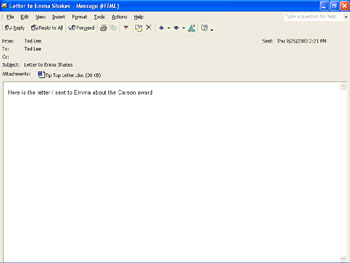
Now double-click the same message header.
Outlook displays the message in a window, like this one:
-
To read the attachment, simply double-click its name on the Attachments line.
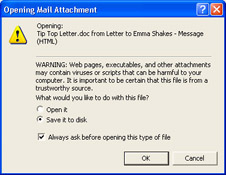
More about the preview pane The dialog box shown in this graphic might appear, warning you that e-mail attachments can contain viruses:
-
Because you know this file came from a safe place (your own hard disk), select the Open it option, and then click OK .
The attachment opens in the program in which it was created. If you see a dialog box asking whether you want to merge the changes, close it without doing anything.
-
Close the program to return to Outlook.
Information about Adding attachments, page 287
| |
Some viruses now come attached to programs that automatically run in the preview pane. To turn off the preview pane, click Preview Pane on the View menu. You can click AutoPreview on the View menu to display the first three lines of a message immediately below its header. When you select an unread message header, Outlook removes the bold formatting after a few seconds because it assumes you have read the message in the preview pane. If you don t want Outlook to mark your previewed (but unopened) messages as read, click Options on the Tools menu, click the Other tab, and click the Preview Pane button. Then select the desired option in the Preview Pane dialog box and click OK. (You can manually mark messages as read or unread by clicking Mark as Read or Mark All as Read on the Edit menu.) When the preview pane is turned on, you can adjust the relative amount of space allocated to the panes by dragging the border between them up or down. You can also adjust the size of the columns in the header pane by dragging the column heading borders.
| |
Responding to a Message
Suppose the message you just opened requires a response. Follow these steps to send a reply:
-
Click the Reply button.
To send a response to the sender of the message and to all recipients of courtesy copies, you would click the Reply to All button. Outlook opens a Message window like the one shown in this graphic:
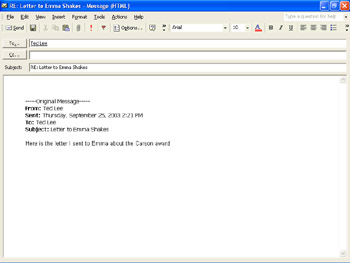
Notice that the To and Subject boxes are already filled in. Also notice that the attachment is not included as part of the reply, but the original message appears below the blinking insertion point. (If you prefer not to display the original message in your responses, read the tip on this page.)
-
Type Thanks for the letter. That should work! Then click the Send button.
Back in the original Message window, Outlook has added a note at the top of the window that you have sent a reply to this message.
| |
To save a message, click the message header in the header pane, and then click Save As on the File menu. Name the file, specify the file type in the drop-down list, specify a location for the saved file, and click Save. You can save an e-mail messages as a text file, as an Outlook template, as a message file, and as HTML (which is suitable for display in a web browser). To save an e-mail attachment as a separate file, open the message, right-click the attachment s name, click Save As on the shortcut menu, and then designate the storage location for the file. To save an attachment without opening the message, select the message header in the workspace, click Save Attachments on the File menu, click the name of the attachment, and then complete the Save Attachment dialog box as usual. A word to the wise: When you receive a message with an attachment, save the attachment in a temporary folder and scan the folder for viruses before you do anything with the file.
| |
Forwarding a Message
If you receive a message that you think will be of interest to someone else, you can easily forward the message with just a few mouse clicks. Follow these steps to try it:
-
With the Emma Shakes message still displayed in its window, click the Forward button on the toolbar.
Outlook displays the Message window shown here:
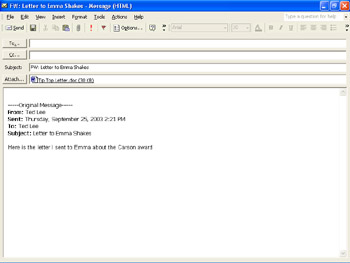
This time only the Subject box is filled in. Notice that the attachment will be sent as part of the forwarded message. Again, the original message appears in the window.
-
For demonstration purposes, type your own e-mail address in the To box, and click the Send button.
Outlook changes the note in the original Message window to indicate that you forwarded the message.
-
To view your new messages, close the Message window, and if necessary, click the Send/Receive button.
The header pane now looks like the one shown here:
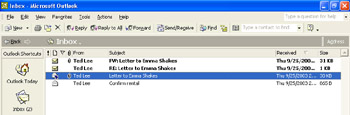
The right-pointing blue arrow on the envelope icon of the original Emma Shakes message tells you that you have forwarded this message. (The header and icon display the most current action.)
-
Open both new messages to look at them, and then close them when you are done.
| |
If you don t want Outlook to display the original message at the end of your reply, click Options on Outlook s Tools menu, and then click the E-mail Options button on the Preferences tab. Click the When replying to a message box s down arrow, select the Do not include original message option, and then click OK twice. (Notice that you can also change the way the original message appears in a forwarded message using this dialog box.)
| |
EAN: N/A
Pages: 116