Adding and Customizing Clip Art
The term clip art refers to any ready-made graphic that can be added to a document ”or in this case, a slide ”to illustrate a point or create a tone or impression . You can add clip art to an existing slide or create a new slide specifically to hold a piece of clip art.
Microsoft Office comes complete with a large selection of clip art that you can use as you want, and more clip art is available on the Internet. Many clip art collections are available for free use; you can also purchase collections of clip art from a variety of companies.
In this section, we ll show you how to add a clip art graphic to an existing slide in the 1 Redmond BEAT presentation. Then you ll format the graphic in various ways to achieve the desired effect.
Inserting a Clip Art Graphic
If you have an idea of the type of graphic that you d like to include on a slide, the most efficient way to add a graphic is through the Insert Clip Art task pane. Follow these steps:
-
If PowerPoint is not already running on your computer, click the Start button at the left end of the Windows taskbar, and start PowerPoint now.
-
If you closed the 1 Redmond BEAT presentation at the end of the previous chapter, in the Open a presentation area of the New Presentation task pane, click 1 Redmond BEAT .
The presentation should be displayed in Slide Sorter view.
-
Switch to Normal view, and then select the Slides tab in the overview pane.
-
Click Slide 7 , and then on the Drawing toolbar, which is docked at the bottom of your screen, click the Insert Clip Art button.
-
If the Add Clips to Organizer dialog box appears, click Later to catalog your media files some other time.
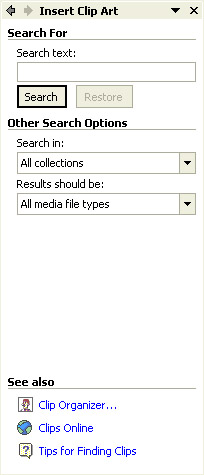
You now see the Insert Clip Art task pane shown in the graphic on the next page.
When any task pane is open, you can switch to the Insert Clip Art task pane by clicking the arrow in the task pane s title bar and then clicking Insert Clip Art in the drop-down list.
-
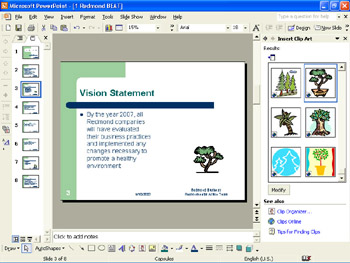
In the Search text box, type recycling .
-
Click the Results should be box s down arrow, deselect all the check boxes except Clip Art , and click the Search button.
PowerPoint displays thumbnails of all the graphics that relate to the keyword recycling , as you can see here:

If the results don t identify a graphic you can use, you can enter a new word in the Search text box.
-
Point to any graphic that matches the 1 Redmond BEAT theme, and click the graphic s down arrow.
As you can see, we chose the third recycling symbol in the first column. PowerPoint displays a drop-down menu like this one:
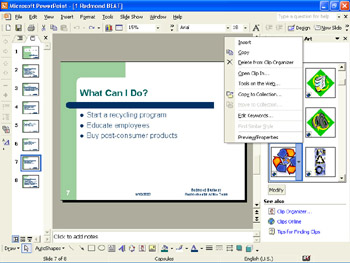
Using this menu, you can perform a variety of tasks related to a selected clip art object, including inserting it, copying it, and previewing it.
-
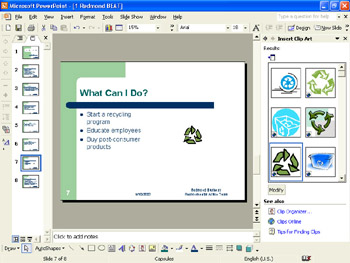
Click Insert to add the graphic to Slide 7, and then click a blank area of the slide to deselect the graphic.
You can also simply click the graphic once to insert it. The results are shown in this graphic:
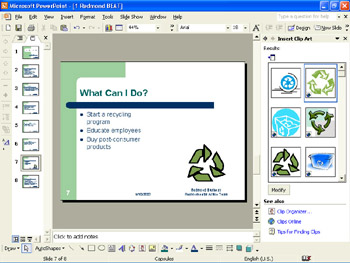
The Automatic Layout button appears so that you can control automatic formatting options for insertions, including for clip art. You can disregard this button ”it won t be visible in a printout or slide show.
-
If the Picture toolbar appears, double-click its title bar to dock it at the bottom of the work area.
When you dock a toolbar, the workspace decreases in size slightly to make room for it. (Don t worry if the Picture toolbar doesn t appear.)
-
Click the Save button on the Standard toolbar to save the presentation.
| |
You can use the Drawing toolbar s AutoShapes button to add shapes to your slides. For example, you can add a star by clicking the AutoShapes button, clicking Stars and Banners on the drop-down menu, and selecting the shape you want from the palette of options. Next position the mouse pointer where you want the shape to appear on the slide, hold down the left mouse button, and drag the shape into place. You can further size the shape by dragging its handles, or reposition it by dragging it to a new location. If the shape has a yellow diamond adjustment handle, you can drag the handle to adjust the shape s most prominent characteristic. (For example, you can change the angle of an isosceles triangle by dragging its adjustment handle.) To quickly replace one shape with another, select the shape, click the Draw button on the Drawing toolbar, click Change AutoShape, and select a different shape from the palette of options.
| |
| Information about | Displaying toolbars , page 10 |
| |
In the Insert Clip Art task pane, you can click the Clip Organizer link in the See also area at the bottom of the task pane to access more Office graphics. When you click this link, PowerPoint displays the Favorites “ Microsoft Clip Organizer window, in which you can browse through subfolders containing different categories of graphics that might fit your presentation. Some of the categories are empty so that you can fill them with clips that you download from Microsoft s Design Gallery web page or from other web sites. To access Microsoft s Design Gallery, click the Clips Online button in the Clip Organizer window, or click the Clips Online link at the bottom of the Insert Clip Art task pane.
| |
| |
You might want to create a brand new clip art slide, rather than add a clip art graphic to an existing slide. Simply click the New Slide button on the Standard toolbar, and then select one of the clip art auto layouts in the Slide Layout task pane.
| |
Sizing and Positioning a Clip Art Graphic
As with other objects in PowerPoint, you can easily size and relocate a clip art graphic on a slide. Follow these steps:
-
Click the graphic to select it.
PowerPoint surrounds the graphic with small circles called handles so that you can control the graphic s position and shape.
-
Point to the handle in the graphic s lower-right corner. When the pointer changes to a double-headed arrow, hold down the left mouse button, and drag downward until the graphic is about double its original size.
-
Point anywhere inside the graphic, hold down the left mouse button, and drag downward and to the right until the graphic sits in the lower-right corner of the slide.
-
Click outside the graphic to deselect it.
Slide 7 now looks like this:
| |
All the graphics in Microsoft Office s clip art collection have been assigned keywords that describe their contents. When you point to a graphic, these keywords appear in a pop-up box. To find a particular graphic, you can enter as many keywords in the Search text box as you want, separating them with commas. If the results of a search don t identify a graphic you can use, you can click the Modify button in the Insert Clip Art task pane, and enter a different keyword in the Search text box.
| |
Cropping a Clip Art Graphic
If you don t want to use all of a graphic, you can cut away the parts you don t want by cropping the image. Follow these steps to see how:
-
Move to Slide 3 of the 1 Redmond BEAT presentation.
-
If the task pane is not open, click Task Pane on the View menu, and then switch to the Insert Clip Art task pane.
-
In the task pane, click the Modify button to display the Search text box, type trees in the box, and press Enter .
PowerPoint displays thumbnails of matching graphics in the task pane s Results area.
-
Scroll the list of graphics related to trees, and then click the tree graphic in the second column of the third-to-the-last row to insert it in the presentation.
-
Move the graphic to the lower-right corner, and with the graphic still selected, click the Crop button on the Picture toolbar to activate the cropping tool.
-
Move the cropping tool over the graphic s lower-middle handle, and drag upward until the tree s container is hidden.
Your graphic should look similar to the one shown here:
-
Click the Crop button again to turn off the cropping tool.
You can also click away from the graphic to turn off the cropping tool but leave the graphic selected.
Cropping does not change the underlying graphic, just your view of it. So you can easily restore a cropped graphic to its original size by selecting the graphic and then clicking the Reset Picture button on the Picture toolbar.
Adding Clip Art to a Slide Background
You can add a clip art graphic to the background of a slide so that the text flows over it. Then you can make the text stand out better by adjusting the colors of the graphic to create a more muted effect. Follow these steps to add a graphic to the background of Slide 8:
-
Select Slide 8 .
-
In the Insert Clip Art task pane, click the Modify button to display the Search text box, type light bulb in the box, and press Enter .
-
Click the light bulb in the first column of the third row.
PowerPoint inserts the graphic and adjusts the text to make room.
-
Drag the upper-left handle outward until the graphic has increased in size by about 25 percent. Then select the text object area, and drag the right-middle handle outward to expand the text area until the graphic partially obscures the text.
-
Select the graphic again, and on the Drawing toolbar, click the Draw button.
-
On the button s menu, click Order and then Send to Back .
You can also right-click the graphic and click these commands on the shortcut menu. When you add a background graphic, your text might become difficult to read. You need to make the text of the bulleted items more legible by lightening the background graphic.
-
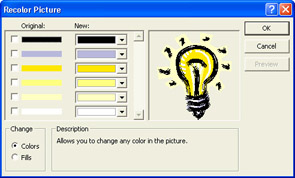
On the Picture toolbar, click the Recolor Picture button.
PowerPoint displays the dialog box shown in this graphic:
-
Check that the Colors option is selected in the Change area.
You select the Fills option if you want to change the graphic s background colors.
-
Select the first Original check box (black). Then in the adjacent box in the New area, click the down arrow, and select the third-to-the-last color in the first row (pale green).
The preview box shows the effects of the change.
-
Click OK .
Slide 8 now looks as shown in this graphic:

| |
To add the same graphic to the background of all the slides in a presentation, first insert the graphic on the presentation s slide master, which controls the formatting of the presentation s slides. Then click Order and Send to Back on the Draw button s drop-down menu. For more information about masters, refer to PowerPoint s Help.
| |
| Information about | Microsoft Graph, page 148 |
EAN: N/A
Pages: 116