Editing Worksheets
In this topic, we will cover some simple ways of revising worksheets, including making simple corrections, moving entries around, and inserting additional rows and columns . To make an edit, you first have to select what you want to change. You ve already seen how to select a cell , so we ll start by showing you how to select multiple cells to speed up the editing process.
Selecting a Range with the Mouse
In Chapter 1, we covered some techniques for selecting text. Here, you ll select blocks of cells called ranges . Selecting and working with a range saves you time because you can apply formats to the range or refer to it as a whole, instead of having to deal with each cell individually.
Any rectangular block or blocks containing more than one cell is a range. A range can include two cells, an entire row or column, or the entire worksheet. Range references consist of the address of the cell in the upper-left corner of the rectangular block and the address of the cell in the lower-right corner, separated by a colon . For example, A1:B2 identifies the range that consists of cells A1, A2, B1, and B2.
To learn how to select ranges, follow these steps:
-
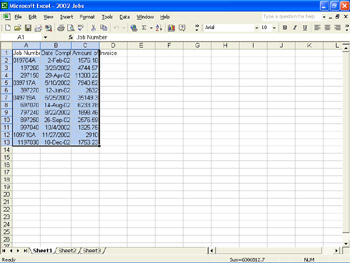
Click cell A1 , hold down the left mouse button, and drag diagonally to cell C13 without releasing the button.
As you drag, notice that the reference in the name box at the left end of the formula bar indicates the number of rows and columns in the selected range.
-
Release the mouse button when the range A1:C13 is highlighted.
As you can see in this graphic, cell A1 ”the cell where you started the selection ”is white, indicating that it is the active cell in the range:
-
Press Ctrl+Home to deselect the range and activate cell A1.
| |
To select a range with the keyboard, select the first cell, hold down the Shift key, and press the Arrow keys. To select all the cells in a column, click the column header (the gray box containing the column s letter). Similarly, select all the cells in a row by clicking the row header (the gray box containing the row s number). You can select a range that consists of more than one block of cells by selecting the first range, holding down the Ctrl key, selecting the next range, and so on.
| |
Changing an Entry
First let s cover how to change individual entries. Glancing at the Amount of Invoice column in 2002 Jobs, suppose you notice that the amount in cell C7 should be 3514.93, not 35149.3. To correct the entry without having to retype the whole thing, follow these steps:
-
Double-click cell C7 to select the cell and position an insertion point in the entry.
You can also click the cell and press the F2 key.
-
Point between the 4 and 9 in the cell, and click the left mouse button to reposition the insertion point. Then type a period.
-
Press the Right Arrow key once, and press the Delete key to delete the second period.
-
Press Enter to confirm the corrected entry.
Copying and Moving Within a Worksheet
To copy information, you can use the Copy and Paste buttons on the Standard toolbar, the Copy and Paste commands on the Edit menu, or the Copy and Paste commands on the shortcut menu for a selected cell or range. Similarly, you can move entries using the Cut and Paste commands. But as you ll see in this section, you can also simply drag information to copy or move it. The result of dragging is similar to using the Copy, Cut, and Paste commands, except that Excel doesn t place a copy of the selected range on the Clipboard.
Let s try different methods for copying and moving entries:
-
Select A1:C13, and click the Copy button.
Excel surrounds the selection with a moving dotted line and stores a copy of the entries in the selected range on the Clipboard.
-
Click cell D1 , and then click the Paste button.
Excel assumes that the selected cell is the upper-left corner of the paste area and pastes the copied entries into D1:F13. Notice that you don t have to select the entire paste area. At the bottom of the pasted range is a floating Paste Options button that resembles the Paste button on the Standard toolbar. You can ignore this button for now.
The copied selection remains surrounded by a moving dotted line until you perform an action other than selecting a cell or cells. For example, you could continue to paste the same information into a different part of your spreadsheet, or you could press Enter to complete the current copy action. If you change your mind before completing the action, press Esc to cancel it.
Moving entries works similarly, except that you use the Cut button instead of the Copy button. But let s try moving entries a different way:
-
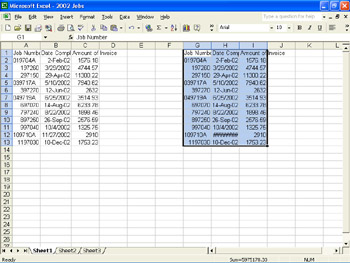
With D1:F13 selected, move the pointer to the right border of the selected range.
-
Hold down the left mouse button, and drag the outline of the selection over the range G1:I13.
As you drag, a small box displays the reference of the range that the selection will be moved to when you release the mouse button.
-
Release the mouse button.
Excel moves the entries to their new location, like this:
Copying entries works similarly, except that you hold down the Ctrl key while you drag.
-
With G1:I13 selected, hold down the left mouse button and the Ctrl key, and drag the outline of the selection over the range D1:F13.
Excel moves the copied selection next to the original range.
-
You don t need this third set of entries, so click the Undo button to undo the last copy operation.
-
Move the entries in G1:I13 to D1:F13 so that they re next to the original range.
-
Click the Save button to safeguard your work.
| |
You can use keyboard shortcuts to copy a range and then paste it into your worksheet. Select the range, and press Ctrl+C. Then click the cell in the upper-left corner of the destination range, and press Ctrl+V. To move the range instead of copying it, follow the same procedure but use Ctrl+X instead of Ctrl+C.
| |
| Information about | Undo button, page 23 |
Copying and Moving Between Worksheets
Until now, you have been working with Sheet1 of the 2002 Jobs workbook. But suppose you need to set up a second worksheet with a structure similar to that of Sheet1. Do you have to enter all the information again? No, you can copy between worksheets, or even between workbooks, as easily as within a single worksheet. Let s experiment a bit:
-
Select D1:F13, and point to the selection s bottom border.
-
When the pointer changes to a four-headed arrow, hold down the left mouse button and the Alt key, and drag the outline of the selection down to the Sheet2 tab. (Don t release the mouse button or the key yet.)
Sheet2 of the 2002 Jobs workbook opens.
-
Still holding down the left mouse button and the Alt key, drag the outline of the selection over the range A1:C13. Then release the mouse button and the Alt key.
Excel moves the selected entries from Sheet1 to Sheet2. You can also copy rather than move entries between worksheets by holding down the left mouse button and both the Ctrl and Alt keys while dragging.
-
With A1:C13 on Sheet2 selected, point to the selection s bottom border, and when the pointer changes to a fourheaded arrow, hold down the left mouse button and both the Ctrl and Alt keys, and drag the outline of the selection down to the Sheet3 tab. (Don t release the mouse button or the keys yet.)
-
Drag the outline over the range A1:C13, and release both the mouse button and the keys.
Excel moves the entries from Sheet2 to Sheet3. Now Sheet1, Sheet2, and Sheet3 all contain the same data. If you prefer using menu commands or toolbar buttons, you can move and copy entries between sheets just like you would to move and copy entries within a sheet. After you use the Cut or Copy command or button, click the tab for the sheet to which you want to add entries, click the cell where you want the entry to appear (or the first cell of the range where you want the entries to appear), and use the Paste command or button.
| Information about | Moving worksheets to different workbooks, page 136 |
Clearing a Cell
Clearing a cell is different from cutting an entry. Cutting an entry assumes that you will paste the entry somewhere else, whereas clearing a cell simply erases the entry. Let s try this now:
-
On Sheet3 , click the column A header ”the gray box containing the letter A ”to select the entire column.
-
On the Edit menu, click Clear .
Excel displays the submenu shown in this graphic:
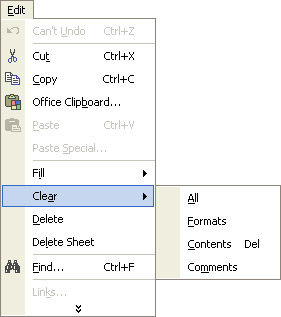
The All option clears all formats, contents, and comments from the cells. The Formats option clears only the formats, and the Contents option clears only the contents. The Comments option clears any attached comments, leaving the formats and contents intact.
-
Click All .
The entries in the column disappear.
-
Select B1:C13, and clear the cells by pressing the Delete key.
When you press Delete, Excel leaves any formats and comments intact.
-
Click the Sheet2 tab, select A1:C13, and right-click the selection. Then click Clear Contents on the shortcut menu to clear the selected cells.
| |
You might want to attach a comment to a cell for a variety of reasons ”for example, to explain a formula or to remind yourself to check an assumption. To attach a comment, select a cell, click Comment on the Insert menu, and type the comment in the text box that appears. (The comment is signed with the name entered the first time you started Excel, but you can edit or delete this signature. Also, the comment box is surrounded by move and size handles, and you can drag the handles to size the box.) Click anywhere outside the cell and text box to enter the comment. Excel places a red marker in the upper-right corner of the cell and hides the comment. To temporarily display a comment, point to the cell. To keep a comment displayed, right-click the cell and click Show Comment on the shortcut menu. To edit or delete a comment, right-click the cell and click either Edit Comment or Delete Comment on the shortcut menu.
| |
Inserting or Deleting a Column or Row
It is a rare person who can create a worksheet from scratch without ever having to tinker with its design ”moving this block of data, changing that heading, or adding or deleting a column here and there. In this section, we ll show you how to insert and delete columns and rows. Follow these steps:
-
Move to Sheet1 by clicking its tab.
-
Point to the column C header, hold down the left mouse button, and drag across the column D header to select the two columns.
-
Right-click anywhere in the selected columns, and click Insert on the shortcut menu.
Excel inserts two blank columns in front of the Amount of Invoice column, one for each column in the selection. Ignore the Insert Options button (the small paintbrush button) that appears to the right of the column; you don t need it for this simple insert operation.
Inserting a row works the same way as inserting a column. You simply click the row header ”the box containing the row number ”to select the entire row, and then click Insert on the row s shortcut menu.
Now let s delete a column.
-
Click the header for column D , and then click Delete on the Edit menu.
Excel deletes the column and moves the Amount of Invoice column over to take its place, as you can see in this graphic:

You can leave the empty column C where it is for now ” you ll use it later.
| |
Rather than insert an entire row or column, you an insert a specified number of cells. Simply select a cell or range of cells, and then click Cells on the Insert menu. In the Insert dialog box, you need to tell Excel how to move the existing cells to make room for the inserted cells. Select the Shift Cells Right or Shift Cells Down option, and click OK. Excel then inserts the cell or cells, shifting the selected cell or cells to the right or down. (You can also insert an entire row above the selection or an entire column to the left of the selection using the last two options in the Insert dialog box.) Deleting cells is similar to inserting them except that you click Delete on the Edit menu and make selections in the Delete dialog box.
| |
EAN: N/A
Pages: 116