Adding Simple Text Objects
You might find that you are entering a lot of single words or simple labels that don't require all the bells and whistles of the Multiline Text Editor. AutoCAD offers the single-line text object that is simpler to use and can speed text entry if you are adding only small pieces of text.
Continue the tutorial on the Unit.dwg file by trying the following exercise:
-
Adjust your view so it looks like Figure 8.12.
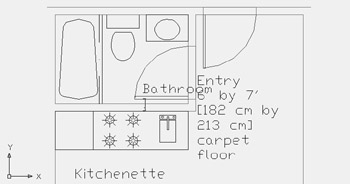
Figure 8.12: Adding simple labels to the kitchen and bath by using the Dtext command -
Enter Dt
 or choose Draw Text Single Line Text. This issues the Dtext command.
 -
At the Specify start point of text or [Justify/Style]: prompt, pick the starting point for the text you are about to enter, just below the kitchen at coordinate 16 ¢ -2 ² ,21 ¢ -8 ² (490,664 for metric users). Note that the prompt offers the Justify and Style options.
-
At the Specify height: prompt, enter 6 ² ( 15 for metric users) to indicate the text height.
-
At the Specify rotation angle of text <0>: prompt, press
to accept the default, 0 °. You can specify any angle other than horizontal (for example, if you want your text to be aligned with a rotated object). You'll see a text I-beam cursor at the point you picked in step 3. -
At the Enter text: prompt, enter Kitchenette . As you type, the word appears in the drawing as well as in the Command window.
Tip If you make a typing error, use the Right and Left arrow keys to move the text cursor in the Command window to the error; then use the Backspace key to correct the error. You can also paste text from the Clipboard into the cursor location by using the Ctrl+V keyboard shortcut or by right-clicking in the Command window to access the shortcut menu.
-
Press
to move the cursor down to start a new line. -
This time you want to label the bathroom. Pick a point to the right of the door swing at coordinate 19 ¢ -11 ² ,26 ¢ -5 ² (610,805 for metric users). The text cursor moves to that point.
-
Type Bathroom
. Figure 8.12 shows how your drawing should look now. -
Press
again to exit the Dtext command. Tip If for some reason you need to stop entering single-line text objects to do something else in AutoCAD, you can continue the text where you left off by pressing
at the Start point: prompt of the Dtext command. The text continues immediately below the last line of text entered.
Here you were able to add two single lines of text in different parts of your drawing fairly quickly. Dtext uses the current default text style settings (remember that earlier you set the text style to Standard), so the kitchen and bath labels use the Standard style.
Editing Single-Line Text Objects
You edit single-line text objects by using the same tools as those for multiline text, although the dialog boxes that result are different. In this exercise, you'll change the labels in both the kitchen and bath by using the Ddedit command:
-
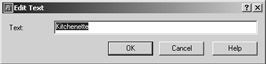
Open the Edit Text dialog box. (Choose Modify Object Text Edit and then select the Kitchenette label, or select and right-click the label and choose Text Edit.)
-
Using the cursor, highlight ette in Kitchenette and delete it.
-
Click OK. (Notice that Ddedit is still active.)
-
Click the Bathroom label.
-
In the Edit Text dialog box that appears, highlight room in Bathroom and delete it.
-
Click OK and then press
to exit the Ddedit command.
As you can see, even the editing is simplified. You are limited to editing the text only. This can be an advantage, however, when you need to edit several pieces of text. You don't have other options to get in the way of your editing.
You can change other properties of single-line text by using the Properties palette. For example, suppose you want to change the bath label to a height of 9 ² . Use these steps:
-
Click the Bath text, and then right-click and choose Properties to open the Properties palette.
-
Select the Height value in the Properties palette and change it to 9 ² .
-
Press
, and the text in the drawing increases in size to 9 ² high. -
Click the Undo tool on the menu bar to undo the change in text height.
-
Choose File Save to save the changes you've made thus far.
-
Close the Properties palette.
The Properties palette lets you change the Height, Rotation, Width Factor, Obliquing, Justification, and Style of a single-line text object. You can also modify the text content.
Justifying Single-Line Text Objects
Justifying single-line text objects works in a slightly different way from justifying multiline text. For example, if you change the justification setting to Center, the text moves so the center of the text is placed at the text insertion point. In other words, the insertion point stays in place while the text location adjusts to the new justification setting. Figure 8.13 shows the relationship between single- line text and the insertion point based on different justification settings.
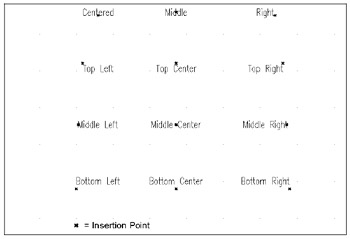
Figure 8.13: Text inserted using the various justification options
To set the justification of text as you enter it, you must enter J ![]() at the Specify start point of text or [Justify/Style]: prompt after issuing the Dtext command.
at the Specify start point of text or [Justify/Style]: prompt after issuing the Dtext command.
| Tip | You can also change the current default style by entering S |
After you've issued the Dtext's Justify option, you get the following prompt:
Enter an option
[Align/Fit/Center/Middle/Right/TL/TC/TR/ML/MC/MR/BL/BC/BR]:
Here are descriptions of each of these options. (I've left Fit and Align until last, because these options require a bit more explanation.)
Center Centers the text on the start point, with the baseline on the start point.
Middle Centers the text on the start point, with the baseline slightly below the start point.
Right Justifies the text to the right of the start point, with the baseline on the start point.
TL, TC, and TR TL, TC, and TR stand for Top Left, Top Center, and Top Right. Text using these justification styles appears entirely below the start point, justified left, center, or right, depending on which option you choose.
ML, MC, and MR ML, MC, and MR stand for Middle Left, Middle Center, and Middle Right. These styles are similar to TL, TC, and TR, except that the start point determines a location midway between the baseline and the top of the lowercase letters of the text.
BL, BC, and BR BL, BC, and BR stand for Bottom Left, Bottom Center, and Bottom Right. These styles, too, are similar to TL, TC, and TR, but here the start point determines the bottom- most location of the letters of the text (the bottom of letters that have descenders, such as p, q, and g ).
Align and Fit With the Align and Fit justification options, you must specify a dimension within which the text is to fit. For example, suppose you want the word Refrigerator to fit within the 26 ² -wide box representing the refrigerator. You can use either the Fit or the Align option to accomplish this. With Fit, AutoCAD prompts you to select start and end points and then stretches or compresses the letters to fit within the two points you specify. You use this option when the text must be a consistent height throughout the drawing and you don't care about distorting the font. Align works like Fit, but instead of maintaining the current text style height, the Align option adjusts the text height to keep it proportional to the text width, without distorting the font. Use this option when it is important to maintain the font's shape and proportion. Figure 8.14 demonstrates how Fit and Align work.
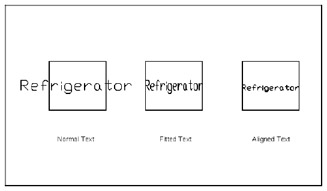
Figure 8.14: The word Refrigerator as it appears normally and with the Fit and Align options selected
You can change the justification of single-line text by using the Properties palette, but the text will move from its original location while maintaining its insertion point. If you want to change the justification of text without moving the text, you can use the Justifytext command. Choose Modify Object Text Justify or type Justifytext at the command prompt; then select the text you want to change. Justifytext works on both multiline and single-line text.
Using Special Characters with Single-Line Text Objects
Just as with multiline text, you can add a limited set of special characters to single-line text objects. For example, you can place the degree symbol ( °) after a number, or you can underscore (underline) text. To accomplish this, you use double percent (%%) signs in conjunction with a special code. For example, to underscore text, you enclose that text with %% followed by the letter u, which is the underscore code. So, to create this text, "This is underscored text." you enter the following at the prompt:
This is %%uunderscored%%u text .
Overscoring ( putting a line above the text) operates in the same manner. To insert codes for symbols, you just place the codes in the correct positions for the symbols they represent. For example, to enter100.5 °, you type 100.5%%d . Here is a list of the codes you can use:
| Code | What It Does |
|---|---|
| %%o | Toggles overscore on and off. |
| %%u | Toggles underscore on and off. |
| %%d | Places a degree sign ( °) where the code occurs. |
| %%p | Places a plus/minus sign where the code occurs. |
| %%% | Forces a single percent sign; useful when you want a double percent sign to appear or when you want a percent sign in conjunction with another code. |
| %% nnn | Allows the use of extended characters when these characters are used in a text-definition file; nnn is the three-digit value representing the character. |
Using the Character Map Dialog Box to Add Special Characters
You can add special characters to a single line of text in the same way you add special characters to multiline text. You might recall that to access special characters, you use the Character Map dialog box. To open the Character Map dialog box, choose Start All Programs Accessories System Tools Character Map. You can then use the procedure discussed in the "Adding Special Characters" section earlier in this chapter to cut and paste a character from the Character Map dialog box. If you find that you use the Character Map dialog box often, create a shortcut for it and place the shortcut in your Start menu or Desktop.
| Tip | This is a fairly long chapter so if you want to take a break from the tutorial, this is a good resting place. |
-
At the command prompt, enter Mirrtext
. -
At the New value for MIRRTEXT <1>: prompt, enter
.
EAN: 2147483647
Pages: 261