Creating a Sheet Set from an Existing Project
As an introduction to sheet sets, you'll first create a sheet set from an existing set of drawings. You'll then see how your sheet set can be used as a way to keep track of the files in a project.
This example is a small house remodel with some basic drawings. Although the project is small, it will show you the main elements of the Sheet Set Manager.
Using the Create Sheet Set Wizard
The Create Sheet Set Wizard is the main tool you'll use when creating a sheet set. It offers a step-by- step method for setting up new sheet sets, and as with all wizards, you can back up and make changes along the way. Here's how to use it:
-
 In AutoCAD, click the Sheet Set Manager tool in the Standard toolbar. The Sheet Set Manager palette appears (you might see the title bar and tabs reversed from the example shown here, depending on whether the palette is located on the left or right side of the AutoCAD window).
-
Click the drop-down list at the top of the palette and select New Sheet Set. The Create Sheet Set Wizard appears.
Warning The Sheet Set Manager will not allow you to create a new sheet set unless a drawing is currently open .
-
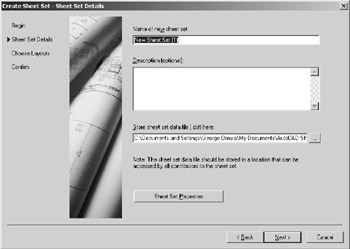
Select the Existing Drawings radio button and click Next . The Sheet Set Details page of the wizard appears.
-
Enter My Existing Sheet Set for the name of the sheet set.
-
Enter My first sheet set using samples from Mastering AutoCAD in the Description text box.
-
 Click the Browse button to the right of the text box labeled "Store Sheet Set Data File(.dst) Here.
 -
On the CD Browse to the location of the Sheet Set Sample 1 folder, which by default is in C:\AutoCAD 2005\Projects\Chapter 22\ . This is a folder created when you installed the sample files from the Mastering AutoCAD companion CD.
-
Click Next. The Choose Layouts page of the wizard appears.
-
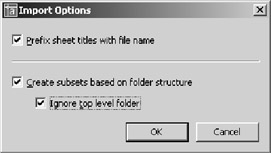
Click the Import Options button. The Import Options dialog box appears.
-
Make sure all three options have a check mark; then click OK. You'll learn more about the options in this dialog box in the next section.
-
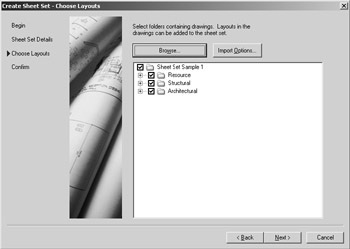
Click the Browse button and then locate and select the Sheet Set Sample 1 folder you selected earlier. This is typically located in the C:\AutoCAD 2005\Projects\Chapter 22 folder. After you've select the folder, you'll see the list of subfolders in that folder.
Tip You can set a default location for your sheet sets by using the Files tab of the Options dialog box. See Appendix A for more on the Options dialog box.
-
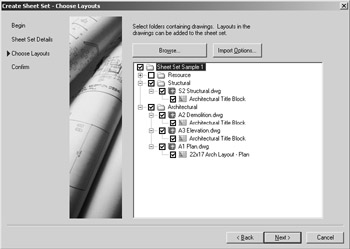
Click the plus sign to expand the listings for Architectural and Structural. You see the drawings in those folders. Expand the list for each drawing and you see the layouts available in each drawing. You can select and deselect the layouts and drawings to include in the sheet set.
-
Remove the checkmark next to the Resource folder shown in the list. You don't want to include the Resource folder because that contains the files used as Xrefs in the Paper Space files. You want to select only the drawings and layouts that represent the sheets in your set.
-
Click Next. You see the last page of the wizard, which shows you the statistics of your new sheet set. Notice that it shows only the layouts from the selected drawings, because the layouts are really the focus of the Sheet Set Manager. Click Finish to exit the wizard. AutoCAD creates a new sheet set.
-
Select the Sheet List tab in the Sheet Set Manager to view its contents. You see that the Sheet Set Manager now shows a list of the drawings in the Sheet Set Sample 1 folder.

The Sheets list you see in the Sheet Set Manager shows you the name of the existing drawing files with the layout name appended. This helps you identify both the filename and the layout associated with the sheet. As you become more familiar with the Sheet Set Manager, you can choose to display only the layout name.
Exploring the Sheet Set Manager
Although you have more work to do before the sheet set becomes a useful tool, it's complete enough that you can explore some features of the Sheet Set Manager before you add the resource drawings.
Formatting Sheet Sets with the Import Options
In step 9 of the preceding exercise, you saw the Import Options dialog box. This dialog box lets you control how files and folders are organized in the Sheet Set Manager and how the sheets are assigned names . Here is a listing of these options:
Prefix Sheet Titles With File Name The Sheet Set Manager displays only the layout names in its Sheets list. With this option turned on, the Sheet Set Manager will add the name of the file containing the layout as a prefix to the sheet name. If you want only the layout name to appear in the Sheets list, turn off this option.
Create Subsets Based On File Structure If you set up your file structure to separate your project folder into subfolders (such as architectural, mechanical, structural, and civil), you can retain that structure in the Sheet Set Manager by turning on this option. Turn off this option if you want the Sheet Set Manager to display all the sheets in your project in a single column with no subfolders.
Ignore Top Level Folder When you select a project folder containing your drawings for the sheet set, and subfolders are used to keep separate categories of drawings organized, this option will cause the Sheet Set Manager to ignore the top-level folder and display only the subfolders. This is useful if you have one main folder that contains subfolders of your drawings.
The sample folders you used for the previous exercise were set up to demonstrate how these options work. All of the options were turned on. As a result, the Sheet Set Manager displayed the sheets with two main categories, Architectural and Structural, reflecting the folder structure of the sample project files. It also did not display the main folder called Sheet Set Sample 1 because you turned on the Ignore Top Level Folder option. Finally, the sheet names showed the layout names appended to the drawing filenames because the Prefix Sheet Titles With File Name option was turned on.
| |
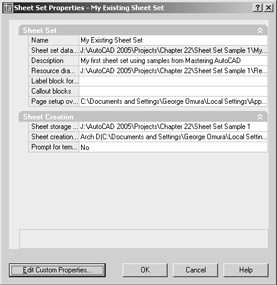
In the Sheet Set Details page of the Create Sheet Set Wizard, you saw a button labeled Sheet Set Properties. If you click this button, the Sheet Set Properties dialog box appears, showing you some of the settings that are part of your new sheet set.
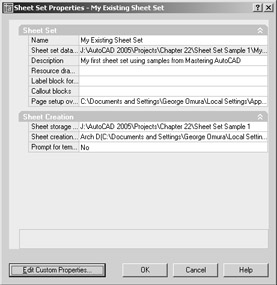
Much of this information describes the location of the files that the Sheet Set Manager will use as you work with sheet sets. Also note that there is an Edit Custom Properties button at the bottom of the dialog box. This enables you to add or edit some of the properties of the sheet set. This information can be edited in the Sheet Set Manager as you'll see later.
| |
Previewing and Opening Drawings in the Sheet Set Manager
You can view quite a bit of information about the drawings in your list. You can also open a file just by double-clicking its name in the Sheets list. Here's how:
-
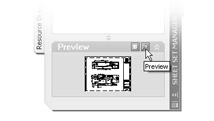
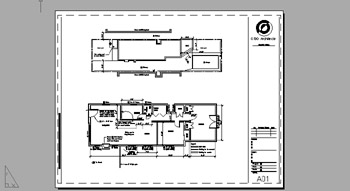
Select 1 - A1 Plan - 22 17 Arch Layout - Plan from the Sheets list. The Details group at the bottom of the palette displays a description of the sheet, including the name, location, and size of the file that contains the sheet.
-
Click the Preview button in the title bar of the Details group. The description changes into a thumbnail view of the drawing.
-
Double-click the 1 - A1 Plan - 22 17 Arch Layout - Plan listing. AutoCAD opens the drawing.
Adding the Resource Drawings
Now add the resource drawings to the Sheet Set Manager's Sheets list. Remember that the resource drawings are the source Xref files for the sheet drawings. By adding them to the Sheet Set Manager, you will have ready access to all the files in your project:
-
Select the Resource Drawing tab in the Sheet Set Manager. The palette changes to show the Locations list.

-
Double-click the Add New Location listing. A standard file dialog box appears.
-
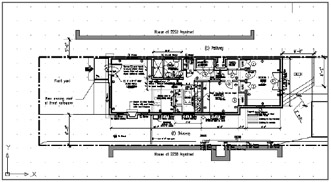
Locate and select the Resource subfolder under the Sheet Set Sample 1 folder that you've been using; then click Open. The Sheet Set Manager palette displays the list of drawings in that folder.
-
Double-click the Plans.dwg listing. The Plans file opens, showing you the source drawing for the 1 - A1 Plan drawing.
Your sheet set now contains a list of all the files in the project. You can now use the Sheet Set Manager to keep track of your AutoCAD files as the project progresses. If you need to plot all your sheets, archive them, or move them, you can do so with relative ease by using options described toward the end of this chapter.
Adding New Sheets to Your Sheet Set
Now that you've created a sheet set from an existing project, as the project continues you'll want to use the Sheet Set Manager to create any new sheets that you want to add to your set. This will ensure that the Sheet Set Manager knows about all the files in the project at all times.
But before you start to add new sheets, you'll need to do a bit of setup. You'll need to make sure that the Sheet Set Manager knows which template file to use for any new sheet drawings you add to the set.
Pointing to a Sheet Template
The following exercise will show you how to tell the Sheet Set Manager which template file to use for new sheets:
-
Select the Sheet List tab of the Sheet Set Manager.
-
Right-click the My Existing Sheet Set listing at the top of the Sheets list; then select Properties. The Sheet Set Properties dialog box appears. You see two groups of listings: Sheet Set and Sheet Creation. The Sheet Set group offers information about the current sheets and sheet set. The Sheet Creation group lists information about new sheets.
-
Click the Sheet Creation Template option in the Sheet Creation group. A Browse button appears to the right of the option.
-
 Click the Browse button. The Select Layout As Sheet Template dialog box appears.
 Notice that the Drawing Template File Name text box shows the location of the current default file from which a new sheet will be derived. That default location is as follows :
C:\Documents and Settings\User Name\Local Settings \Application Data\Autodesk\AutoCAD 2005\R16.1\enu \Template\SheetSets\Architectural Imperial.dwt
Tip You can change the default location for sheet set templates in the Files tab of the Options dialog box (Tools Options). In the Files tab, expand the list for Template Settings, select Sheet Set Template File Location, click Browse, and then locate and select your sheet set template file location.
Also note that a layout name is listed in the Select A Layout To Create New Sheets list box.
-
Now continue to select a template file. Click the Browse button to the far right of the Drawing Template File Name text box. The Select Drawing dialog box appears. This is a standard file dialog box.
-
Browse to the C:\AutoCAD 2005\Projects\Chapter 22\Sheet Set Sample 1\Resource folder, select the 22 17 Arch.dwt file, and then click Open. This is the template file used for the sheet drawings of the set you've been working with.
-
Back in the Select Layout As Sheet Template dialog box, select Architectural Title Block from the Layout list; then click OK. Click OK at the Sheet Set Properties dialog box.
-
Next you see a confirmation window asking whether you want to apply the change you made to all nested subsets. Click Yes.
You've just set up your sheet set to "point" to a custom template that contains the title block for any new sheet files you might create. The last step points out a feature you'll want to be aware of.
In this exercise, you set the 22 17 Arch.dwt template file to be the file the Sheet Set Manager uses for all new drawings. If you prefer, you can set up the Sheet Set Manager to use different template files for new sheets in the sheet subsets. For example, you can have one template for the Architectural subset and a different one for the Structural subset if they require different title blocks.
To set up the template for the subsets, take the same steps you took in the previous exercise, but instead of right-clicking the My Existing Sheet Set listing, select the subset name. In the Sheet Set Sample 1 sheet set, the name would be Architectural or Structural.
Another option is to turn on the Prompt For Template option near the bottom of the Sheet Set Properties dialog box. As the option name indicates, it prompts you for a template file whenever you create a new sheet.
Adding a New Sheet
Now you're ready to create new sheets that are based on the same title block as the other existing sheets in the set:
-
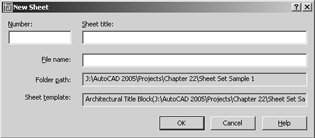
In the Sheet Set Manager palette, right-click the Architectural subset listing and select New Sheet to add a sheet under this heading. The New Sheet dialog box appears.
-
In the Number text box, enter A4 , and in the Sheet Title text box enter Details . Notice that as you type, the File Name text box is automatically filled in. You can enter a different sheet title if you like.
-
Click OK to finish creating your new sheet. You'll see your new sheet appear in the Sheets list of the Sheet Set Manager palette.
-
Double-click the A4 Details listing in the Sheets list. The A4 Details drawing opens to the layout tab. Notice that the layout tab has been given the name A4 Details.
Before you added the new A4 Details sheet, the Sheet Set Manager had only been collecting data about your sheet set and displaying that data in the palette. It hadn't actually created any new files. In the preceding exercise, the Sheet Set Manager created the A4 Details file, though it didn't open it until you double-clicked it in step 4.
Now that the A4 sheet has been created, you can edit it as you would any other drawing to include Xref files, blocks, or other drawing data. You can then create a viewport in the layout to lay out the sheet the way you want.
| Tip | Besides keeping track of existing and new drawing files in a project, the Sheet Set Manager can help you with plotting, archiving, and publishing your set. See "Archiving, Publishing, and eTransmitting Sheet Sets" later in this chapter. |
In a large project with many sheets, managing title block information can be a lot of work. In the next section, you'll look at some other sheet set features that can automate much of the work of maintaining title block information. You'll also learn how the Sheet Set Manager can simplify the creation of callout bubbles and cross-references between drawings.
EAN: 2147483647
Pages: 261
- Chapter III Two Models of Online Patronage: Why Do Consumers Shop on the Internet?
- Chapter IX Extrinsic Plus Intrinsic Human Factors Influencing the Web Usage
- Chapter XI User Satisfaction with Web Portals: An Empirical Study
- Chapter XIV Product Catalog and Shopping Cart Effective Design
- Chapter XVI Turning Web Surfers into Loyal Customers: Cognitive Lock-In Through Interface Design and Web Site Usability