Printing Your Renderings
Printing Your Renderings
When you've decided that your rendering is perfect, you can print a copy directly from AutoCAD. Through a Layout tab, you can also put together presentations that include 2D floor plans and elevations with your rendering on a single sheet. Or you can have several renderings on one sheet.
Try the following to set up a Layout tab to render the 3D model in both a rendered view and a hidden-line view:
-
Click the Layout1 tab. Then right-click in the Layout1 tab and select Page Setup Manager.
-
In the Page Setup Manager dialog box, click Modify. Then in the Page Setup dialog box, select your printer from the Printer/Plotter group 's Name drop-down list and select Acad.ctb or Acad.stb from the Plot Style Table group's Name drop-down list. Click OK to exit the dialog box and then click Close at the Page Setup Manager dialog box
-
Double-click inside the viewport that shows the 3D model and then enter V
 to open the View dialog box.
 -
Select 3DFront from the Current View list and then click Set Current. Click OK to exit the View dialog box.
-
Choose View Render Render or click the Render tool from the Render toolbar.
-
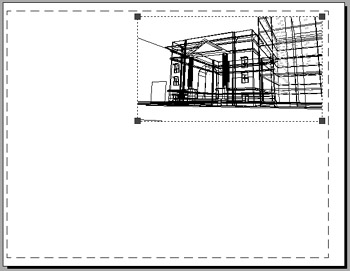
Select 1:1 from the Sub Sampling drop-down list and then click the Render button. When the rendering is done, it will look similar to Figure 17.35.
You have set up a layout with a single viewport showing the Perspective view of the 3D model. Next, make a copy of the viewport:
-
Double-click outside the viewport to go to Paper Space.
-
Click the viewport border to expose its grips, and then use a grip to make the viewport smaller so it is about half the height of the Paper Space layout. Keep the height-to-width proportions of the viewport as close to the original as possible.
-
Copy the viewport down so you have an identical viewport just below the original.
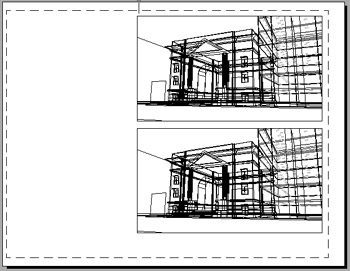
Now you're ready to set up the viewport to render the views in specific ways. For example, you can set one viewport to render as a fully rendered view while rendering another viewport as a hidden-line view:
-
Click the top viewport, and then right-click and choose Shade Plot Rendered.
-
Click the lower viewport, and then right-click and choose Shade Plot Hidden.
-
Choose File Plot Preview. After a moment, you see a preview of your plot showing a fully rendered view in the top viewport and a hidden-line view in the lower viewport.

You can add additional viewports to include floor plans and elevations if needed. Or you can add Isometric views with labels that point out features of the drawing.
You also have control over the quality of the rendered viewport. If you right-click the Layout tab and choose Page Setup Manager, the Page Setup Manager dialog box opens. Click the Modify button to open the Page Setup dialog box. You can use the Shaded Viewport Options group to select from a set of viewport quality settings.
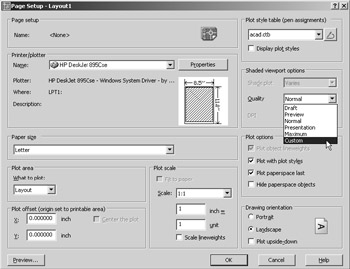
You can choose from Draft, Preview, Normal, Presentation, Maximum, and Custom. These options are described in detail in Chapter 7, so I won't go into detail here. Just remember that the options are available to help you get the most from your rendered printer output.
EAN: 2147483647
Pages: 261
- The Effects of an Enterprise Resource Planning System (ERP) Implementation on Job Characteristics – A Study using the Hackman and Oldham Job Characteristics Model
- Data Mining for Business Process Reengineering
- Intrinsic and Contextual Data Quality: The Effect of Media and Personal Involvement
- Healthcare Information: From Administrative to Practice Databases
- Development of Interactive Web Sites to Enhance Police/Community Relations
- Chapter VII Objective and Perceived Complexity and Their Impacts on Internet Communication
- Chapter XIV Product Catalog and Shopping Cart Effective Design
- Chapter XVI Turning Web Surfers into Loyal Customers: Cognitive Lock-In Through Interface Design and Web Site Usability
- Chapter XVII Internet Markets and E-Loyalty
- Chapter XVIII Web Systems Design, Litigation, and Online Consumer Behavior