Using Grips to Simplify Editing
Throughout this book, I've shown you ways of using the Grips feature to edit drawings. When and how you use grips will really depend on your preference, but in some situations editing with grips makes more sense than editing without them. Here you'll explore some basic situations in which grips can be useful.
Now, suppose you want to change the location and orientation of the kitchen. In this exercise, you will use the Grips feature to do just that:
-
Set up a view similar to the one in Figure 12.19 and turn on Polar Tracking.
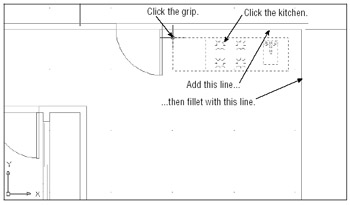
Figure 12.19: Finishing the kitchen wall and selecting the kitchen rotation base point -
Add the horizontal line at the top of the kitchen, as shown in Figure 12.19.
-
Fillet the new line with the vertical wall line to the right of the unit.
-
Click the kitchen.
-
Click the grip in the upper-left corner to make it a hot grip. The grip changes color to indicate that it is selected.
-
Right-click the mouse and then choose Rotate from the shortcut menu. (You can also press
 two times until you see the *** ROTATE *** message at the prompt.)
 Tip Remember that the spacebar acts the same as the
key for most commands, including the Grips modes. -
Enter “90 or rotate the kitchen by pointing the cursor downward until the tracking vector appears, and then click the mouse.
-
Click the kitchen grip again; then, using the Endpoint Osnap, click the upper-right corner of the room.
-
Press the Esc key twice to clear the grip selection. Your drawing should look like Figure 12.20.
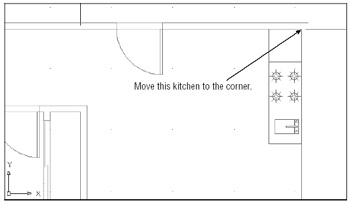
Figure 12.20: The revised kitchen
Because the kitchen is a block, its grip point is the same as its insertion point. This makes the kitchen block ”as are all blocks ”a great candidate for grip editing. Remember that the door, too, is a block.
Now suppose you want to widen the entrance door from 36 ² to 42 ² (90 cm to 105 cm for metric users). Try the following exercise editing the location of a door in a wall.:
-
Use a crossing window to select the door jamb to the left of the entry door, as shown in Figure 12.21.
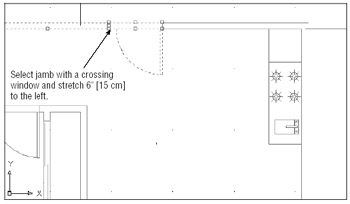
Figure 12.21: The widened door opening -
Shift+click both of the door jamb's corner grips.
-
Click the bottom corner grip again. It is now a hot grip.
-
At the ** Stretch ** prompt, enter @6<180 (metric users should enter @15<180 ). The door should now look like Figure 12.21. You can also use the Direct Distance method: with Polar Tracking on, point the cursor to the left and then type 6
. Tip The Stretch hot-grip command will ignore a block as long as you do not include its insertion point in the selection window.
| |
You can set up AutoCAD to display the grips on all the entities within a block. This enables you to use those grips as handles for any of the grip operations such as Move, Rotate, or Scale. However, you cannot edit individual objects within the block.
To display all the grips within a block, type Gripblock ![]() 1
1 ![]() . You can also turn on the Enable Grips Within A Block option in the Grips dialog box (choose Tools Grips).
. You can also turn on the Enable Grips Within A Block option in the Grips dialog box (choose Tools Grips).
| |
Notice that in step 4 you didn't have to specify a base point to stretch the grips. AutoCAD assumes the base to be the original location of the selected hot grip (the grip selected in step 3).
Now you can enlarge the door by using the Grip command's Scale option. Scale enables you to change the size of an object or a group of objects. You can change the size by entering a scale value or by using an object for reference. In this exercise, you will use the current door width as a reference:
-
Press the Esc key twice to clear your selection set.
-
Click the door and then click the door's grip point at the hinge side.
-
Right-click the mouse and choose Scale.
-
At the Specify scale factor or [Base point/Copy/Undo/Reference/eXit]: prompt, enter R
to select the Reference option. -
At the Specify reference length <0 ¢ -1 ² >: prompt, type @
to indicate that you want to use the door insertion point as the first point of the reference length. -
At the Specify second point: prompt, click the grip at the endpoint of the door's arc at the wall line (see the first image in Figure 12.22). Now as you move the cursor, the door changes in size relative to the distance between the grip and the end of the arc.
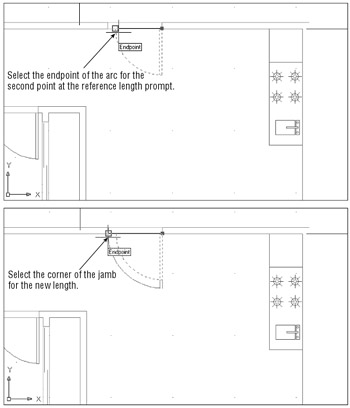
Figure 12.22: The enlarged door -
At the Specify new length or [Base point/Copy/Undo/Reference/eXit]: prompt, use the Endpoint Osnap again and click the door jamb directly to the left of the arc endpoint. The door enlarges to fit the new door opening (see the second image in Figure 12.22).
-
To finish this floor plan, zoom out to get the overall view of the unit, turn on the Flr-pat layer, and then erase the floor pattern in the bedroom area just below the bathroom.
-
Save the file.
| |
Chapter 3 mentioned that you will sometimes need to select an object that is overlapping or very close to another object. Often in this situation, you end up selecting the wrong object. To help you select the exact object you want, AutoCAD offers the Selection Cycling tool and the Draworder command.
Selection Cycling lets you cycle through objects that overlap until you select the one you want. To use this feature, hold down the Ctrl key and click the object you want to select. If the first object highlighted is not the one you want, click again, but this time don't hold down the Ctrl key. When several objects are overlapping, just keep clicking until the correct object is highlighted and selected. When the object you want is highlighted, press ![]() , and then go on to select other objects or press
, and then go on to select other objects or press ![]() to finish the selection process.
to finish the selection process.
Another way to gain access to an overlapped object is to use the Draworder command. You can select the overlapping object and then choose Tools Draw Order Send To Back. This has the effect of "moving"the overlapping object underneath the overlapped object. You can then click the previously overlapped object to select it. You can also use the Draw Order toolbar to gain access to the Draworder command.
| |
You could have used the Modify Scale option to accomplish the operation performed in this exercise with the Scale hot-grip command. The advantage to using grips is that you don't need to use the Osnap to select exact grip locations, thereby reducing the number of steps you must take to accomplish this task.
In the next section, you will update the Plan file to include the revised studio apartment and the one-bedroom unit you have just created (see Figure 12.23). You will be making changes such as these throughout the later stages of your design project. As you have seen, AutoCAD's ability to make changes easily and quickly can ease your work and help you test your design ideas more accurately.
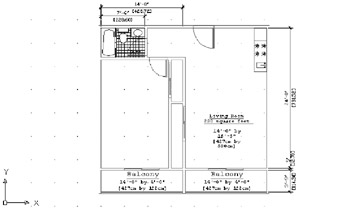
Figure 12.23: The finished one- bedroom unit
EAN: 2147483647
Pages: 261