Getting to Know the 3D Modeling Workspace
When it comes to 3D modeling, there really isn't much you can't do with AutoCAD 2008. You can create just about any shape you can imagine in AutoCAD. Of course, the more complex the shape, the more time it will take, but AutoCAD 2008 offers a new level of freedom in 3D modeling that the older versions lacked.
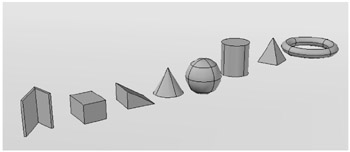
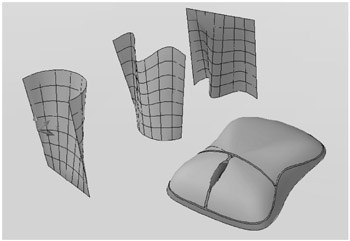
AutoCAD offers some basic shapes known as solid primitives. These tools let you quickly create a polysolid, box, wedge, cone, sphere, cylinder, pyramid, or torus (see Figure 6.1). You can edit these primitives to form other, more complex shapes. Other tools allow you to create free-form curves from 2D objects such as lines, arcs, and splines, as shown in Figure 6.2. A Helix tool helps you create spiral shapes such as screw threads or parking garage ramps.

Figure 6.1: The solid primitives available in AutoCAD

Figure 6.2: Shapes generated from lines, arcs, and splines
Most of this book is devoted to showing you how to work in what is called the AutoCAD Classic workspace. This Classic workspace is basically a 2D drawing environment, though you can certainly work in 3D as well.
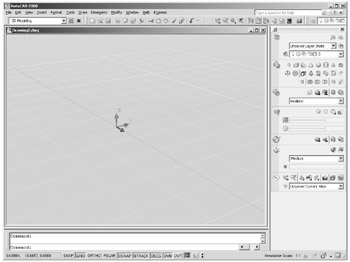
AutoCAD 2008 offers something called the 3D Modeling workspace, which gives you a set of tools to help ease your way into 3D modeling. This 3D Modeling workspace gives AutoCAD a different appearance (see Figure 6.3), but don't worry. It still behaves in the same basic way, and the AutoCAD files produced are just the same.

Figure 6.3: The AutoCAD 3D Modeling workspace
Here's how to switch to AutoCAD's 3D Modeling workspace:
-
Start AutoCAD, and then choose Tools è Workspaces è 3D Modeling. You'll see a new palette appear to the right of the AutoCAD window.
-
To start a new 3D model, choose File è New to open the Select Template dialog box. Select the acad3D.dwt template file, and click Open. Your screen will look similar to Figure 6.3.
Although AutoCAD now looks entirely different, it isn't really as different as it might seem. The drawing area displays the workspace as a perspective view with a grid. This is really just a typical AutoCAD drawing file with a couple of setting changes. The view has been set up to be a perspective view by default, and a new feature called visual style shows 3D objects as solid objects. You'll learn more about the tools that let you adjust the appearance of your workspace later in this chapter. For now, you'll explore the tool palettes to the right of the AutoCAD window.
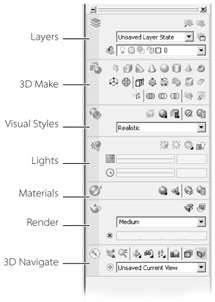
Two palettes appear in the 3D Modeling workspace. To the far right is the Standard AutoCAD tool palette containing some shortcuts to various AutoCAD functions. To the left of the Standard palette is the Dashboard, which offers all the tools you'll need to create 3D models. It is divided into seven sections called control panels. Each section is marked by an icon in the far-left border of the Dashboard (see Figure 6.4).

Figure 6.4: The Dashboard and its components
![]() The Layers control panel gives you control over drawing layers. You'll learn more about layers in the next chapter. For now, you'll focus on the main 3D tools in the Dashboard.
The Layers control panel gives you control over drawing layers. You'll learn more about layers in the next chapter. For now, you'll focus on the main 3D tools in the Dashboard.
![]() Below the Layers control panel is the 3D Make control panel. This panel contains the tools you'll use to create 3D objects. You'll also find tools that are specifically designed to edit 3D objects in this control panel.
Below the Layers control panel is the 3D Make control panel. This panel contains the tools you'll use to create 3D objects. You'll also find tools that are specifically designed to edit 3D objects in this control panel.
![]() Next is the Visual Styles control panel. If you want to change the way AutoCAD displays your 3D model, this is the place to go. I mentioned earlier that the reason your drawing in the workspace looks different from what you are used to is because a different visual style is applied to the drawing. You can select from five visual styles in this control panel. You can even create your own visual style, though that is an advanced topic and is not discussed in this book.
Next is the Visual Styles control panel. If you want to change the way AutoCAD displays your 3D model, this is the place to go. I mentioned earlier that the reason your drawing in the workspace looks different from what you are used to is because a different visual style is applied to the drawing. You can select from five visual styles in this control panel. You can even create your own visual style, though that is an advanced topic and is not discussed in this book.
![]() Below Visual Styles is the Lights control panel. With these tools, you can add special lights to create presentation views of your model. You can set up point lights, which are like lightbulbs, or spotlights, which point a light in a specific direction. If your application is architectural, you can set up an accurate representation of sunlight to perform shadow studies for any location and time of day.
Below Visual Styles is the Lights control panel. With these tools, you can add special lights to create presentation views of your model. You can set up point lights, which are like lightbulbs, or spotlights, which point a light in a specific direction. If your application is architectural, you can set up an accurate representation of sunlight to perform shadow studies for any location and time of day.
![]() The Materials control panel allows you to create and apply textures to your 3D objects. The texture can be anything from a shiny metallic to a brick pattern. The pattern emerges when you use the Render control panel to create a rendered view of your model. A crude representation of the material also appears when you use the default Realistic visual style in your workspace.
The Materials control panel allows you to create and apply textures to your 3D objects. The texture can be anything from a shiny metallic to a brick pattern. The pattern emerges when you use the Render control panel to create a rendered view of your model. A crude representation of the material also appears when you use the default Realistic visual style in your workspace.
![]() The Render control panel lets you generate a high-quality rendering of your model based on the lighting and materials you've used. The rendering appears in a separate window that opens when you start the render process. You can save a rendered view as an image file such as a TIFF or JPEG file.
The Render control panel lets you generate a high-quality rendering of your model based on the lighting and materials you've used. The rendering appears in a separate window that opens when you start the render process. You can save a rendered view as an image file such as a TIFF or JPEG file.
![]() At the bottom is the 3D Navigate control panel. As you might guess, this is where you'll find tools to help you get around in your 3D model. You'll find tools to change your view angle as well as your field of view when using a perspective view. You can switch between perspective view and isometric-style views (also called parallel projection). With the tools in this control panel, you can even create an animation known as a walk-through, which allows you to move around as if you were walking through your model.
At the bottom is the 3D Navigate control panel. As you might guess, this is where you'll find tools to help you get around in your 3D model. You'll find tools to change your view angle as well as your field of view when using a perspective view. You can switch between perspective view and isometric-style views (also called parallel projection). With the tools in this control panel, you can even create an animation known as a walk-through, which allows you to move around as if you were walking through your model.
In the next section, you'll gain some firsthand experience creating some 3D shapes and manipulating them. This way, you'll get a feel for how things work in the 3D Modeling workspace.
Besides the Dashboard, the bottom of the AutoCAD window contains a few extra tools, as shown in Figure 6.5. These tools are just a different way to allow you to get to the different layouts. You'll also notice that the cursor and UCS icon are different. You'll learn more about these features later in the section "Rotating Objects in 3D Using Dynamic UCS."

Figure 6.5: Tools to switch from model space to layouts