Section 10.1. Getting Started with GWT
10.1. Getting Started with GWTTo get started with GWT, you must:
Let's start with step 3; the first two steps are trivial. Figure 10-1 shows what the sample application we will develop in this chapter will look like on the three major browsers. Figure 10-1. Our sample application running in Internet Explorer, Firefox, and Opera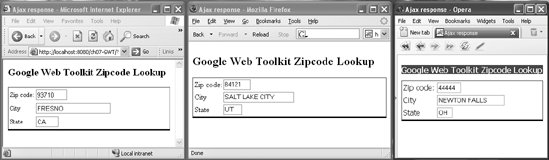 Run GWT's ApplicationCreator program to get your application skeleton started. Make sure that you invoke ApplicationCreator from the directory in which you installed GWT, or use the full path to the ApplicationCreator executable: C:> applicationCreator com.oreilly.client.ZipCodes This command creates a src directory tree with two subdirectories: src/com/oreilly/client and src/com/oreilly/public. There's nothing surprising here: the subdirectories simply follow the standard Java packaging conventions. The client directory contains the Java class file ZipCodes.java, and the public directory contains ZipCodes.html. Figure 10-2 shows the directory tree that ApplicationCreator builds. Figure 10-2. The files created with ApplicationCreator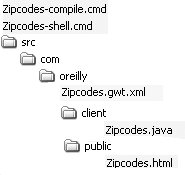 The glue that holds the application together is in ZipCodes.gwt.xml (Example 10-1). This file contains information about how your application ties into the GWT core. Example 10-1. ZipCodes.gwt.xml
The ZipCodes.gwt.xml file also lists the servlets that we will use on the backend to answer requests. For now, we need the <entry-point> tag, which specifies the class that starts the application, and the main toolkit library inheritance definition tag, <inherits>. In addition to the src directory and its contents, ApplicationCreator generates two executable files: ZipCodes-compile.cmd and ZipCodes-shell.cmd. ZipCodes-compile compiles the application into a form that GWT can use; the source code contained in ZipCodes.java will be converted into JavaScript that works across different browsers. The next step in development is running ZipCodes-compile.cmd: C:> ZipCodes-compile Output will be written into www\com.oreilly.ZipCodes Copying all files found on public path Compilation succeeded ZipCodes-compile has now created something that GWT can run. The directory structure is now in place; you can see it in the www directory on the filesystem (Figure 10-3). Figure 10-3. The www directory and files created by ZipCodes-compile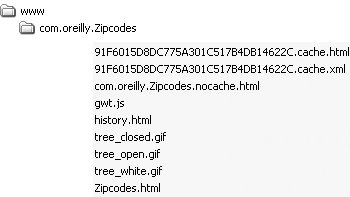 Now everything is in place to test the skeleton program that GWT has developed for you. To run and test the ZipCodes application, run ZipCodes-shell.cmd, which starts a web server container that allows you to run the program and test it: C:> ZipCodes-shell This command starts a compact version of Tomcat (http://tomcat.apache.org) and then launches a browser and loads the URL ZipCodes.html, as shown in Figure 10-4. The "Click me" button is part of the skeleton application that ApplicationCreator created. If you click this button, the text "Hello World" appears. Figure 10-4. The GWT development shell and browser The fun part is just beginning. A regular Ajax application hosted by a Java application server would require several pieces to get running: HTML, JavaScript, and Java server-side code. But with GWT, the Java and JavaScript are intermingled, and the server-side code is hidden as well. The actual code looks more like that of a Swing or AWT application, as you can see in Example 10-2. Example 10-2. ZipCodes.java
The ZipCodes class implements GWT's EntryPoint interface and overrides the onModuleLoad( ) method. The onModuleLoad( ) method adds widgets (user interface components) to divs in the HTML file; Table 10-1 lists all the widgets that GWT provides. Think of the RootPanel as the Java class that represents the area in the HTML file that corresponds to the <body> tag. To access an element within the body of an HTML document, you call RootPanel.get(elementId), passing in the element id as a string. To add a button to the client, for example, use get( ) to find the div you want and then call add( ) to add the button: RootPanel.get("slot1").add(button); In this case, slot1 is the id of the div that will receive the button. To assign an action to a button or another widget, add a listener: button.addClickListener(new ClickListener( ){...}); This looks like Swing code, but don't be fooled; this is code that uses the GWT libraries. All of this Java code is compiled into JavaScript and HTML, and it will be the client view for your application. What that means is that you can debug this code with your Java IDEsomething that has not been possible before GWT. Sure, you could use a JavaScript debugging tool like the Venkman JavaScript debugger, but using two debuggers is a bit cumbersome. Using GWT makes full round-trip debugging with a single debugger possible! 10.1.1. Hosted Mode Versus Web ModeBefore building a debuggable GWT application, you need to understand the two modes in which a GWT application can run:
When a GWT application is under development, it is a best practice to stay in hosted mode. Hosted-mode development is more productive because round-trip debugging is possible. Then, when the application is ready to be released, you can compile it to JavaScript and HTML and deploy it in web mode. |