Introduction to the RDP
| < Day Day Up > |
| As stated earlier in the chapter, the RDP incorporates Altiris eXpress Deployment Server and ProLiant Integration Module. The ProLiant Integration Module consists of the SSSTK, HP-supplied deployment events, and important documentation, while the Altiris eXpress Deployment Server provides deployment automation configured through the console. This section explores these components in better detail to provide basic understanding of RDP functionality. Deployment Server Console OverviewThe Deployment Server Console provides the means to view and deploy servers within your network. The information in this section provides a brief description of the views and functions provided with the Deployment Server Console. Deployment Server Console ViewUsing the Deployment Server Console simplifies operations, is easy to use, and is composed of the four components detailed below.
Deployment Server Console InteractionsEvents and operations are observed and performed at the console.
Figure 9.15. Deployment Server Console view.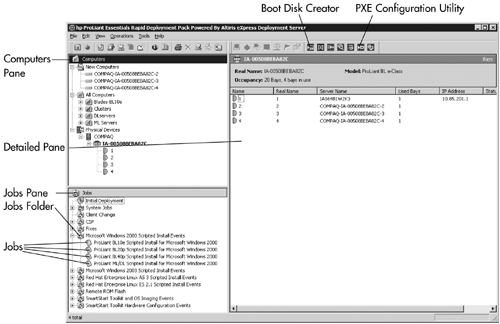 ProLiant-Specific FeaturesThis section describes enhancements made to the Altiris Deployment Server Console specifically for ProLiant servers. Integration with Lights-Out ManagementLights-Out Management enables the management of remote servers and the performance of remote console operations regardless of the state of the OS or hardware. The Deployment Server provides the capability to use the power management features of Integrated Lights-Out (iLO) and Remote Insight Lights-Out Edition (RILOE) to power on, power off, or cycle power on the target server. Each time a server connects to the Deployment Server, the Deployment Server determines whether iLO or RILOE is installed in the server. If either is installed, the Deployment Server gathers information, including the DNS name, IP address, and first username, as shown in Figure 9.16. To perform management actions using RILOE or iLO, you must enter the password if it has not been previously saved. This password is saved in the SQL database using a standard encrypted password field. Any commands from the Deployment Server to RILOE or iLO are sent through HTTPS, so the communication is secure and encrypted. Figure 9.16. Lights-Out information. To display the stored Lights-Out information for each server:
To access the iLO or RILOE interface from the Deployment Server Console:
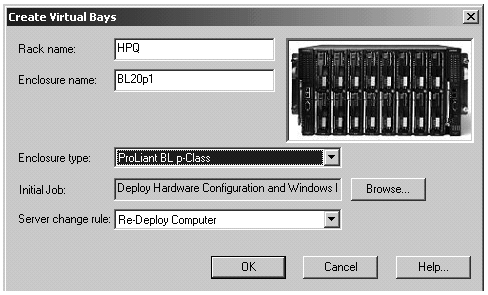
This interface provides easy access to iLO and RILOE features, such as remote console. Physical Devices ViewThe RDP detects and displays server blades based on their physical rack, enclosure, and bay locations. After server blades are connected to the Deployment Server, the Computers pane displays the Physical Devices listing. The servers are viewed according to their Rack\Enclosure\Bay (R\E\B) settings. Because R\E\B is a new feature and is only available with server blades, this view option is presented only if the Deployment Server database contains R\E\B information for any computer. A job can be deployed on a server listed in this view. The table in Figure 9.17 lists the server icons that are used in the Physical Devices View in the Deployment Server Console. Figure 9.17. Physical Devices view. Virtual Rack/Enclosure/Bay (R/E/B)ProLiant BL servers can be predefined with configuration settings and assigned jobs before the servers are connected to the Deployment Server, as shown in Figure 9.18. This feature is equivalent to using the Deployment Solution Virtual Computer feature. However, the Virtual Bay feature is available only with the RDP installation. Figure 9.18. Create Virtual Bays screen. To create a virtual bay:
The new virtual bays appear under Physical Devices with virtual bay icons when the virtual enclosure is selected. The server names and IP addresses appear in the Details pane. The R/E/B numbers are listed in the Physical Devices view, with bays indicated by virtual icons. When a server blade with a matching R/E/B connects to the network and is identified by the Deployment Server, the awaiting configuration and jobs automatically execute. The virtual icon changes to a managed server icon in the Deployment Server Console. ProLiant BL Server Rip and ReplaceProLiant BL servers include rule-based deployment based on a change in physical location. This feature enables rapid serviceability when replacing failed server blades, a procedure called "rip-and-replace." The Deployment Server tracks the physical location of every ProLiant BL server and detects when a new server has been placed in a particular bay. The Change Rules feature can be configured to initiate one of several different deployment actions when the Deployment Server detects a new server placed into a previously occupied bay. Rules are set for individual server blades. note A server blade must be discovered and deployed by the Deployment Server or be located in a virtual bay to access the server change rules. note Licenses applied to a specific server cannot be removed or transferred to another server. To access the server change rule:
The following rules can be configured from the Bay properties window:
|


| < Day Day Up > |
EAN: N/A
Pages: 214